Tuesday, 31 December 2024

Reasons to start a journal in the New Year

With a fresh new year around the corner, it's the perfect time to start a regular journalling habit! I've written many times on this blog about how I love writing in my journals - I use a bullet style journal to plan my week and a blank journal which I fill with my thoughts, ephemera and simple sketches. I find that journalling is a great way to keep those superfluous thoughts from running around inside my head, and it's also a way of bringing a dose of creativity to my daily life.

Why start a journal in the New Year?

It's a great time to start a journal. When a new year begins it's natural to want to reflect on the year just gone and to plan the year ahead. Everyone else is doing the same thing so there is plenty of motivation, and after the excess of Christmas you are in the mood to clear some space both physically and mentally. 

What do you need to get started?

Recently I wrote an article on how to journal when you don't know where to start and it contains plenty of advice to help you get over any block you might have to starting. All you need is something to write on and something to write with, and you don't need any expensive supplies. You probably already have a blank notebook around that has been waiting for a purpose! 

When it comes to physically putting pen to paper, I always start a new journal a few pages in. Then I can come back and fill the first couple of pages at a later date, or else I fill them with stickers and ephemera as time goes on. 

Starting a journal in the new year
Photo credit Daria Shevtsova via Unsplash

What are the benefits of a regular journalling habit?

I find writing in my journal an enormous help to my wellbeing. When I have too many things running through my head, writing them down helps to clear my mind and organise my thoughts. It helps my anxiety to get things down on paper, and it's also really relaxing. 

Journalling helps me to work through and solve problems, for example a tricky decision that needs to be made. Often writing out a pros and cons list can help to find the answer that I'm looking for.  

In the new year I like to think about the things that I want to work on and achieve. For example changes that I want to make to my lifestyle, or things that I want to do. A journal can help to keep a record and track progress, or be a list of places to visit, recipes to make, activities to try. 

Recently on social media I've been seeing examples of dopamine menus. I don't like the name but I do like the concept - it's basically just a list of things that you enjoy doing. I had a similar list in my first bullet journal and I'm definitely going to create a new one for my next journal. 

Writing regularly can create a lovely record of things that you've done, especially when going through a life event that you will want to look back on. For example I've been journalling about the building of our house extension, both a factual account of what has been happening and also how I've been feeling about it at the time. 

Keeping a journal and pen handy is a great way to reduce screen time. You can fill a few minutes by jotting down some thoughts, or else settle down for a longer session away from the screen with a hot drink and a good view. 

Journalling is also a great way to improve creativity. I like to try out different layouts and styles, accessorise pages with stickers and washi tape, or try some simple sketches and start an illustrated journal

Finally...

One important thing that I want to mention is a reminder that your journal is personal to you. Don't feel the pressure to share it on social media - when you see beautiful journal pages online they have been created for that purpose and are designed to gather views and interaction. They can be great for inspiration, but can also make you feel inadequate and feel like stopping when you've barely begun.

Start with some cheap supplies so that you aren't intimidated by a beautiful journal that you don't want to ruin, and just take it from there!

Monday, 30 December 2024

Ultimate bedroom tips that your kids will surely love

This is a collaborative post

Your child’s bedroom should be a reflection of who they are—a space where they feel at ease and inspired to explore their interests. Balancing practicality with creativity can turn their room into a multi-functional space for rest, play, and learning. 

Thoughtful choices in furniture, decor, and storage can create an environment that’s not only visually appealing but also supports their development. These tips will guide you in crafting a bedroom that blends style with purpose and leaves your kids beaming with excitement.

1. Maximise Space for Play and Exploration

Kids love having enough room to play and explore, and a clutter-free space allows for better creativity and movement. A well-organised room encourages them to engage in their favourite activities and makes the room feel more open and welcoming.

Start by choosing furniture that saves space, such as beds with built-in storage or compact desks. Use vertical storage solutions like shelving and wall hooks to keep the floor clear for activities. 

Creating defined zones for play, rest, and learning helps children feel that every part of the room has a purpose. For instance, a colourful rug can mark the play area, while a comfortable beanbag chair can set the stage for reading or relaxing.

2. Focus on Colours and Themes Kids Can Relate To

A kid-friendly bedroom should reflect their interests and make them feel at home. Choosing the right colours and themes can make a big difference in how much they enjoy their space.

Opt for bright, cheerful colours or muted tones with pops of their favourite hues. Themes like animals, outer space, or their favourite book characters can make the room feel exciting and personal. If your child loves change, go for interchangeable decor such as wall decals, bedding, or themed cushions so the room can evolve as their tastes grow.

Colourful child's bedroom
Photo credit Kenny Eliason via Unsplash

3. Inspire Creativity with a Loft Bed with a Desk

A loft bed with a desk is an ideal way to combine functionality and creativity in your child’s room. This multi-functional furniture piece maximises space by elevating the sleeping area, leaving room below for a dedicated workspace. Whether it’s for homework, art projects, or imaginative play, this setup provides your child with a sense of ownership and an environment that encourages productivity and inspiration.

  • Maximises Floor Space: The elevated design frees up valuable room for a desk underneath, creating a practical area for studying or crafting without compromising the overall space in the bedroom.
  • Encourages Focus and Independence: A dedicated workspace below the loft bed helps your child concentrate on tasks like homework or hobbies while teaching them responsibility for their personal area.
  • Sparks Creativity and Play: The playful design of a loft bed naturally excites children, making the room feel dynamic and engaging. Themed options, like castle or treehouse designs, add an imaginative element that children adore.
  • Customisable and Practical: Add task lighting, a comfortable chair, and storage bins to make the desk area more functional and tailored to your child’s preferences. You can personalise the space further with decor that reflects their interests and personality.

A loft bed with a desk is especially beneficial for smaller rooms, as it consolidates sleeping, working, and playing zones into a compact footprint. By choosing a design that complements your child’s interests and needs, you create a space that is both practical and inspiring, making their room a true haven for creativity and growth.

4. Add Cosy Elements for Comfort and Relaxation

Transform your child’s bedroom into a comforting retreat by adding soft textures, warm lighting, and thoughtful details. Start with their bed—layer it with plush throws, colorful pillows, and soft sheets to make it irresistibly inviting. A bed that feels cozy not only helps your child relax but also becomes a space they look forward to spending time in.

Create a designated corner for unwinding by adding a small armchair, beanbag, or floor cushions. This spot can double as a reading nook or a quiet retreat where your child can relax with a book or listen to their favourite music. 

Lighting plays a key role in setting the mood, so opt for warm-toned lamps, fairy lights, or a soothing nightlight. These touches make the room feel safe and calming, helping your child wind down at the end of the day.

5. Make Storage Fun and Accessible

Make tidying up a part of the fun by designing storage solutions that are both functional and engaging for your child. Start by choosing bins, baskets, or storage boxes in playful colors or patterns that match the room’s theme. These visually appealing options motivate your child to use them, making organisation feel like an enjoyable activity.

Install low-level cubby shelves or open cabinets where toys, books, and games can be displayed and easily accessed. Incorporating hooks at their height for hanging coats, backpacks, or costumes empowers your child to organise their belongings independently. Label bins or baskets with pictures or icons to make clean-up even more straightforward for younger children.

6. Encourage Active Play with Creative Features

Turn your child’s bedroom into a space where they can release their energy and engage their imagination by incorporating elements for active play. A slide attached to a bunk bed or a small climbing wall can instantly elevate the room’s fun factor. These features encourage movement and provide an outlet for your child’s natural energy right in their own room.

For a simpler addition, try including a pop-up play tent, an indoor swing, or soft floor mats for tumbling or yoga. These additions are easy to integrate into the room and offer hours of engagement. By introducing features that blend play and movement, you create a space that’s not just for rest but also a hub for activity and exploration.

7. Personalise with Sentimental Touches

Make your child’s bedroom uniquely theirs by adding personal touches that reflect their achievements, interests, and memories. Start by creating a gallery wall where you can frame their artwork, certificates, or favorite family photos. Seeing these meaningful pieces on display will give your child a sense of pride and ownership over their space.

Add a memory box or shelf where they can store keepsakes, from birthday cards to small mementos of family trips. Displaying their sports trophies, musical instruments, or favourite collectibles reinforces their individuality and creates a space they feel deeply connected to.

Your child’s bedroom is more than just a space—it’s a canvas for their growth and self-expression. By choosing adaptable furniture, encouraging active play, and adding personal touches, you can design a room that grows with them. These tips help you create a flexible and engaging environment that supports your child’s changing needs while remaining a favourite place in your home.

Friday, 20 December 2024

An update on my Nutcracker Christmas cross stitch project

Around this time last year I wrote about my currently incomplete cross stitch projects. There were quite a few! I've made progress on several of them, but the one that I'm most proud of is The Christmas Nutcracker from Bothy Threads. Here's how it was looking last Christmas, with just the shoulders of the Nutcracker stitched.

Nutcracker cross stitch by Bothy Threads

I worked on it quite a lot in the early part of the year, then I put it aside for a few months. When I fancied doing some cross stitch over the summer I picked up another neglected cross stitch project, as it felt strange to be working on a Christmas project when it was warm and light outside!

But as the cold and dark have returned I've found myself called back to the Nutcracker, and I'm really pleased with how it's getting on. The pattern is in two parts, the first sheet is a layer of cross stitch and then the second sheet is a layer of more intricate embroidery stitches. I don't want to confuse myself, so I'm going to complete all of the cross stitch first before I move on to the second layer.

I would say that I'm definitely halfway through the first layer, so a quarter of the way through the project!

Nutcracker cross stitch by Bothy Threads in progress

It's quite simple to stitch, there are some mirrored areas and it is mainly worked in blocks of colour with no shading. The pattern is easy to follow, and by working on a colour at a time you can make a lot of progress quite quickly. 

I'm going to be making this my main project over the Christmas period and I'm hoping to get lots done, maybe by the New Year I'll even be able to complete the cross stitch layer!

Monday, 16 December 2024

Some simple felt crafts for Christmas

I love crafting with felt at Christmas. Felt is so versatile - it comes in a huge range of colours, you can cut it easily into all sorts of simple shapes without needing to worry about hemming it, you can sew it or even just glue it easily, and the soft texture feels really cosy.

I've shared lots of festive felt crafts on my blog over the last few years - here are some of my favourites.

My Embroidered felt Christmas bunting is once again hanging up over our mantlepiece like it does every year. It's just large triangles of felt with a simple border using the sewing machine. Then I alternated embroidered stars and snowflakes. This was a lot easier to do than it looks - I used an outline drawn on tissue paper which I sewed through and then removed, it worked really well! 

Embroidered felt Christmas pendant bunting

This year I made a really simple felt Christmas garland using some leftover felt pieces. All you need to do is to cut out some simple shapes from the felt and then sew them together using a sewing machine. It's a bit fiddly at first but sews up quickly and the garland is perfect for hanging on the Christmas tree or around the house.

Simple felt Christmas garland with coloured shapes

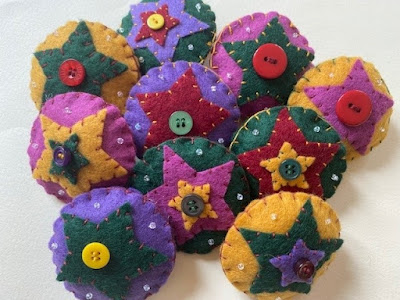
My Felt star Christmas ornaments were made to use up some scraps of felt in different colours that I had leftover in my felt box. I tried to pick colours that went well together, even if they weren't all traditional Christmas colours. The colours remind me of the Three Kings and their gifts! They are finished with a contrasting button. I display them in a bowl on the sideboard, but they can also be made into hanging decorations with some simple coloured thread.

Felt star Christmas ornaments

This Cross stitch snowflake felt bunting is a way of displaying the tiny snowflake cross stitch patterns that I designed - you can find them here free simple snowflake cross stitch patterns. You can use odd scraps of Aida fabric to sew the snowflakes, then turn them into bunting with some felt circle frames and ribbon. They would also make lovely hanging ornaments. 

Simple cross stitch snowflake and felt Christmas bunting

Another stash busting project is this Felt Christmas tree and bauble bunting. Not just to use up scraps of felt but also ric rac, ribbon, beads and sequins. They have a small amount of padding and are double sided so they can be hung across a window.

Felt Christmas bunting with trees and baubles

Finally, my favourite Christmas felt craft is these Felt Christmas stocking decorations. They are nostalgic for me for two reasons - firstly because I remember my Mum making them when I was little and secondly because they were the very first Christmas decoration that I made when I was decorating my own home. It was so long ago that I didn't even had a craft stash - I had to go out and buy the felt and beads specially for the project!

They are designed to hold a small bar of funsize chocolate and to be hung on the tree as an alternative to the chocolate foil ornaments that you can buy. When my children were little they used them as mini stockings for their favourite teddies!

Felt Christmas stocking ornaments

I hope that you have fun crafting this Christmas!

Friday, 13 December 2024

Hama bead Christmas kit inspiration for adults

This post contains Amazon affiliate links

I love a festive craft project, even better if it's something that I can display in my home as I celebrate the Christmas season. At this busy time of year sometimes you just want a simple project that you can work on when you have some quiet time, and Hama beads are the perfect craft that's both relaxing and satisfying. Working from a kit means that you have everything you need in one place without having to spend time gathering materials from around the house, and I've hunted down some gorgeous Hama bead Christmas crafting kits which would be fun to work on during those long dark evenings.

You'll notice that they are all official Hama bead branded items. While they can be a little more expensive than the cheaper options, I've learned the hard way that the imitation beads are just not as good!

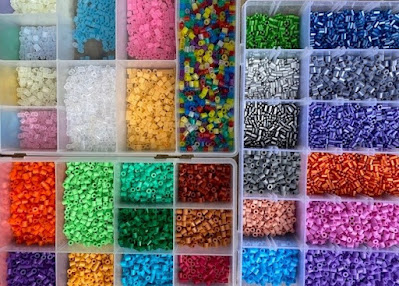
Box of Hama beads organised by colour

First up is something that you can get a start on ready for next year! The Hama bead Advent Calendar (affiliate link) is a really fun Advent craft, and then when it's finished it can be re-used year after year. The kit contains 24 festive designs and shaped pegboards which can be kept for future Christmas projects.

If you want to make something simple which you can use to decorate your home then the simple Hama bead ornaments (affiliate link) or simple Hama bead decorations (affiliate link) are perfect. The designs are quick and easy to make, and can also be worked on together with small children for some family crafting fun.

I love these Hama bead Christmas trees (affiliate link) because once you have the included small Christmas tree pegboard you can really get creative with different designs. You could even make the trees in different colours to match your festive decor, for example in red/white or purple/silver. Then the completed trees can be used as Christmas tree decorations or turned into bunting.

Finally this Hama bead Santa Claus pegboard (affiliate link) is really fun, and again could be customised to suit your own decor. You could mount him on a stick to prop up in a flower pot, hang him inside a wreath, or prop him up on the mantlepiece.

Alternatively, you could just treat yourself to a big bucket of coloured Hama beads (affiliate link) or a selection of mini Hama beads (affiliate link) and browse my Hama bead Christmas crafts and projects which is packed with ideas for both simple and more complex Hama bead crafts which are perfect for this time of year!

Hama bead fairy light bunting craft for Christmas
Hama bead fairy light bunting

Wednesday, 11 December 2024

Simple Christmas felt garland craft

I love crafting with felt, it's so easy to work with and I love the soft texture and bright colours. This Christmas I made a really simple felt Christmas garland to add to my collection of homemade Christmas decorations.

I the same method that has worked well for two previous projects - my simple felt heart garland and my Halloween themed felt bunting. Using scraps of felt and a sewing machine it's a quick way to make some simple bunting that can be switched out according to season. 

This was a stash buster project for me, so I was limited by the felt colours in my stash. I've run out of red which is a bit of a disaster for Christmas crafting! But I had some pre-cut red circles left over from another project which worked perfectly, and I chose shapes based on the colours that I had available. 

I ended up with a red circle, a green Christmas tree, a golden bell and a brown gingerbread man, with each shape measuring around 4cm in height. I cut 10 of each shape and for this project I attempted to keep the shapes in the same pattern throughout. 

Tips for cutting out the shapes - I made a paper pattern for each shape which I pinned to the felt while cutting. Use small, sharp scissors, and don't worry too much about perfection!

Small felt shapes for Christmas garland

When all the pieces are cut then I sewed them together. If you want to keep to an order make sure you know what you are doing, as once you start sewing it's easier if you can have the next one ready to go at all times. Before starting to sew, make sure to pull out a decent length of thread and then again at the end so that the felt garland will be easy to hang. 

Then just line up the shapes and sew them together! It's a bit of a fiddly job but it gets easier as you go along, I had several false starts! Just get the next piece ready to sew before you've finished the previous one, and squish them together a little bit as you sew each end.

Simple Christmas felt garland with festive shapes sewn together

The finished garland adds a lovely Christmas hint to the festive decorations, whether hung on the tree or elsewhere around the house!

Felt Christmas garland hanging on Christmas tree

Simple felt Christmas garland

Tuesday, 10 December 2024

Is a cheap violin right for you?

This is a collaborative post

You might be wondering if getting a cheap violin is worth the shot, especially if you’re a beginner. Well, we’re here to tell you that it’s not easy to determine if cheap instruments are for you. The thing is you need to consider things and factors after the other. If this is your first time landing in the world of violins, why not create presentations to organise your thoughts and weigh your options? You can outline the factors, benefits, and drawbacks to help you decide whether a cheap violin is the right choice for you.

Who Should Consider a Cheap Violin?

Beginners & New Learners

Heads up, if you're a beginner or a new learner, a cheap violin makes perfect sense since you're still determining your commitment to the instrument. A lower-priced violin allows you to explore violin playing without a major financial investment, and you can upgrade later as your skills develop and you're sure you want to continue.

Budget-Conscious Musicians

Next, if you're budget-conscious and need an instrument but can't afford a premium model, a cheap violin could be your solution. This might be your situation if you're a student, hobbyist, or just starting your musical journey and need to balance your passion for music with financial constraints.

Temporary or Short-Term Use

Lastly, if you need a violin for temporary or short-term use, you'll find cheap violins to be a practical solution. This could be your case if you're taking a brief music course, wanting to try out the instrument before committing to a better quality one, or need a backup instrument for specific situations.

Violin on table

The Benefits of Buying a Cheap Violin

Affordable Initial Investment

When you make an affordable initial investment in a cheap violin, you're protecting your finances while exploring the instrument. You won't have to worry about a major financial setback if you decide violin playing isn't for you, and you can save more money for a future upgrade if you do continue.

Ideal for Beginners

As a beginner, a cheap violin gives you exactly what you need to start learning the fundamentals. You can focus on developing proper form, understanding basic techniques, and learning to read music without the pressure of potentially damaging an expensive instrument during your learning process.

Good for Experimentation

When it comes to experimentation, a cheap violin offers you the freedom to explore without worry. You can try different playing styles, practice in various environments, or even test out different modification techniques without the stress that would come with experimenting on a more expensive instrument.

The Drawbacks of Buying a Cheap Violin

Durability and Construction Issues

When it comes to durability and construction issues, you'll likely face several challenges with a cheap violin. The wood quality is typically lower, which can affect both sound and structural integrity. You might encounter problems like poorly fitted bridges, loose pegs that won't stay in tune, or even cracks and separations in the wood.

Limited Longevity

Regarding limited longevity, you'll find that a cheap violin often has a shorter lifespan than its more expensive counterparts. As you progress in your playing, you'll likely outgrow its sound capabilities quickly.

Conclusion

There you go, our piece-by-piece information about purchasing a cheap violin. From the considerations like type of players to its benefits and drawbacks, you can now have an overview of whether these affordable instruments are for you. If you're still undecided, it's fine to take your time and even ask for some advice on instrument teachers or local stores near you.

Friday, 6 December 2024

Christmas themed bullet journal and journalling supplies

This post contains Amazon affiliate links

I regularly write in both my bullet journal and my everyday journal, and one of the things that makes it enjoyable for me is decorating and accessorising the pages to match the season. With Christmas well on the way, I thought I'd share some journalling supplies which are perfect for brightening up a journal now that the days are feeling gloomy!

Christmas journalling by the window
Photo credit Alisa Anton via Unsplash

I get through a lot of stickers in my journalling! I use them as accents in the corners of pages, to decorate a themed journal page, and sometimes as image journal prompts.

Sometimes I like to use a large Christmas sticker (affiliate link) for some emphasis, or else I also like to use smaller Christmas stickers (affiliate link) as tiny accents or to create a border around the page.


Christmas stickers for festive journalling

Another way that I like to decorate my pages is with washi tape. I have quite a collection now since I first bought washi tape back in 2013! I love this colourful Christmas washi tape (affiliate link), or else this simpler vintage Christmas themed washi tape (affiliate link).

Pile of Christmas themed washi tape

Finally another addition to Christmas journalling supplies is a set of Christmas paper punches (affiliate link). You can use them for either the punched pieces themselves or to add interest to the edge of a page by cutting away a line of outlines. You could also look for a larger paper punch like this paper punch Christmas tree (affiliate link) which could be used to decorate a festive journal page.

Christmas small festive paper punches

Try working on entries with some cheerful coloured gel pens (affiliate link) or some glittery highlighters (affiliate link) and bring some festive cheer to your journal pages this season!

Wednesday, 4 December 2024

Different ways to display completed mini cross stitch designs

Most of my cross stitch projects are large designs that take several years to complete. But sometimes I just want a quick win, and that's when I turn to a mini cross stitch kit for some speedy crafting satisfaction. In particular I'm a sucker for the mini kits that are displayed at the till in Hobbycraft, especially as they are usually part of a tempting multi-buy promotion. 

But what to do with all the finished tiny cross stitched pieces? Here are some ideas!

Frame them in a small embroidery hoop

I bought these mini Christmas embroidery kits a few years ago. They were easy to stitch, and as well as cross stitch they also have some different embroidery stitches to add interest. I framed each one in a painted embroidery hoop with added glitter, and they form part of my Christmas mantlepiece display. 

Three Christmas mini framed cross stitch embroidery hoops

Use them to make a greetings card

This little cupcake design is really sweet! I used my Cricut to make a simple frame and mounted the cross stitch inside to make a card.

Cupcake cross stitch in greetings card

Use them as panels in a quilt

This would work best for a decorative quilt, or maybe one that is used as a wall hanging. Just use the cross stitched fabric to make a panel for the quilt, mixed in with different fabric panels or patchwork. You can find a tutorial for a gorgeous quilt here - Cross Stitch and Paper Piecing

Use for a cushion, pillow or lavender bag

You can either use a slightly larger piece or combine several smaller pieces to make a cushion or pillow. This is a great way to display your finished project! You can find a video tutorial here:


You can also use a smaller piece to make a simple lavender bag, either by folding over a larger piece of fabric or using contrasting fabric to back it.

Cross stitch lavender bag craft

Sew a bookmark


This project works best with very small designs, like my free mini cross stitch Christmas motifs. You can combine several together to form a wide strip, or you can even buy cross stitch fabric cut to bookmark size (affiliate link) which you can sew on directly.

Use for gift tags

It's really easy to make gift tags from tiny cross stitch motifs, and they add a lovely personal touch to a gift. If you put a pretty hanging tag then they could be re-purposed as Christmas tree ornaments!

Combine smaller designs for a larger project

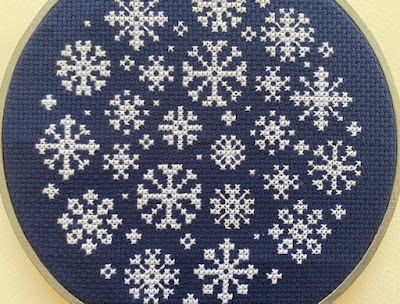
I used some of my mini snowflake cross stitch patterns to make a larger framed embroidery hoop piece. It took a bit of fiddling to produce a design that I was happy with, but I was really pleased with the result which I stitched on dark fabric - you can find the free pattern here Snowflake embroidery hoop design.

Mini snowflake cross stitch designs in embroidery hoop

Sew together to use as bunting flags

You can use small finished pieces to make some lovely bunting, maybe combined with bunting flags in different fabrics. I love the woodland bunting which you can find in this article along with the free patterns - Children's cross stitch patterns

For really tiny pieces

I love these really small wooden frames (affiliate link) which can be used to frame those really miniature cross stitch projects. They can be used for hanging decorations and ornaments, pendants, brooches, keyrings and so on.

I hope that I've given you some ideas for ways to display those tiny cross stitch projects!

Monday, 2 December 2024

Christmas gift ideas for book lovers

This post contains Amazon affiliate links

If you have a book lover in your life, then finding a gift for them this Christmas is easy! Just think about what sort of book lover they are (or maybe they are like me, and could fit into every category!)

Gift ideas for book lovers...


...with a large 'To Be Read' pile

I always have a pile of books that I want to read, and I enjoy having a selection that I can choose from depending on my mood. Help your book lover to keep them organised with some pretty bookends (affiliate link),  a decorative shallow basket (affiliate link) or even a large book trolley (affiliate link)!

...who like to be comfortable while they are reading

I love to read in bed, propped up on cushions with a hot water bottle by my feet. Help make your reader more comfortable with a supportive reading pillow (affiliate link), a clip on reading light (affiliate link) or a foldable bed tray (affiliate link) to keep drinks and snacks handy.

Tray on bed with book, mug and bowl
Photo credit Micheile Henderson via Unsplash

...who read while away from home

I love my Kindle (affiliate link) for reading while I'm travelling, it means that I can have a book with me for every reading mood and also access to lots of free books to download. A waterproof Kindle case (affiliate link) comes in handy for reading, whether you are the beach, by the pool, or just at home and in the bath!

...who lend out their books

Most readers enjoy sharing their books with others, but sometimes a temporary lending situation can turn into a permanent one - I've replaced books several times that have never made it back to me. I use book plates or stickers (affiliate link) for my favourite books or you could take it one step further and buy a personal library kit (affiliate link) so that no book will ever go missing again!

...who have several books on the go at once

Readers always need bookmarks! I have loads, and yet I never seem to be able to find one when I need one. You could look for a personalised one, make one, or else buy a large pack of pretty bookmarks (affiliate link) so that your reader will always have one to hand. 

Another great idea is a set of sticky index tabs (affiliate link) which can be used to mark favourite chapters or passages. 

Pile of books with pages marked by sticky tabs
Photo credit Kelsy Gagnebin via Unsplash

...who have a particular favourite book or author

World of Books has a dedicated Rare Books section which I love to browse - you might find a first or special edition of a book, and the prices are very reasonable. You could also look for a biography of an author that they like, or a compilation book which includes their favourite author and other similar writers. There are plenty of websites which can suggest new books based on books that you've enjoyed, and you might help them to discover a new favourite.

....who read while they are eating

Maybe it's a bad habit, but if I'm settling down with a book in some peace and quiet I'll often make myself a hot drink and a selection of snacks, or else I will read while I'm eating a meal. Choose food which can be eaten with one hand and doesn't make your fingers messy - think healthy options like nuts or dried fruit, or more indulgent treats like suger coated chocolates, mints and jelly sweets.

An adjustable book stand (affiliate link) or a simple hand book holder (affiliate link) can make reading while eating much more comfortable.

...who enjoy book reading challenges

There are plenty of scratch off posters with top books (affiliate link) which are fun to use and display, and a great way to find some reading inspiration. You can also look for a book filled with book suggestions, like 1000 Books to Read Before you Die (affiliate link) which would certainly keep even an avid reader busy!

...who want to remember what they've read

You can choose a dedicated book journal (affiliate link), or else any pretty notebook and pen can do the job. There is plenty of reading journal inspiration online, so if you are feeling crafty you could even take the time to set up some reading journal pages to get them started. If they are crafty, add some bookish stickers (affiliate link) or a set of pretty washi tapes (affiliate link).

Pile of books and a reading journal
Photo credit Ayako via Unsplash

I hope that this has given you plenty of ideas for the reader in your life this Christmas!