Pages

Monday, 30 October 2023

An update on my Bullet Journal

I started my first Bullet Journal nearly a year ago, and it's an organisational system that is working really well for me! I wrote in January about how I was trying out a Bullet Journal, and as I've just migrated to my second journal I thought I'd write a little update with how I'm getting on, and what has changed since I started using it. 

My first Bullet Journal was an A5 Seawhite Journal from Hobbycraft and I paid £8.50. This is a really thick journal with lovely sketchbook thickness pages. Unfortunately it was rather wasted on me as I was only using it for writing, and I found the ink didn't flow very well. It's much more suitable for people that want to get a little arty with their journals as it holds watercolour paint very well.

For my second journal I bought an A5 Bullet Planner in store from Flying Tiger which cost £5. It's very slightly smaller but the pages are much thinner and smoother to write on. It also has a pen holder which the Seawhite one doesn't have, and two place marking ribbons. I much prefer it! 

One of my simple Bullet Journal pages

What worked and was carried over

My daily/weekly/monthly planning system - this still works really well. I make it a habit on a Sunday afternoon to transfer tasks from the nearly completed week to the next, and to make my weekly page for the following week and a monthly page if needed. 

My yearly calendar of regular dates - I've really kept on top of birthdays this year by making it a habit to check important dates that are coming up.

My list of passwords and registration details - These are written down in a coded format in case I lose the journal. I've referred back to it many times!

The Household Tasks planner - This is a list of regular household tasks with a highlighted checkbox to show how often they need to be done, things like cleaning out the lint in the tumble dryer, a maintenance wash of the dishwasher, defrosting the freezer. This has been so helpful, and I've really kept on top of these boring jobs that get worse if you don't do them regularly.

The To Watch page - I like to keep a list of things which I want to watch or which have been recommended to me. I trimmed it a little for the new journal, as it was a good time to see what was still relevant.

What didn't work and has been left behind

The Exercise Tracker - I very quickly lost interest in this! I just didn't find it useful, I can tell by how I'm feeling whether I've exercised recently or whether I need to go out and do something.

Monthly habit trackers - I still use these occasionally but not as often as I was intending to.

My To Be Read pile - This was useful when I started the journal as I had a whole page of books that I needed to read. Now that I've caught up with it (following these tips - How to conquer the To Be Read Pile!) I only have 5-10 books at a time which is more manageable. I read so quickly that I don't want to keep going back and adding/removing books, and I track my reading in Goodreads. 

Too many lists of projects - I had lists of craft projects, home projects, long-term projects, goals for the year and so on. It was too many pages to keep track of, so I'm going to pick out the key ones and make just the one page in the new journal called 'Projects'.

Contact details - I never ended up filling this page in, I have all the information I need stored elsewhere.

Woman writing in a journal
Photo credit Kelly Sikkema via Unsplash

I'm really pleased with how well I've kept up with the Bullet Journal system and I've found a way to make it work for me. I was a little over enthusiastic at first when I was seeing all the inspiration online and wanting to make pages for everything, but over time I've managed to pare it back to what I really need!

Do you keep a Bullet Journal? If you want to know more about the system this is a good place to start - The Bullet Journal Method. I'd love to hear how you use one!

You might also like this post - Things that don't go in my Bullet Journal

Friday, 27 October 2023

Autumn 2023 - And what I've been up to lately!

I thought it was time for a bit of a catch up! Here's what I've been up to lately:

Reading

I did another order with Wob a few weeks ago and I also did some charity shop shopping, so I'm quite well stocked up on books to read at the moment! I also make regular use of the Amazon Prime Library and free Kindle books. Some of the books that I bought were ones that I borrowed from the library during lockdown and really wanted to read again, like Where the Crawdads Sing, Great Circle and The One Hundred Years of Lenni and Margot

I really enjoyed the Elon Musk biography and so I've started reading Steve Jobs also by Walter Isaacson. This one isn't quite as gripping - it's pre-Tik Tok and so you need a longer attention span to get into it! Also I'm not quite as interested in the early history of computing as it's a bit before my time. I'm hoping that it will pick up a bit once we get into the iPods, iPhones and so on.

Watching

Harry and I are still working our way through Red Dwarf. We have finally made it to the end of all the episodes that I've watched! Now we have seasons 10, 11 and 12 to go, and I've just discovered that there is a very short season 13 to watch too, so there's plenty to go with for now

I've really been enjoying A Small Light on Disney+. It's a biographical drama of Miep Gies, one of the secretaries who helped the Frank family hide in Amsterdam during World War 2. I'm very familiar with Anne Frank's diary as I've read it many times over the years, and last month we visited Anne Frank's House in Amsterdam. But although the Frank family and others do appear in the series, the focus of the story is on Miep, her husband, and the risks that she and many others took during that that period. It's fascinating, because the diary very much focuses on life inside the Annexe and this takes a look at the wider historical picture of what was going on outside. I would absolutely recommend it!

Crafting

I've been having a lot of fun crafting with Hama beads again. I worked on some Halloween projects and I have some more ideas as we get closer to Christmas.

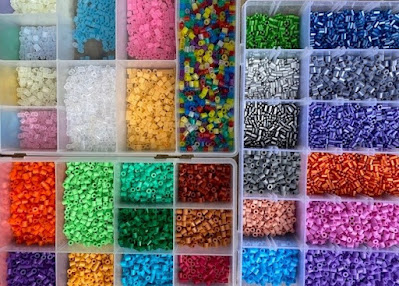
Hama beads sorted by colour

I'm also quite into jigsaws at the moment. I had a big clear out of my jigsaws recently because I had so many. I used to do some reviews for Ravensburger and I'd collected quite a few which I knew I wouldn't do again. I found myself re-visiting a brilliant channel on YouTube which I used to dip into a couple of years ago - Karen Puzzles - and it inspired me to get into puzzling again. There are so many beautiful jigsaws out there! I started by treating Mia to a Squishmallows jigsaw that we could work on together while my husband was away and it was really fun, and not as difficult as it looks, she loves her Squishmallows. I've now got a few puzzles lined up on my wish lists for birthday and Christmas, and I'm thinking very seriously about attempting a 3000 piece puzzle in the New Year (I can't start one now because we'll need the dining table for Christmas dinner!)

Ravensburger Squishmallow jigsaw completed

Listening to

I listen to Spotify in the car on the way to school and back, and that's a lot of listening time. But I found that Spotify was just playing the same songs over and over, and it really annoyed me that it was choosing what I listened to. So I found how to turn off the feature that auto plays songs, and I stopped choosing the curated playlists like Daily Drive. Instead I downloaded lots of albums, mainly ones that I used to listen to as a teenager, and I've been working my way through them. When the album has finished it just stops and I have to consciously choose what to listen to next. It's working really well for me, and it's also reminding me of songs on albums that I loved but haven't listened to in years because they aren't the most popular songs from the artists. 

Playing

I still love playing Pikmin Bloom on my phone! I started playing when it was released two years ago and it's still keeping me interested. Every month there are different challenges which can be a little frustrating at times, especially if you don't spend any money to play, but I find that it often gets me out for a walk during the day if I need to plant some flowers in a particular colour or walk a certain number of steps. I also like playing when we are travelling as I can pick up different seedlings, it's quite limited around where I live and play.

Working on

I've been trying very hard to stop the scrolling on my phone, especially constantly checking of the news and never ending websites like Reddit. Reddit is great for keeping up with hobbies, but I found that I was spending longer reading about about other people doing a hobby than actually doing it myself. It has really helped, my mind feels much clearer and I feel like my attention span has increased.

Looking forward to

This last half term of school always seems like a long one as the days get shorter and the weather gets colder, especially after such a warm, sunny summer. I really hope this winter isn't as cold and long as last year! But I'm already looking forward to Christmas and spending time together with family. We also have a holiday booked for Easter which is the one that was cancelled in March 2020 due to Covid, and although it's a way off yet it's definitely one to look forward to!

What have you been up to lately?

Wednesday, 25 October 2023

Halloween crafts using Hama beads

This is a collaborative post

A few years ago I published this post - Hama bead crafts for Halloween. But that was a long time ago, and since then I've published many more Halloween crafts using Hama beads on my blog, both the usual midi size and also the much smaller mini sized beads. So I thought that I would publish an updated post containing all of the Halloween Hama bead crafts that I've shared to date! Make sure that you click the link to the original post for the full tutorial and patterns.
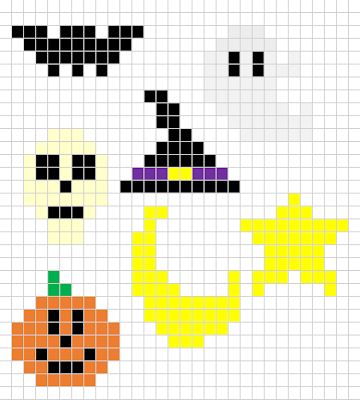
Small Halloween Hama bead designs

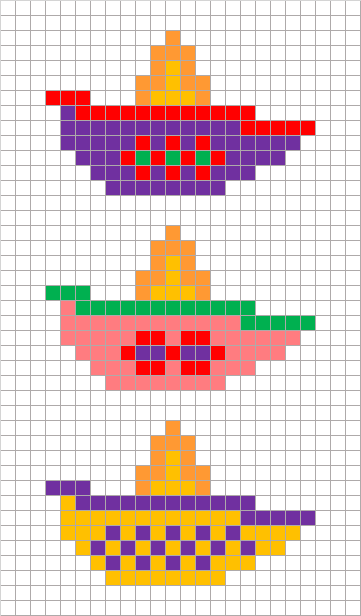
These pixel art Halloween designs would also work really well for cross stitch or other digital art. The small designs don't use too many beads and can be customised to use the colours that you have.

Mini Halloween Hama bead projects

Hama bead sugar skull bunting

This Halloween sugar skull bunting uses a very simple pattern that can be made in lots of different ways. It's a great craft for using up odds and ends of colours and looks fantastic hung up on a mantelpiece or across a window.

Simple sugar skull Halloween bunting

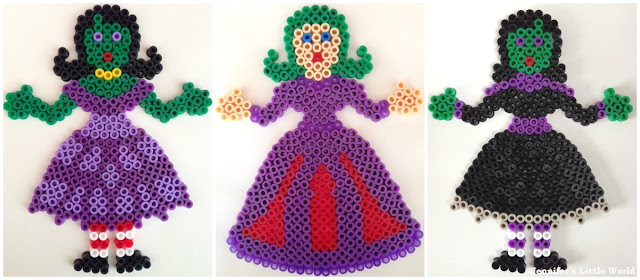
Hama bead witch designs using the princess pegboard

I used the versatile princess pegboard (you can find a link at the bottom of this post) to make some Halloween witches. I used lots of purple and black beads!

Hama bead Halloween witches

These designs can then be used as Halloween decorations, maybe to make a Halloween witch display.

Hama bead Halloween coasters

I love using Hama beads to make coasters, the small circular pegboard is just the right size. These coasters all have a Halloween theme.

Hama bead Halloween coasters

Hama bead Halloween napkin rings

If you are planning a Halloween party then these Hama bead Halloween napkin rings would look amazing on the table!

Halloween Hama bead napkin rings

Halloween house using the Hama bead house pegboard

I used the Hama bead house pegboard (there's a link at the bottom of the post) to make this Hama bead haunted Halloween house, complete with bats and pumpkin.

Hama bead haunted Halloween house

Hama bead sugar skull Halloween picture

Remember the Hama bead sugar skull bunting I shared earlier? I used the same pattern to make sugar skulls which I arranged on black cardboard to make a spooky Halloween picture.

Hama bead sugar skull Halloween picture

The following crafts use mini Hama beads. These tiny beads can be fiddly, so it's a craft better suited to adults, but the results can be very intricate and satisfying. “Crafting with such detail allows you to bring out creativity in small but powerful ways. It’s the patience and care in these tiny projects that make them so rewarding, transforming simple materials into meaningful Halloween decor." says John Webber of Carved, a handmade goods company.

Halloween pin badges using mini Hama beads

These little pin badges don't take long to make and would make a great subtle Halloween accessory.

Mini Hama bead Halloween pin badges

Mini Hama bead sugar skull earrings

I used the Hama bead sugar skull pattern once again but this time with the mini Hama beads to make some little Halloween earrings.

Mini Hama bead sugar skull earrings

Phew, I didn't realise that I had shared quite so many Halloween Hama bead crafts over here! I do hope that you found something to inspire you!

Monday, 23 October 2023

What to do with leftover Hama beads

Most families with children will have encountered Hama beads at some point! Even if you've not bought them themselves you may have been given them as gifts or had them passed on by another family. You might discover that once you've completed a kit you have beads leftover which aren't enough to make another full shape, or that you are left with many odds and ends of random colours. So I've put together some tips for things that you can do with leftover and spare Hama beads!

The main thing - don't just throw them away! If your family has outgrown or finished playing with Hama beads then there is bound to be someone that you know that would appreciate them (I've received many beads that way!) You can also donate to a charity shop or give away on Freecycle or a local Facebook group, there are many people that would enjoy using them. Even if you don't have many beads or you don't have the prettiest colours, younger children often prefer the activity of placing the beads on the pegboards to creating the perfect design.

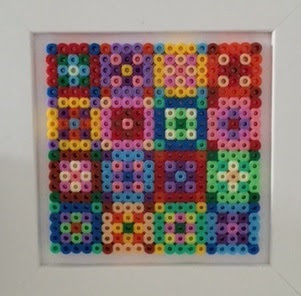
Hama bead quilt style picture

I've shared a few craft projects that would be perfect for using small amounts of different coloured beads. I love this pretty Hama bead quilt style picture which I keep framed in our bathroom. It's a really simple design, and can use up beads where you only have one in a single colour.

Simple coasters are a great way to use odds and ends of Hama beads to create something with a purpose. I've shared some ideas here - How to make Hama bead coasters - and all you need are the smaller sized pegboards which come in a variety of different shapes.

Simple Hama bead coasters for leftover beads

Of course you aren't limited to using Hama beads on pegboards. The beads can be strung together either alone or with other beads to make bracelets, or maybe onto long strings to create a beaded curtain. They could be used to embellish other crafts such as macramé or even crochet and knitting.

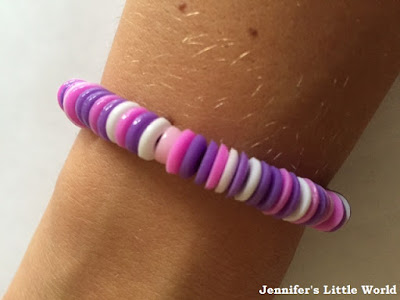
If you want to use the beads for bracelet making, something fun that you can do with them is to melt them in the oven, which makes for a flatter and smoother bead. You can find instructions here - How to make a melted Hama bead bracelet

Melted Hama bead bracelet tutorial

There are also some other crafts that you can try by melting the beads. This works especially well if you've ended up with some of the cheaper beads that don't work quite as well when used as intended. I've written a blog post sharing several crafts using melted Hama beads

If your Hama bead collection is diminishing and you want to use up as many as you can, I'd recommend having a good sort out and arranging the beads by colour. I like to use compartmentalised boxes to keep my Hama bead colours separate, or you can also use small bags. It's a really good way to see exactly how many beads you have left of each colour, as well as helping you see the different types of beads and colour combinations that you have. You'll probably find that this gives you some craft ideas too!

Hama beads organised by colour in boxes

If you are looking for some projects to work on using beads that you have around the house then you can find all my Hama bead craft posts here - Hama bead craft projects - I hope that you can make the most of the Hama bead supplies that you have!

Friday, 20 October 2023

A visit to Grenen, near Skagen, where two oceans meet

On our recent northern European cruise we stopped for the day in Skagen in Denmark. I must admit that I had never heard of Skagen before our visit! But I'm really glad that we had the opportunity to visit. Skagen is the northernmost town in Denmark, and the northernmost point of land is at Grenen. The reason that most people visit Grenen is because on this sandy peninsula two seas meet - the Baltic Sea and the North Sea. 

Grenen is about three kilometres from Skagen and then it's about a half hour walk across the sand to get to the northernmost point. Your cruise company will probably offer some different options for tours in Skagen, but we've always found it much cheaper to explore cruise stops on our own!

We took a complimentary shuttle bus from the cruise port into the town centre and then headed out in the direction of Grenen. We didn't intend to walk all the way there, but we were doing so well that we just kept going! Many people had hired bicycles and this would be a really good option as the cycle path is flat, straight and easy to follow, but there were also lots of other people walking. The walk takes you out of the town past some attractive buildings, and then along the cycle path which is slightly inland but still a really pleasant walk. There were plenty of signs with maps so you could see where you were and identify the landmarks like the lighthouses. 

Lighthouse between Skagen and Grenen

At Grenen there is a large car park, toilets, a gift shop and cafe. From Grenen you can walk out to the sandy peninsula yourself, and plenty of people were doing it, but it would be hard work across the sand. We opted to pay a little to take the Sandormen tractor pulled coach. You can use a credit card to easily buy tickets from a small vending machine in the car park, or you can pay cash on board. An adult round trip cost 35, 00 DKK and a child 15,00 DKK (you can find all the details here - Sandormen). It's quite a short journey out across the sand.

Sandormen tractor to the Grenen peninsula

The Sandormen drops you right at the Skagen peninsula, where the two seas meet. Having seen enhanced pictures on social media I was a little bit sceptical about what we would actually be able to see, but when you are there you can really see how the two seas are washing together! It was very busy (get there early if you want the Instagram shots without other tourists in the background!), because lots of people wanted to take their photo with a foot in each ocean. It was really beautiful and although it was crowded it also felt peaceful.  

Standing at Grenen where two seas meet

We didn't stop for too long here, and then took the Sandormen back to Grenen. We spent a little while there having a look around the gift shop and using the facilities. There are some lovely views and you can climb up on the dunes to have a look around.

Sandormen tractor at the Grenen peninsula

Then for a change, we walked back to the town along the beach. Again it was easy to find the way, and it was a really interesting walk. The beach is both sandy and rocky and all along the coastline there are large concrete bunkers, some of which you can go inside. Then we walked back through the houses to the town centre. When we arrived at the town we used Google maps to find the way, but to be honest you can't really get lost because the town is so small.

Bunkers on the walk between Grenen and Skagen

I'm really glad that we made the effort to walk out to Grenen, it was a lovely walk in both directions which we found easily manageable and it was definitely somewhere that it was worth making the effort to get to.

When I was planning our trip I found this blog post a really useful resource - How to explore Skagen Denmark on your own. The author discusses various options for reaching Grenen from the town, the sights that you'll see along the way, and also other places to visit in Skagen while you're there.

Wednesday, 18 October 2023

Hama bead crafts for Diwali

This post contains Amazon affiliate links

I love using my Hama beads to craft for seasonal occasions, and with Diwali approaching I thought I'd share a few Diwali crafts that I've shared on the blog using one of my favourite craft materials - Hama beads!

Hama bead rangoli

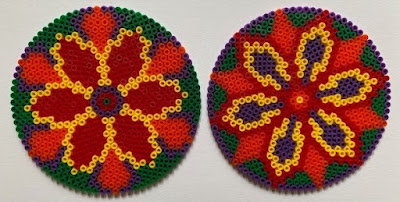
Hama bead rangoli designs large and small

Rangoli are decorative floor patterns which are created during Hindu festivals such as Diwali. The designs can be shaped as flowers or petals, or geometric designs can also be used. Rangoli are traditionally created using sand, petals or coloured rice, and welcome the goddess Lakshmi into the home. I used Hama beads to create some geometric rangoli designs using both the smaller and the larger circular Hama bead pegboards. You can find the patterns for these designs by following the links to the original blog post.

The Large Hama bead rangoli designs are very detailed, and use lots of beads. As well as making pretty Diwali decorations they could also be used as coasters for small bowls or plates.

Large Hama bead rangoli designs

The Small Hama bead rangoli designs use the smallest circular Hama bead pegboard and are the perfect size to use as coasters for small glasses. They would also make great bunting, or could be stuck to walls or windows as Diwali decor.

Hama bead diwa lamps

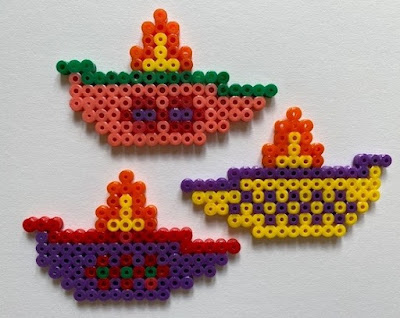
During Diwali, small lamps called diwa lamps are lit to symbolise the triumph of light over dark or good over evil. My Hama bead diwa lamps use a very simple pattern on the basic square Hama bead pegboard, and can be customised in all sorts of different colours and patterns depending on which beads you have available in your stash. You can find the pattern by following the link to the original blog post above.

Hama bead diwa lamp craft

I made some simple stands for my lamps so that they can be stood upright. 

Hama bead diwa lamp craft

If you are looking for more Diwali crafts then you might like this post - Simple Diwali crafts for children.

If you are teaching your young children about Diwali, here are some books that they might enjoy:

The Best Diwali Ever (affiliate link) - A heart warming picture book about Diwali, siblings and how very special this celebration can be.

Diwali colouring book for kids (affiliate link) - A simple coloring book for young children, suitable for ages 2-5. Contains all sorts of things to colour including lamps, fireworks, candles, lanterns, food & rangoli patterns.

First Festivals: Diwali (affiliate link) - Featuring simple text, gorgeous illustrations and satisfying lift-the-flaps, this book explores common Diwali traditions and helps young children understand the importance of this special holiday.

Mr Men and Little Miss Happy Diwali (affiliate link) - The five-day festival of lights is celebrated by millions of people across the world and the Mr Men and Little Miss can't wait to join in. They're busy cleaning their homes, creating Rangolis, lighting lamps and enjoying all the festivities, including large feasts that Mr Greedy is particularly looking forward to. It’s going to be a busy five days of light and laughter!

Monday, 16 October 2023

Some books that I've enjoyed recently

Lately I've been a bit stuck with my reading. I'm currently working through Steve Jobs by Walter Isaacson which although interesting has become a bit of a slog. So I've been mixing it up a bit with a few 'chick lit' freebies from Amazon, which are fun to read but not very satisfying and rarely make it into my 5* category on Goodreads!

But there have been a few books which I've really enjoyed lately, and so I thought I'd share them in case you are looking for any reading inspiration.

The Cazalet Chronicles by Elizabeth Jane Howard

The Cazalet Chronicles is a series of five books (The Light Years, Marking Time, Confusion, Casting Off and All Change). It's a long and detailed family saga which chronicles not just the large Cazalet family but also their household staff and friends, taking place from just after the Great War until the 1950s. I borrowed the first book from a friend and then had a bit of a break before I was able to borrow the remaining four books from my Aunt. They are big books and there are a lot of characters to keep track of (there are handy family trees and character notes at the beginning of each volume which I often had to refer back to). The books are beautifully written, going into great detail about the everyday happenings of daily life. Sometimes it seems mundane, and sometimes the characters are going through huge life changing events. I just wanted to keep on reading! I'm definitely going to look out for my own copies of these books because I can see myself returning to them in the future, they are great comfort reading when you want to become absorbed in a story without having to concentrate too much. 

The Virgin Suicides by Jeffrey Eugenides

This is one of those books which I've always meant to read, and so when it appeared in the Amazon Prime library I downloaded it straight away. It looks as though the film was recently re-released, and so the book is currently popular again as it has found a new audience via TikTok. I really enjoyed the book, I'm always drawn to books with an unreliable narrator (like most books by Kazua Ishiguro who is one of my favourites) which reveal the story through glimpses and leave the reader to put the full story together in the best way that they can. It's a sad and sometimes disturbing book, and I can see why people can still relate to it today.

My Year of Meats by Ruth Ozeki

I discovered Ruth Ozeki by chance last Christmas when I had a Waterstones voucher to spend, and I'm so glad that I did. I loved both The Book of Form and Emptiness and A Tale for the Time Being and so I added this one to my collection from a recent Wob order. It follows Jane, a documentary maker who finds herself producing a television series aimed at Japanese housewives, aimed at encouraging them to cook and eat more meat from American suppliers. There is also a parallel story of a young woman in Japan who is trying to please her husband, who is involved in the programme, by preparing the recipes for him. But as Jane works on the programme she discovers more and more disturbing information about the meat industry and realises that she can't continue to promote it to Japan. It's made clear that the book is a work of fiction, but there are definitely some real life issues to highlight about the meat industry both in America and around the world, and it made me glad that I'm now vegetarian!

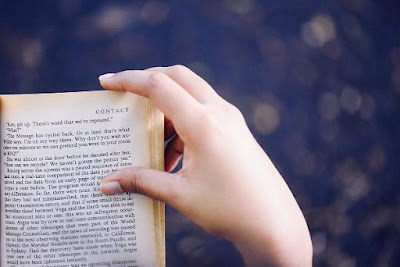
Person turning the page of a book
Photo credit Prasanna Kumar via Unsplash

Friday, 13 October 2023

A canal tour in Bruges

On our recent cruise over the summer holidays our ship stopped in Zeebrugge. There isn't much to do in the port itself so you have a couple of options - a day trip to Brussels or a day trip to Bruges. We chose Bruges because it is much closer and we remembered a lovely day trip a few years ago. There are several different options to travel from the port to Bruges. After a lot of research we decided to splash out on a taxi as it was the easiest and quickest option, but there are also shuttle buses and trains available.

We really wanted to do a canal boat tour as I remembered doing one before and really enjoying it. It's a really good way to see the city, and if you do it first thing then you have time to go back and have a closer look at anything interesting that you might have spotted from the boat. 

Bruges canal boat tour and landing stage

The boat tours are run by five different shipping companies, each departing from a different landing stage. You can find details of the companies and landing stages here - Bruges by boat. It's a fixed price of 12 Euros per adult and 7 Euros per child (aged 4-11, children under 4 are free). You buy the tickets on the spot and you can't book in advance, so although the lines do move quickly it's worth arriving early to avoid a long wait. The boats run from early March until mid November, and may also run at other times of the year.

There are also some private tours available which can be booked in advance and are often combined with  a guided walking tour. These are much more expensive but may be worth it if you want to know that you have a guaranteed spot.

Bruges view from canal boat tour

All the tour boats follow the same course around the canals which takes about 30 minutes, and the number of boats is limited which means that it doesn't feel too busy on the water. You can find full details of the course here - Bruges canal boat tour details.

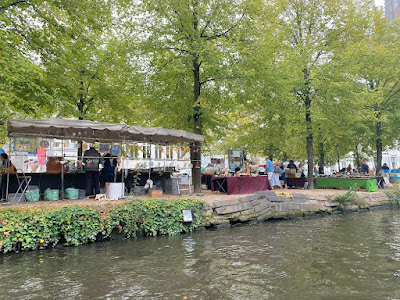
You can see lots of interesting things from the tour. I was fascinated by what looked like a flea market packed with people in a beautiful setting among the trees.

Flea market on canal banks in Bruges

There is also an exciting moment when you go underneath a very low bridge. I am so short that I didn't actually need to duck as we went below it, but many people did!

Bruges canal boat tour going under a very low bridge

The tour was fully guided with plenty of explanation from the captain in several different languages. It was a really interesting and enjoyable tour.

A few days before our visit to Bruges we spent the day in Amsterdam where we also took a canal boat tour. That experience was very different! It was difficult to choose a tour in Amsterdam as the boats all take different routes and are priced differently, and boarding was a bit chaotic. The canals felt very crowded, several times we had to wait for another boat to move out of the way and at one point we nearly collided with another boat that was going far too fast. The canal boat tour in Bruges was much more relaxed and peaceful!

After the tour we headed back to the Market Square for the obligatory Belgian waffle before going for a walk around the city. Bruges is a small town and very walkable so even if you are just there for a few hours you can still have a really good look around. You only need a few hours to get a good feel for the city, and I'd definitely recommend a visit if you are in the area.

Belgian waffle in Bruges Market Square

Wednesday, 11 October 2023

Hama bead diwas for Diwali, with stands

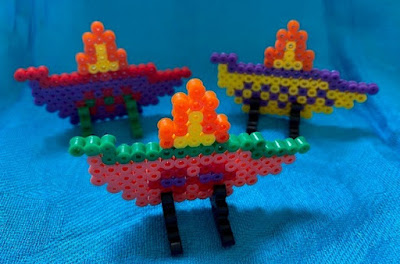
Today I'm sharing a simple Diwali craft using one of my craft materials - Hama beads! Diwa are small oil lamps which are traditionally lit during the festival of Diwali. They symbolise the triumph of light over dark and good over evil. My Hama bead lamps are all made using the same simple template but can be customised using different colours and patterns.

Hama bead diwa lamps for Diwali craft

Here is the pattern that I used for my lamps:

Hama bead Diwa Diwali designs and patterns

And here are the finished Hama bead pieces. They are made on the square Hama bead pegboard, and can be displayed facing in either direction. If you are new to crafting with Hama beads then you might find this post helpful - Ironing tips for Hama beads

Hama bead diwa lamp designs

I decided that my Hama bead diwas would look best if they were standing up for display. You can buy simple Hama bead stands, and I've put a link to some at the bottom of the post. I have a few around that I've collected as part of various sets, but they are quite expensive, and it's very easy to make your own simple stands using Hama beads. 

The pattern for a Hama bead stand is below. You can use beads in colours which co-ordinate with your projects. Smaller designs may stand up with just the one stand if you are careful, but generally you'll want two stands per item.

Simple Hama bead stand pattern

This photograph shows my two homemade stands at the top, compared with one of the Hama branded stands underneath. My stands work just as well as the official ones, but the items will stand slightly higher off the ground. I don't think it's noticeable though, and the homemade stands are also easier to use when it comes to sliding in the beaded projects.

Hama bead stands, official and homemade

Here are my finished Hama bead diwa lamps! They will look lovely on the mantelpiece this Diwali alongside our simple salt dough diwa lamps.

Hama bead diwa lamp designs craft for Diwali

If you are looking for more Diwali craft ideas then you might enjoy this post - Simple Diwali crafts for young children.

Monday, 9 October 2023

Felt crafts for Halloween - a round up

I love crafting with felt! It's such a versatile material, you can cut it easily, it doesn't fray, it's easy to sew and it comes in a range of gorgeous bright colours and pretty pastels. I've shared a few Halloween crafts using felt on my blog over the last couple of years and I thought I'd bring them all together here in case you are looking for some Halloween felt crafting inspiration.

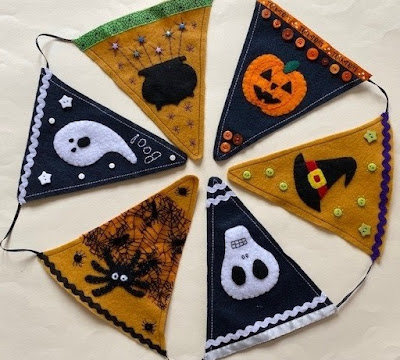
Last year I made this Halloween felt bunting using scraps of felt and other bits and pieces from my stash. 

Halloween homemade felt bunting pendants

Each pendant has a different theme, alternating black and orange along with plenty of embellishments like buttons, sequins, ric rac and ribbon. I love the variation in the pieces!

Halloween felt bunting embroidered with embellishments

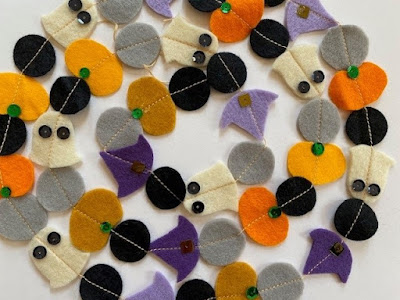
This year I made a really simple Halloween felt garland which I'm going to string up next to the bunting. All you need are small scraps of felt in Halloween colours like black, orange, grey and purple. The pieces are cut into small shapes about 3-4cm across and quickly sewn together using a sewing machine. I added some sequins to make them sparkle. 

Simple homemade Halloween felt garland

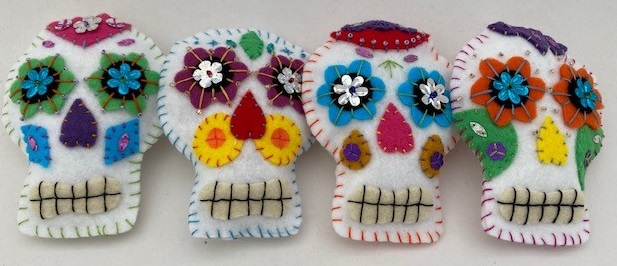
Another great Halloween felt craft for using up scraps are these embroidered felt sugar skulls. My skulls measure about 10cm in height so they are a good size to use as hanging decorations. You can use a range of coloured scraps along with sequins and small beads to make each one unique. I used white for the background of the skulls but I'm also very tempted to make some in vibrant pinks and purples!

Halloween craft felt sugar skulls

For my next Halloween felt craft I'd like to try a Halloween themed picture. I found this full video tutorial linked below for a circular piece which I love, so I might attempt something similar:

Finally, if you are looking for more beautiful felt craft ideas then I love Bugs and Fishes as a source for inspiration and tutorials.

I've shared many Halloween crafts on my blog over the years, if you are looking for more then you might also enjoy these last minute Halloween crafts for children

Friday, 6 October 2023

How I entice my teenagers down from their bedrooms

When my children were little they always wanted to be close to me. They only went to their rooms for sleeping, and they never got up to any mischief because they were always in the same room as I was! Now they are older they prefer their own space a lot more, and spend most of their time when at home in their bedrooms. This started during the pandemic, when they did their home schooling video calls in their rooms, but of course it's a natural part of growing up too. 

Sometimes it's nice for me to have a bit more peace and quiet to work on my own projects! But I do also miss them, especially at the weekends when sometimes it feels as though the entire day has gone and I've hardly seen them. So I've been trying to find ways to entice them out of their rooms and into spending some time with me.

Anything food related is a good one for Mia. A few times I've taken her out to the café at the garden centre around the corner and treated her to a fancy hot chocolate and a cake. As a bonus there is a Hobbycraft in the same retail park and so we often make a stop there too. We always seem to have a voucher to spend, or else there is something on special offer!

Table with hot chocolate and cake

I can also entice them downstairs to watch something together if I provide a favourite snack like popcorn or chocolate fingers. And Mia loves baking, especially if licking a spoon is involved!

Child stirring a mixing bowl

Sometimes I'm able to drag one child at a time out for a walk. We have a little loop that runs down through our estate and back through a foresty footpath. I entice them with the promise of some private talking time with just me which they like, it's a good way to both get some exercise and also chat through anything that's bothering them.

Recently I've got back into doing jigsaws again and I've discovered that they both like helping out from time to time. Mia spotted this Squishmallow jigsaw while I was browsing on Amazon the other day, and I had a voucher so I bought it for us to do together. It's a very challenging one! I'm trying to keep away from it during the day so that we can do it together!

Squishmallow jigsaw just started

I also like to find a television show or film that we'll all enjoy watching together. At the moment I'm sitting down with Harry and we are working our way through Red Dwarf, which has recently been put up onto iPlayer. I was a massive fan as a teenager and watched it over and over, I always have a Red Dwarf quote in my head! But I discovered that there have been three more seasons that I've never even watched because they were on Dave and I didn't know how to watch them! So we are just about to get to the new episodes which is quite exciting. Harry has also been loving Look Around You which is also on iPlayer, it's a sort of spoof science television show series which was on a few years ago. It's very surreal and very funny. 

Sometimes I can persuade the children to come downstairs and sit at the kitchen table with me while we all work on our own projects, especially if there's a pack of biscuits involved. They often do some homework, and I like seeing what they are up to at school. They also do things without screens, like reading or drawing. It's nice to all be in the same space but still doing our own thing!

I much prefer this stage of parenthood to the early baby and toddler days!

Wednesday, 4 October 2023

Free - mini Halloween pixel art designs for Hama beads or cross stitch

With Halloween approaching, I thought I would use my newly organised Hama bead supplies to make some little Halloween Hama bead pieces! These designs are very small (they measure about 3-5cm across) and so they don't use too many beads. They would also be great for cross stitch or other pixel art crafts. I came up with designs for a moon and star, a bat, a skull, a ghost, a pumpkin and a witch's hat.

Free Hama bead Halloween designs and patterns

Here are the patterns for the designs. You can vary the colours of course based on what colour beads you have available - I have plenty of grey beads so I used those for the ghost, and the skull is made from an unusual off white shade that I found in my stash.

Free mini Halloween pixel art designs for Hama beads or cross stitch

These designs can all be assembled on the basic square pegboard. If you are new to Hama beads then you might find this post useful - Ironing tips for Hama beads. You can find links to some useful supplies at the bottom of this post.

Ways that you could use the finished Hama Halloween bead pieces:

To stick to place card for a Halloween party

Scattered across a Halloween party table

As Halloween party bag gifts

Make into magnets or keyrings

Make into bunting or strings as Halloween decorations

Use as gift tags for Halloween presents

Hand to trick or treaters for a sugar free alternative

Add a cord to make a spooky pendant

If you enjoyed this post then you might also like my round up of Halloween Hama bead crafts!

You can find all my Hama bead posts here - Hama bead crafts

Teen bedroom makeover - creating a stylish space for your adolescents

This is a collaborative post

Your teenager's bedroom is more than just a place to sleep; it's their sanctuary, a reflection of their personality, and a space where they can express themselves. 

So, if you're ready for a teen bedroom makeover, let's dive into the art of transforming this room into a stylish haven that resonates with their evolving tastes and needs.

1. Get Input From Your Teen

The first step in any successful teen bedroom makeover is to involve your teenager in the decision-making process. Sit down and have a conversation about their likes, dislikes, and what they envision for their space. This collaborative approach ensures that the room reflects their personality and style.

2. Choose A Theme Or Style

Once you have an idea of your teen's preferences, work together to select a theme or style for the bedroom. Whether it's a minimalist retreat, an enchanting Bohemian haven, or an urban industrial loft, having a clear theme will guide your design decisions.

3. Select A Mature Colour Palette

Say goodbye to pastel pinks and baby blues; it's time to embrace a more mature colour palette. Involve your teenager in choosing the colours for their room. Earthy tones, muted neutrals, or bold accents can create a stylish backdrop for their space.

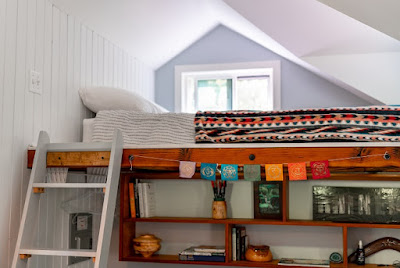
Teen bedroom with loft bed and study area
Photo credit Andrea Davis via Unsplash

4. Invest In Quality Furniture

A stylish teen bedroom needs functional and stylish furniture. Consider pieces that can grow with your teenager, such as a comfortable bed, a sturdy desk for study sessions, and ample storage options. Quality furniture not only looks good but also lasts longer.

When it comes to sourcing the ideal sleeping arrangements, Bedkingdom.co.uk can help you find a new bed for your teen in no time. Their extensive selection includes all manner of bed types, from ottoman beds to four-poster bed frames and more, and, as a bonus, they even offer free UK delivery.

5. Create A Study Zone

As your teen's academic responsibilities increase, a dedicated study zone becomes essential. Choose a desk and chair that match the room's theme and provide proper lighting. Ensure there's enough storage for textbooks and school supplies.

6. Incorporate Their Hobbies And Interests

Teenagers often have a range of hobbies and interests. Use these as inspiration for decorating their room. Whether it's sports, music, art, or travel, incorporating their passions into the decor can make the space feel even more personal.

7. Maximise Storage Solutions

Teenagers tend to accumulate a lot of stuff, so effective storage solutions are a must. Consider under-bed drawers, wall-mounted shelves, and stylish bins or baskets to keep clutter at bay. A well-organised room is a stylish room.

8. Add Personal Touches

Encourage your teenager to add personal touches to their room. This could include artwork, photographs, or mementos that hold sentimental value. These personal touches make the space feel uniquely theirs.

9. Experiment With Wall Décor

Wall décor can make a big impact in a teen's room. Consider options like wall decals, posters, or even a gallery wall featuring their favourite art pieces. Removable wall art allows for easy updates as their tastes change.

Teen bedroom with wall art
Photo credit Kenny Eliason via Unsplash

10. Comfort Is Key

Teenagers often spend a lot of time in their bedrooms, whether they're studying, socialising, or relaxing. Invest in comfortable bedding, throw pillows, and cosy blankets to create a welcoming atmosphere. A comfortable space encourages relaxation and rest.

11. Layered Lighting

Good lighting is essential in a teen's room. Incorporate layered lighting with options like a stylish ceiling light, bedside table lamps, and task lighting for the study area. Dimmable lights can create different moods for various activities.

12. Tech Integration

Teenagers are tech-savvy, so consider integrating technology into their room. A charging station for devices, Bluetooth speakers for music, and smart lighting or blinds controlled by a smartphone can add a modern touch.

13. Encourage Organisation

Teens aren't always known for their organisational skills, so help them stay tidy by providing storage solutions that are easy to use. Labelled bins, hooks for bags and jackets, and a laundry hamper are all practical additions.

14. Respect Privacy

Teenagers value their privacy. Ensure their room offers a sense of seclusion and personal space. Consider blackout curtains for better sleep and a lockable door if appropriate.

15. Future-Proofing

Teenagers grow up fast, so think about future-proofing the room. Invest in furniture and decor that can adapt as their tastes evolve. Versatile pieces will save you from constant redecorating.

16. Encourage Creativity

Teenagers are at an age where creativity blossoms. Set up a creative corner with art supplies, a drawing easel, or a DIY crafting station. Encouraging their artistic expression can make their room feel like an inspiring and productive space.

17. Consider A Feature Wall

For a bold and stylish touch, consider creating a feature wall. This could involve painting one wall in a striking colour or using wallpaper with an eye-catching pattern. A feature wall can serve as the room's focal point and add a touch of drama to the decor.

Final Thoughts

In a nutshell, a stylish teen bedroom makeover is all about collaboration, personalisation, and creating a space that resonates with your teenager's personality and interests. 

By following these top tips and involving your teen in the design process, you can create a stylish and functional haven that they'll love spending time in. It's a win-win situation – a happy teenager and a stylish home!