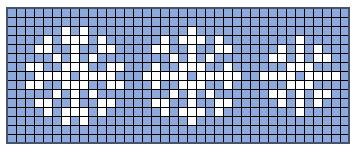
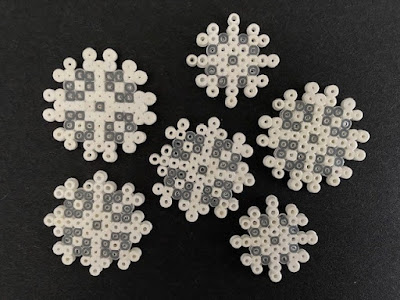
I love crafting with mini Hama beads, you can make some really detailed and delicate pieces which are great for embellishing cards or adding to other decorations around the home. Today I'm sharing some designs that I've created for mini Hama bead snowflakes. The mini Hama beads are so tiny that each snowflake measures about 1.5cm - 2cm in diameter.
Just a quick note to say that I know a snowflake should have six sides, but having spent ages with my graph paper trying to design a six sided snowflake upon such a small scale I sadly had to admit defeat!
I began with these simple snowflake designs. These snowflake patterns will also work beautifully for all pixel art crafts, for example cross stitch, diamond painting or digital artwork.
These designs will work for all Hama bead sizes, but I have chosen to make my snowflakes using mini Hama beads as they are so delicate and I think they make perfect snowflakes. The beads are very tiny, about the size of a single cross stitch. If you are new to crafting with the mini Hama beads then you might like to read my helpful post - A guide to mini Hama beads which has lots of tips for using these tiny beads.
The snowflake designs are created using the square pegboard. Make sure that you are using the correct size pegboard for your beads. The best way to work with the tiny Hama beads is to use tweezers to position them on the board.
When you are happy with the layout of your beads you can cover them with ironing paper and iron to fuse the beads together. You need to be very careful when ironing mini Hama beads. Make sure that the iron is on a low or medium setting and only press for a second or two. You can find more tips for ironing Hama beads here - Ironing tips for Hama beads. I like to iron my designs lightly on both sides to make sure that the beads are firmly melted together in place.
Here are my finished mini Hama bead snowflakes! I do have a craft or two in mind for them which I will be sharing shortly here on the blog.
Please note that this craft uses mini Hama beads which are not the standard size Hama beads. Make sure that the beads and pegboard you buy are both same size, as the beads and boards are available in three sizes - mini, midi and maxi. If you buy a bag of mini Hama beads in mixed colours then you should have enough white and clear beads to make some snowflakes (although you'll have to sort through to separate the colours!)


No comments:
Post a Comment
I love reading your comments!