Monday, 31 May 2021

My goals for June

I'm really enjoying making myself a list of goals for the next month, I find it really makes me focus on what I want to get done. I did fairly well last month with my goals for May, and so here are the things that I want to get done in June.

Don't obsessively scroll the news websites. I did well avoiding Twitter last month and hopefully that can continue. Now I need to do the same for BBC News, the only news website I really check. I will still check the news, but maybe just at certain points during the day like first thing and lunchtime. 

Throw away or recycle at least 5 things per day. I desperately need a decluttering challenge, but it is  difficult at the moment to find a charity shop taking donations and the drop off box at our gym has been removed. But I'm sure I have plenty of things that can go in the recycling - I'm thinking expired paperwork, instruction leaflets, empty boxes, packaging and so on. I also know that I have a number of small electrical items lying about that can be put out with our household rubbish for recycling. From playing the minimalism game in the past I know what a difference even just getting rid of a few things each day can make. 

Think about taking part in the garage sale trail. My village holds an annual garage sale trail where a number of houses take part on the same day with a map showing all the different locations. I've taken part a few times and we had a pile of stuff for last year, then of course it was cancelled. So I need to make a decision as to whether we take part this year, and if so I can start putting together some things that I can sell. 

Try three new recipes. I have a box filled with recipes that I've pulled out of magazines but never tried! I need to try them or chuck them.

Don't pick up my phone as soon as I wake up. Even though I find that it helps to wake me up instead of falling back to sleep, it would be much better to just get up and get on with chivvying children and making breakfast.

Play the piano every day. I like playing the piano, I make sure that Harry does his piano practice every day, I can easily find ten minutes to sit down and have a play.

Tidy up the front garden, in particular the area around our front hedge. It's hard to describe, but we have a large hedge that goes around the house and we never see it from the other side as our driveway is on one side. I cut it back last week and discovered that areas have become very overgrown and were blocking a couple of small drainage grills. I sorted out the worse bits, but I need to go back and have a good weed underneath, as well as sweeping away lots of dead leaves. 

I think that all this will keep me busy!

Red poppies in a meadow
Photo credit Alexander Schimmeck

Saturday, 29 May 2021

A year of Hama bead crafts - part 2

A few years ago I published a long post containing an entire year's worth of Hama bead crafts and projects - one for each month. I've published so many more ideas since then that I thought it was time to publish part two! 

So here goes, twelve more Hama bead projects, one for each month of the year.

A whole year of Hama bead projects, part two

January - Hama bead snowflake buntingThe Christmas decorations might have been tidied away but you can still decorate seasonally and we are often lucky enough to see some snow in January! These snowflake patterns were designed to be strung up as bunting, but would also make lovely coasters or as a small mat underneath a candle or ornament.

Hama bead snowflake pattern designs

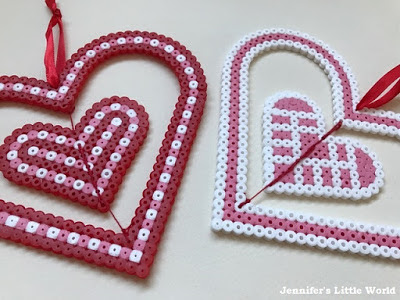
February - Spinning Hama bead heart decorations. These spinning hearts are made using the large and small heart pegboards, with the smaller heart suspended inside the larger one. When they are hung up the hearts spin really prettily. You can also find more Hama bead Valentine's themed crafts here - Hama bead crafts for Valentine's Day.

Hama bead spinning heart decorations

March - 3D layered Hama bead Easter eggs. I used the large Easter egg pegboard to make Easter eggs in different sizes which are then layered together to make some unique Easter decorations. 

Hama bead layered Easter egg craft

April - Easter egg Hama bead sun catchers. A second Easter themed craft, these sun catchers also use the large Easter egg pegboard with coloured tissue paper stuck to the inside. They look lovely when they are stuck up in a sunny window! You can find more Hama bead Easter crafts here - Easter crafts with Hama beads.

Hama bead Easter egg sun catcher craft

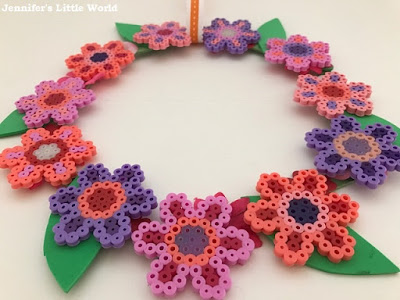
May - Hama bead flower wreath. I love decorating with flowers for spring, and I used the small flower pegboard and some foam shapes to make this simple and colourful wreath.

Hama bead simple spring flowers wreath craft

June - Hama bead flower bouquet craft. The small flower pegboard was used again to make these Hama bead flower bouquets which would make a great front piece for a greetings card or a simple decoration for a mantlepiece or window.

Hama bead flower bouquet craft for children

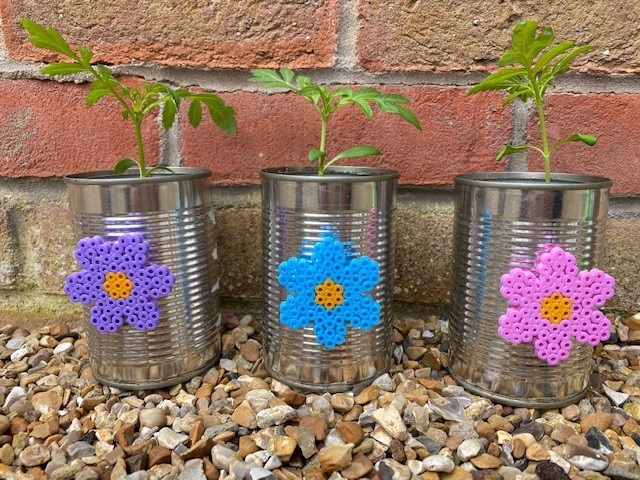
July - Tin can pots with Hama bead flowers. Finally I used the small Hama bead flower pegboard to decorate these old tin cans to make little planters for the garden. 

Hama bead tin can flower craft project

August - Mini Hama bead decorative plant markers. This craft uses mini Hama beads which are very tiny and allow for some really intricate designs. I created some small designs which are glued to small lollipop sticks and can be used to add some pretty colour to flower pots around the house.

Mini Hama bead plant stick decorations

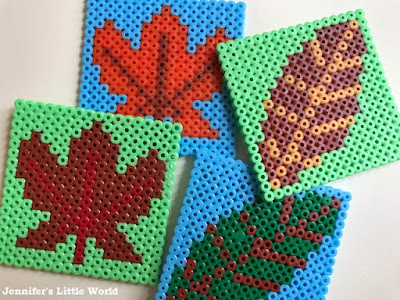
September - Autumn leaf Hama bead coasters. These Autumn themed coasters are inspired by fallen leaves and can be customised with all different colours to make a unique design.

Hama bead Autumn leaf coasters design patterns

October - Halloween Hama bead coasters. I love crafting for Halloween and I was really pleased with these Halloween themed Hama bead coasters, also perfect for placing underneath candles or small ornaments. You can find more Hama bead themed Halloween crafts here - Hama bead crafts for Halloween.

Hama bead Halloween themed coasters

November - Small Hama bead rangoli for Diwali. These mini rangoli are made using the small circle pegboard and using bright colours. They make lovely coasters, or you could string them up as bunting, scatter them around the dining table, or stick them to walls or windows as decoration.

Small Hama bead rangoli for Diwali

December - Hama bead mini Christmas wreaths. These little Christmas wreaths are made once again with the small circle pegboard. I've used Christmas pictures from cards but you could also use photographs of family and friends. They can be hung from the Christmas tree or you could attach a magnet to the back to display on the fridge. You can find more Hama bead themed Christmas crafts here - Hama bead Christmas crafts.

Hama bead mini Christmas wreaths craft

I hope that this has given you plenty of inspiration for Hama bead crafts!

Friday, 28 May 2021

Essential car checks before a road trip

This is a collaborative post

If you are planning to go on a road trip with your family over the coming season, you need to be prepared very well to avoid any car trouble and to have a pleasant trip. If you follow the following car checks before leaving for a road trip it will help you save you unnecessary car repair costs and help you enjoy an enjoyable journey. 

Check Fuel Level

No one misses this check , however at times motorists in a hurry forget checking the fuel levels before they go out for a drive. At times you might have put adequate fuel for your vehicle to be driven however it may finish quicker than expected which means your car is losing its fuel efficiency. In that case you would have to change your driving style to a smoother driving or get it checked by a proper service centre to see which part of your car is causing this trouble. 

Is your MOT certificate up to date?

Having an up to date MOT certificate is very important if you are driving in the UK, not only to help your car perform better but also for you and your family’s safety.  The MOT test ensures that all the important parts of your vehicle are performing well. If you have just have purchased a new car, you won't be liable for an MOT test until three years have passed.  

However if your car is older and is reaching the MOT expiration date then it is very important to take your car for MOT renewal certification. Some of the parts that are mandatory to be checked during MOT are exhausts, battery, engine, tyres, windows, mirrors and tyres to name a few. 

An MOT test usually takes an hour for a normal vehicle, however if any mentioned part is not up to MOT level then you will have to stay back to get it fixed there and then. In case you want to book MOT, you can check DAT Tyres here. It is important to note that not having a proper MOT certificate can result in you paying heavy fines.

People driving inside a car
Photo credit Alex Jumper


Are your tyres fit ?

How to know if your tyres are fit to be driven on a long route? You just need to see three major things in order to determine whether your tyres are roadworthy or not. First of all and most importantly checking the tyre pressure levels is very important. You can check this on your own with a portable tyre pressure measuring gauge. If it falls under adequate level, then you are good to go. Next thing you need to see is whether your wheels are properly aligned or not. You can easily note incorrect wheel alignment if your steering vibrates while you are on drive, or in case you have properly aligned tyres while parking and the steering wheel has tilted in either direction. If any such a case occurs you can get help from a nearby tyre garage. Lastly, you need to measure the appropriate tread depth of the tyres , if it is around 1.6mm you are safe to go . However if the tread falls below the mentioned level that means you would require a tyre change. 

Keep Essentials

In order to achieve a smooth and happy trip with your family you need to gear up by packing proper snacks that you can store for a longer road road trip. Sandwiches or crisps are among few snacks that are tasty and that cause less mess in the car. Furthermore, keeping cell phone chargers is essential too. If your battery runs out and you require any help you would easily be able to contact the required person. 

Sandwich and cherries
Photo credit The Fry Family Food Co.

Wednesday, 26 May 2021

My poor garden

For today's blog post I really wanted to share some lovely photos of my spring garden, but unfortunately Mother Nature has had other ideas. 

It's been so cold here that I've barely even been out in the garden for the last couple of weeks. The garden furniture has been packed safely away because of the wind, and we've not even been in the hot tub for a few days because the weather has been so miserable.

So the poor garden has become sadly neglected. It's been far too wet to cut the grass or the hedge, and so it's all looking a bit overgrown. The weeds are growing up in the vegetable patch, but I just can't bear to wait for a gap in the rain and sit out there in the cold to give it some attention.

Everything has also suffered really badly from the strong winds that we've been having. My poor marigolds in tin can pots are looking very battered. They were already spindly from being kept inside for too long due to the cold weather, and that made them even more vulnerable to the wind. A couple have snapped completely. Luckily I have some spare plants still indoors that I can use to replace them, and more seeds if necessary to start from scratch. 

Snapped flowers from wind damage

It's my poor tomato plants that I'm most worried about. I always do well with tomatoes, I think the climate in this area is very good for them, and I'm always confident that they'll grow well. I have a few in pots to the side which aren't looking too bad, but the ones planted in the middle of the vegetable patch have had their leaves literally blown off and they are also stunted due to the cold. They aren't quite dead, but I'm just hoping that they have it in them to recover!

Poor tomato plants in cold and wind

Fortunately, having replaced most of our fencing over the last couple of years we've not lost any more this time around, so that's something to be thankful for. I'm hoping that all we need is a bit of warmer weather and sunshine to really get things going. The forecast looks good for later in the week, so I'll be charging up the hedge trimmers and pulling on the gardening gloves!

Monday, 24 May 2021

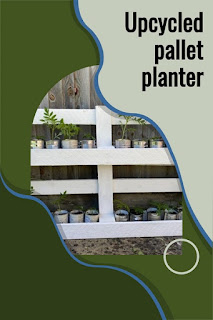
Making a very simple planter from a pallet

My pallet planter is a project which had been on my to do list for far too long! This pallet was delivered along with our piano, which thanks to this blog post I can date back to February 2016. It was a nice pallet, made from new wood although a little splintery, and I wanted to make something cool but kept putting it off.  

Tutorial for upcycled painted pallet planter

I decided that this was the year that I would make something from it! I browsed Pinterest for ideas, but because all pallets are different shapes and sizes I found it difficult to find something that I could copy. I also tried to take the pallet apart but it needed a lot more strength than I have, so I needed to come up with something that would use the original shape of the pallet. After some success growing marigolds in old tin cans last year I thought that the dimensions of the pallet would be perfect for holding tin cans, and so I came up with the plan to build a simple pallet planter.

I'm not much of a woodworker, and I am rather lacking in tools. After looking at the pallet from all angles I decided that I could use a saw to chop it into two pieces and make both a small and large planter. So I chopped off the top, and started by working on the smaller half. I'm afraid I neglected to take a photo of the pallet before I hacked away at it, I think because I didn't really believe that the project would work!

Pallet cut into two pieces to make planters

I sanded the pallet down, then I painted it with two coats of a white emulsion paint that we had left over in the garage. I'm sure that it's not the correct paint to use for outdoor paintwork, and also not the correct paint to use on bare wood, but I was going for a sort of shabby chic look so I thought that I'd try it out. I found that although it was a rather glaring white to start with, after it had been outdoors for a few weeks the colour had faded and it was looking less bright, which I liked. It is open at the bottom so the tin cans rest on the floor, and it's a perfect size.

Small pallet planter painted white

Marigold plants in tin cans in a white painted pallet planter

Then there was a change in the weather and I didn't much feel like working outdoors in the cold, so my project became a little neglected. In the meantime I continued collecting tin cans (yes we eat a lot of passata) and planting them out with a variety of different marigolds. I planted marigolds in tin cans last year and found that they worked really well, so I'm hoping that they will do as well this year! Each row holds twelve cans, so I needed thirty-six cans filled with plants in total. 

Marigolds planted in tin cans

With warmer weather in the air I turned my attention to the larger half of the pallet. My problem was that although I could stand pots on the floor at the bottom, I needed something underneath to hold the cans on the upper layer. My problems were solved with a strip of wood that I found behind our summerhouse last year and had been using across a flowerbed to keep out the cats. I think it may have fallen off a trellis at one point. I nailed it in underneath the upper section and it makes a nice solid shelf.

Pallet planter with strip of wood to hold tin cans

Then I gave the pallet a good clean, and sanded it down as well as I could, before painting it with the white emulsion. It took me ages to paint - over an hour! But it looked good when it was all done. 

White painted pallet for planting

Then I tried it out in a few spots in the garden before settling on the final position by the fence at our side gate. I grew marigolds here last year so I know that they will grow well, it gets a good mix of sun and shade and it is sheltered from the wind. I can also see it easily from the kitchen window, where I seem to spend a lot of time. I've fixed it to the fence by looping some thin wire around the fence panels and pallet, and it seems a sturdy yet easily removable solution.

Pallet painted white for tin can flower pots

Finally I could fill the planter with my tin cans full of marigold and other plants that I've been growing. They've been getting a bit spindly as I've kept them inside for so long due to the cold weather, so hopefully they will bush out a bit!

Painted upcycled pallet with plants in the garden

I'm hoping that it won't be too long before I have some flowers, and then I can move the cans around a bit to make sure that I have a nice even spread of heights and colours.

Small simple pallet planted painted white with tin cans

I'm so pleased with my free pallet planters, and it wasn't nearly as much work as I was expecting!

In the autumn when the flowers have died I can empty out and recycle the tins. For next year I plan to start saving my tin cans earlier on, especially now that I know how many I'll need. I want to have a go at decorating them a bit more, maybe with some bright spray paints, stickers, fabric or with some Hama bead flower decorations. I'm hoping that it will last for a good few summers to come. Now I just have to stop myself looking out for more free pallets to hoard in the garage for years!

Upcycled pallet planter for the garden

Friday, 21 May 2021

Using AI to generate blog post titles

Recently Harry and I were watching some YouTube videos together and we came across this one which was a lot of fun to watch. The video is about using AI to come up with ideas for new video content, and surprisingly many of the ideas would actually work really well. (And Tom Scott is well worth a follow by the way, he's published some fascinating videos on a whole range of topics!)

Harry was fascinated by the whole idea, and he took it upon himself to generate some new blog post ideas for me using DeepAI. He entered in all my blog post titles since March 1st this year to see what the AI would come up with. I've picked out some of my favourites below!

Some blog post ideas which were complete nonsense

Swinging on ice and snow with my dogs

My Christmas gift for April - update

Review - Tinted Shapes

Releasing 3D for children

A few which came surprisingly close, with just slight mistakes

How New York City got me interested in cross stitch 

My birthday in March - update

I'm getting sick of writing and I can't stop 

How we can take our children off the leash and help them be a productive participant 

How I decided to be an adult this year for over a year 

How my work will improve my day 

The ones that would actually work pretty well as blog posts

The day-to-day routine of a family 

My plan to do a lot more activities this fall 

My new blog

We’re having a year break now

My training schedule and strategies 

Tin to flower pot 

And finally, the ones that inspired me to think about writing an actual post!

Our kids are now in school. This is amazing!

What does my daughter think of my blog posts?

What Roblox says about parents

My advice for kids - making the most of the holidays 

A look at my new "I did" journal 

We had a lot of fun looking through this list (there were many more that I've not included here!) and he's been using the tool to come up with all sorts of things. He had a lot of fun generating potential new book titles from his favourite authors, along with blurbs and reviews of these imaginary books. It's also fun to produce paragraphs of vaguely sensible text based on random complete and unfinished sentences that you type in. 

If you use it to make up some new blog or video titles I'd love to hear how you get on!

Wednesday, 19 May 2021

Hama bead flower magnets

Hama bead flower magnets tutorial diy

Following on from my tin can flower with Hama bead flower decorations, I was looking around for different ways that I could use these sweet Hama bead flowers. I realised that they would make lovely magnets! So here's a little tutorial for Hama bead flower magnets. 

I made my flowers using the Hama bead small flower pegboard. It's not easy to buy this pegboard individually but is can be bought as part of this three board set - Flower, Pony and Princess pegboard set (affiliate link). I used just the top flower part of the design, not the leaf area. 

If you don't own this specific pegboard then that's not a problem at all. If you scroll to the bottom of this post I have included some similar flower designs using the small square and hexagonal pegboards which most Hama bead crafters will own.

Hama bead small flower pegboard designs
 
If you are new to Hama beads, you might want to have a look at this post - Ironing tips for Hama beads. I like to iron my beads lightly so that you can still see the holes in the beads, and while they are still warm from ironing I leave them resting between some heavy books for just a few minutes so that they cool flat. Then it's time to turn them into magnets!

Hama bead small flower pegboard to make magnets

I've made Hama bead magnets using a variety of different adhesives and magnets and I've found that the most successful method is to use magnetic tape (affiliate link). You can cut it to size and then peel off the backing to stick to the back of the Hama bead design. This won't produce a very strong magnet but it will stay firmly attached to the plastic beads. If you want to make a stronger magnet I have also had success with a small neodymium magnet (affiliate link). Through trial and error I have found that the best way to attach these magnets is with a glue dot, although a glue gun also works well.

Simply affix a small strip of magnetic tape to the back of the magnet. You might find that the magnetic tape curves away slightly even when stuck down after being rolled up tightly. To prevent this I flatten the finished magnets underneath some heavy books for a day or two to make sure that the magnet will lie flat.

Hama bead flower magnets tutorial

If you don't have a small Hama bead flower pegboard then you can make similar looking flowers using both the hexagonal and square Hama bead pegboards. Here are a couple of designs that you could use:

Hama bead flower on hexagonal pegboard

Hama bead flower on square pegboard

If you are looking for some more ideas using the small Hama bead flower pegboard then you might also like these Hama bead craft ideas:


Hama bead flower magnets tutorial

Monday, 17 May 2021

Some 5* books that I've read recently

This post contains Amazon affiliate links

I've been reading a lot lately. I'm taking full advantage of our local library offering free reservations, and now that they are open for browsing I'm popping down every week and returning with a bulging bag of books.  

I read a mixture of books - books which I've heard about and reserved and books that I pick up off the shelves while browsing. Both methods can be a bit hit and miss, but in general I tend to choose books that I at least finish, even if they don't become one of my top reads. 

But some books keep me thinking, both while I'm reading and long after I've finished, and these are the ones that earn a 5* rating on my Goodreads account. So I thought I'd share a few books that I've given five stars to recently, both old and new, in case anyone is looking for some reading inspiration! All of these were borrowed from the library.

*  The Remains of the Day by Kazuo Ishiguro - This was my absolutely stand out book, the best book that I've read in a long, long time. It was published in 1989 and I can't believe I'd never picked it up before, especially when I've enjoyed other books by this author. I think perhaps I've seen posters for the film and that had put me off. I'm finding difficult to describe exactly why this book grabbed me in the way that it did, because the description of the book, the memoirs of an ageing butler from a large house, doesn't necessarily sound that appealing. But I loved the description of life in a country house between the wars, and in particular the way that the narrator told so much of the story by leaving so much unsaid. I found that it reminded me somehow of Rebecca by Daphne du Maurier, which is another one of my very favourite books. Definitely recommend this one!

*  Klara and the Sun by Kazuo Ishiguro - This was the newly published book that inspired me to add The Remains of the Day to my reservation list, and it's another excellent read. This one is a science fiction book, dealing with artificial intelligence and genetic modification. It's a lot like Never Let Me Go by the same author, which I also love, in that it drops you straight into a story set in a world similar to our own yet slightly different. It's told as though you already know exactly what's going on, and then things are gradually revealed to you over time. It's a really poignant story, and left me with a tear in my eye at the end.

*  The Foundling by Stacey Halls - I was keen to read this after enjoying The Familars, and this book was even better. Historical fiction, it's set in London in the 1750s and follows a young woman who leaves her illegitimate newborn baby at London's Foundling Hospital because she can't afford to care for her. Having saved her money for six years, when she returns to collect her she is told that she had already claimed her baby, just one day after leaving her. I really enjoyed the mystery of the story and seeing how all the loose ends tied together.

*  This Lovely City by Louise Hare - This was on the new books shelf, and having passed it by one week I'm so glad that I picked it up the following week! The book is set in post WW2 London and tells the story of some of the Windrush generation that arrived from Caribbean countries to help with Britain's post-war labour shortage. They were British citizens, coming to the country to help it rebuild, only to discover when they arrived that they were treated as second class citizens, subjected to appalling racism, and only able to take the most menial jobs, if indeed they could find a job at all. The book deals with a local tragedy, with the fingers of blame immediately pointed at the new arrivals, and there are plenty of twists and turns along the way. It covers similar issues to Small Island by Andrea Levy, which is another fantastic read.

*  Stolen by Deborah Moggach - I must admit that I wasn't sure about this one when I first picked it up, but it was worth it. Deborah Moggach is the author of The Best Exotic Marigold Hotel which I really enjoyed a few months back, and I'll definitely be looking out for more books by this author. It's the story of a woman who marries a Pakistani man, and after he discovers her affair he leaves the country and takes the children to live with his family in Pakistan. It's completely heartbreaking, and of course you can't help but to imagine what it would be like to find yourself in this position. I found it a gripping read, desperately wanting to know what would happen to the family, and although it's not based directly on a true story I know that it's a situation that many people find themselves in. 

Do let me know if you've read any good books lately that you think I should read!

Friday, 14 May 2021

Summer crazes past and present

The other day, my children mentioned that a number of their classmates were in possession of a new and exciting item. Apparently Pop It fidget toys are the latest school craze. My children know that I'm too soft, and so when they found me some on sale for only a couple of pounds I caved in and bought them one each. 

I must admit they are actually quite fun and satisfying to play with. They are made of soft silicon plastic and you push the blobs in and out from side to side. It's a bit like colourful bubble wrap, but it can be used over and over again, and it makes a satisfying popping sound which has become the new soundtrack to our school run.

Pop It fidget toy rainbow square

I've always been a sucker for summer crazes, and it always does seem to be around summer time that these things appear. I have fond memories from when I was at primary school and it was all about the yoyos, each branded with different soft drinks. I remember my Mum taking me to the corner shop to buy one, and I loved playing with them on the school field. I also remember the special red and yellow plastic skipping rope that I had to have, and the soft squishy balls with faces that we all collected.

So I know what it's like when everyone else has something and you want to be a part of things, and I think that it's a definitive part of the primary school experience. Over the last few years the children and I have enjoyed spinning fidget spinners, crafting with loom bands and taking to the streets to play Pokemon Go. There were also those Sainsbury's Lego cards that we collected for a couple of years running, leading to strangers from Facebook coming to the door to swap for those last elusive cards.

It's all inexpensive fun, and hopefully they'll remember their own indulgent Mum when they've grown up!  

Summer crazes past and present

What summer crazes do you remember from when you were little? Did you have a yoyo too?

Thursday, 13 May 2021

Four ways to help your kids to express themselves creatively

This is a collaborative post

For many kids, being creative is a breeze and comes naturally. For others, though, it is not always so easy. Children who tend to be shy or reserved may find it difficult to express themselves through creative works, but that doesn’t mean they should miss out on all the benefits of healthy self-expression. 

Creative self-expression is more than just a fun way to pass the time. It’s an important part of development, especially for young children. Little ones who have not yet experienced excessive peer pressure have not yet felt forced to shut themselves down in order to fit in. By teaching your child about the importance of self-expression—and showing them how to express themselves creatively—at a young age could prevent them from sacrificing their personal likes for the sake of conformity. And when kids maintain their likes and express themselves in their own ways, they are less likely to fall victim to low self-esteem and depression as they get older. 

From using diamond painting supplies to create beautiful works of art to participating in a dance class, there are several things you can do to help your kids learn to express themselves creatively. Keep reading to learn more! 

1. Encourage an Interest in Art

Diamond painting in progress

It is no secret art is a great way to express oneself. From drawings and paintings to theater and dance, the arts encompass many things, all of which are excellent for self-expression. Even if your child does not perceive themselves as “artistic,” there are types of art appropriate for anyone. 

Diamond painting is an excellent option for a child who would like to create beautiful images but has not yet mastered the art of painting or drawing. Diamond art kits come with everything needed to make captivating mosaic artwork regardless of age and artistic skill. Similar to both cross-stitch and painting by numbers, this project involves placing colored resin “diamonds” in specific locations on a printed adhesive canvas. The gems may look random when viewed up close, but from a distance, diamond paintings reveal landscapes, characters and other images and designs. 

If your child is bursting with energy and needs an outlet, the creative arts may be a better choice. Enrolling them in a dance or theater class is an excellent way to help them burn off excess energy while allowing them to express themselves on the stage. Who knows? Enrolling your son in a dance class today could lead to him being a broadway star a few years from now! 

2. Support Their Style

Child dressed for a party

Kids have very little control over many aspects of their lives. They have to go to school, eat the food you purchase and prepare, tag along when running errands, do their chores… The list goes on and on. While parents control many aspects of their children’s lives in order to keep them safe and ensure they are on the right path in life, the lack of control can take its toll. This is especially true as kids get older.

One thing you can let your kids control is their personal style. Clothing is a type of self-expression, and it is smart to let your kids wear what they want (within reason). Let your kids pick out their own clothes and wear what makes them feel good. If they look a bit silly, so what? Your child’s style will evolve as they age. Allowing them to experiment with different looks is an excellentand relatively harmlessway to encourage self-expression. In time, allowing your child to choose their own style can boost their confidence and self-esteem.

3. Offer Choices

Child in library choosing a book

It may seem insignificant, but something as simple as allowing your toddler to choose which book they’d like to have read to them at bedtime is an important step in encouraging them to express themself. Let them show and tell you which books, toys and other things are their favorites, and encourage them to enjoy the ones they love most. Even letting your child decide between two pairs of shoes in the morning rather than choosing them yourself allows them to express themself in a small way. 

As they get older, give your kids choices when redecorating their bedrooms, choosing where the family goes out for dinner or planning outings and vacations. Encourage them to speak up and tell you what makes them happy. And remember not to put down their suggestions even if you don’t think they are as great as your child does. It’s important to make them feel like their thoughts and ideas are valid. 

4. Encourage Exploration

As a parent, it can be frustrating when your child wants to try dance class one week and join the soccer team the next. Before you force your child to stick with the first hobby they picked, though, take a deep breath and remind yourself that your child is still learning about their likes and dislikes. Allow them to try different activities and hobbies to find the ones they enjoy most instead of forcing them to stick with something they hate. 

Browse websites or brochures together instead of choosing things yourself. Again, offering choices is an excellent means of encouraging self-expression. Let your kids try new things, and don’t be upset when something doesn’t work out. Even adults don’t always enjoy the things they think they will. Why should we expect a five-year-old to? 

The Bottom Line

Learning self-expression is vital to a child’s development. Unfortunately, many kids never learn how to express themselves in ways they enjoy. Encouraging your kids to express themselves from a young age is an excellent means of helping them grow into happy, confident and well-adjusted teens and adults. The suggestions above are just a few of the many things you can start doing today to help your child express themselves creatively. You may need to get creative yourself, too, to determine the way that works best for your unique son or daughter. 

Wednesday, 12 May 2021

My problem with Twitter

One of my goals for May was to not go on Twitter. So far so good! But I thought I'd share a little bit more about why I wanted to make that my goal.

I've been using Twitter since 2011 when I opened up an account to use with my fledgling blog, as a way to share posts and connect with fellow bloggers. Over the years I've followed many people and gathered a reasonable number of followers myself, albeit mainly through hosting giveaways a few years back and making a follow one way of entering. 

But it turns out that, for me, Twitter is terrible for promoting my blog. I've spent hours scheduling several tweets per day in advance, I've been a part of groups that tweeted out each other's posts and I've sent extra tweets whenever I published a new post. Despite the fact that I do generally get some interaction if ask a question or tweet about something that I've been up to, it's very rare that someone actually clicks on these links, and it's definitely not worth the effort.

So I had been pretending that I was using Twitter 'for work' when the impact was negligible. I enjoy using Twitter to see what people are chatting about and to follow trends, but the truth is that my mindless scrolling had become a very negative influence on my mental health. I was experiencing guilt at not using my time more productively and I was unable to cope mentally with the huge amount of often contradictory information that I was absorbing. I could feel my anxiety increasing the longer that I scrolled, but I just wasn't able to turn away. 

Hands holding a phone and scrolling through Twitter
Photo credit Marten Bjork

There's always something new on Twitter and you never know what you might find. Even if you've read all the recent tweets from people you follow (of course you can never get to the actual end of your feed!) you can then go into the trends and find more tweets to read there. And if you get involved in a conversation you have to hang around and wait for replies, so you have more opportunity to scroll mindlessly.  

There is only lady in particular that I'd been following since my early blogging days. At the beginning of the pandemic she was retweeting informative tweets that put a positive spin on things. But gradually as the months have progressed her feed has spiralled into one filled with misinformation, not just about the pandemic but also covering vaccinations and the US elections, before moving on to debate over the various fringe QAnon conspiracy theories. 

It was like a car crash, and I just couldn't stop looking. I would go into her feed several times a day to see what the latest topic was, read the comments by her followers and the people she was following, while feeling my tension and anxiety rise by the minute. Even when I unfollowed her I could still find her feed by searching for her name and I just couldn't tear myself away.

So this was the final trigger that told me I needed to take a break from Twitter. I'm still allowing myself to follow a link to a tweet from a news source or if shared by a friend (I think that has happened once and I can't even remember what it was) as long as I don't click away from that tweet. 

And I know it's still early days, but I've not missed it at all. I just need to try my very best to make this new habit permanent, as I know how easy it would be to get sucked back in!

Monday, 10 May 2021

My current cross stitch project - Olde World Map by Janlynn

This post contains Amazon affiliate links

I thought I'd share a little bit about my current cross stitch project! I'm working on the Olde World Map by Janlynn (affiliate link) which was purchased as a kit a year or two back. It's a full kit containing everything that you need, with a completed size of 18" by 15".

I started the kit in December 2020. Sometimes when I start a long term craft project like this I set myself a vague deadline, thinking about when I'd like to see it finished, but there's no rush with this one, I just want to enjoy the process. I can see it taking several years to complete.

So far I've almost finished the left hand circular part of the map and I've started working on the background in the lower left of the design going into the wide border. I always start my cross stitch in the middle to make sure that the design is centred on the cloth, then I like get the borders in place so that I can see how the design is going to take shape.

Olde World Map cross stitch kit by Janlynn in progress

I spent more time than I usually would sorting out this kit before I got started. I wound all the different coloured threads onto individual cardboard bobbins and then sorted them into small plastic bags based on their colour. I normally just leave the threads on the cardboard holed sorter that they come on and end up with a huge tangled mess, so this has made a big difference. 

Also for the first time I made myself a copy of the pattern to work from, in case I lose the original. It also means that I can mark the pattern if I need to. In some places it's not the easiest pattern to follow, and in particular some of the backstitch is quite difficult to work out. There are also lots of half stitches, and sometimes it's difficult to see which thread you should be using, so you have to guess a little bit.

It's an interesting design to stitch, with a variety of different types of stitching. There are full coverage areas, parts with lots of similar colours where need to pay close attention to the pattern while you stitch, and repetitive outlines and backstitching that you can work on while there are other distractions around you.  

Janlynn Olde World Map cross stitch kit review

I really love the design and I'm enjoying working on it. I think it's going to look really good when it's finished, and I've already lined up a spot for it on the wall of our dining room!

Friday, 7 May 2021

Tin can flower pots with Hama bead decorations

Upcycled tin can flower pots with Hama beads tutorial

I've been collecting old tin cans for a while now as I have a plan to make a tin can planter for the garden this summer. Here's how I brightened up some of the cans with a simple Hama bead flower design!

Tin can flower pots upcycled with Hama bead flower decorations

For this design I used the Hama bead small flower template. It's expensive to buy individually but is available as part of this lovely set of boards - Flower, Pony and Princess pegboard set (affiliate link). I chose to make my Hama bead flowers using just the top flower part of the design but there would be plenty of space on the tin can to add in a design including the leaves. 

If you don't have this specific pegboard then that's not a problem at all. Just scroll to the bottom of this post where you can see similar flower designs using the small square and hexagonal pegboards. There is also a large flower pegboard which is commonly found in Hama bead sets. Although bigger, this pegboard would also work really well, especially if you want to decorate a larger tin or planter.

The petals of the flowers can of course be made in any colour or design that you choose. I made mine using pastel Hama beads. The best value way to purchase these is in a Pastel mix Hama Beads bucket (affiliate link) which contains a massive 10,000 beads, plenty to keep you going! You can also buy bags of Hama beads in individual colours if you are working on a specific colour scheme. 

Hama bead flower designs on pegboard

To create your Hama bead flower simply place the beads onto the board. When you are happy with your completed design you need to iron the beads so that they fuse together. If you are new to using Hama beads you might find this post helpful:


If you are looking for some different designs using this small flower pegboard you might like my Hama bead flower wreath where I tried out some different bead patterns.

Hama bead completed flower designs

When you've made as many Hama bead flowers as you will need then you can glue them to the tin cans. If you are using the plant pots indoors then a blob of Blu Tack or a large adhesive glue dot will be sufficient. If you want to use the plant pots outdoors then you will need some stronger glue. I'd recommend using a glue gun as you can make a large blob of glue to compensate for the curve of the tin.

Hama bead flowers

I made my flower designs in a range of different colours so that they will have a colourful impact when viewed together.

Upcycled tin cans decorated with Hama bead flowers

I really like how the bright colours contrast with the colour of the tin. I can't wait to see how they look in my tin can planter when it's finished! I've planted my pots with marigolds, I grew marigolds in tin cans last year and they worked really well. They will be kept indoors for now and placed outside when the weather has warmed up, probably mid to late May. If you wanted you could punch drainage holes at the bottom of the tin, although mine have been fine without them.

Plant pot with Hama bead flowers

Hama bead flower tin can decorations

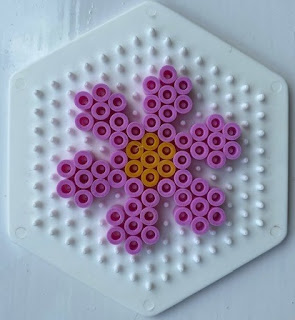
If you don't have a small flower Hama bead pegboard then you can easily make some similar flowers using either the hexagonal pegboard or the square pegboard. Both of these pegboards are readily available and are often included as part of Hama bead starter kits. 

Small Hama bead flower design on hexagonal pegboard

Small Hama bead flower design on square pegboard

If you are looking for more ideas using the small Hama bead flower pegboard then you might also like these Hama bead craft ideas:


Upcycled tin can flower pots with Hama bead flowers tutorial