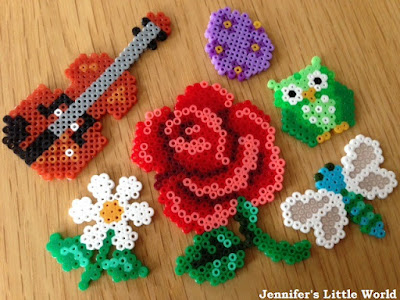
Hama bead supplies and equipment - what you need
To create a Hama bead project you need some Hama beads and a pegboard to lay out your design. You will also need an iron and some ironing paper. There are many Hama bead kits available that contain everything you need along with themed inspiration and ideas, but personally I prefer to buy my supplies separately and use them to work on my own projects. This means that you can buy the extra colours that you need (I seem to use a lot of black and red!) and over time you can build up a collection of different shaped boards. As for the ironing paper, baking or parchment paper that you can use for baking both work perfectly.
Hama beads are available in three different sizes - Maxi, Midi and Mini. The Maxi beads have a diameter of 10 mm and are aimed at young children completing their first Hama bead projects. The Midi beads measure 5 mm in diameter and are the most common size of bead. These are the beads that I most often work with, and they are suitable for both children and adults to use. The smallest beads are the Mini beads, and with a diameter of 2.5 mm they really are very tiny. It's easiest to manipulate them with tweezers, and they are definitely more suited to teenagers and adults as they are very fiddly to use.
If you are new to Hama beads I would recommend starting with the Midi beads. You can buy these beads in large tubs of beads in a range of colours, and the tubs often include a few pegboards to get you started.
If you are looking to buy a pegboard or two I'd recommend starting with a square, hexagonal and circular board as these will allow you to create a wide range of designs. The pegboards can be used over and over again, as long as you are careful not to over iron your projects (see more ironing tips for Hama beads below)
You might also want to take a look at my Hama bead gift guide for some more Hama bead inspiration.
Hama bead supplies and equipment - where to buy
I used to buy most of my supplies in my local craft store until they discontinued the range. Since then I buy most of my beads on Amazon as I find that they are the most reasonably priced, especially for the larger boxes. It's definitely worth keeping an eye out as the prices can fluctuate widely.
Hama beads can be expensive and sometimes it's tempting to look at the cheaper non-branded alternatives. In general I'd advise steering clear of these imitations, as the quality is very poor and they can be difficult and disappointing to work with.
However an exception is the Picture Beads sold by Hobbycraft. I've used lots of these Hama style beads and found that they are nearly as good as branded Hama beads. Hobbycraft sell their beads in mixed bags of related colours, like blues and greens, and they are much cheaper, especially if you catch them on special offer. They are exactly the same size as branded Hama beads and can be used interchangeably with your Hama beads and Hama branded pegboards.
I have also bought Perler branded beads when on holiday in the US and found that these work very well, although they are slightly more brittle in texture once ironed. Perler beads are available in a wider range of unusual colours as well as striped beads, so they are good for adding a bit of interest to a piece.
Hama bead kits
If you don't want to commit to buying too many supplies, or you are buying a gift for someone as an introduction to Hama beads, you might want to think about starting with a kit. There are so many available, and I've put a selection below. Some of the kits have very specific theming, for example based around Disney characters, and others are more general. In my experience the kits contain far more beads that you will need for the projects suggested, so if you find a kit on sale then it can be a good value way of building up your Hama bead collection.
Tips for working with and ironing Hama beads
To create a Hama bead project you just position the beads on the pegboard in your design. There is plenty of inspiration online including lots of projects right here on this blog. For example my entire year of themed Hama bead crafts! If you are creating your own design, make sure that all the beads touch each other, and preferably on more than one side. This is particularly important if you want to create a more durable item like a keyring or coaster.
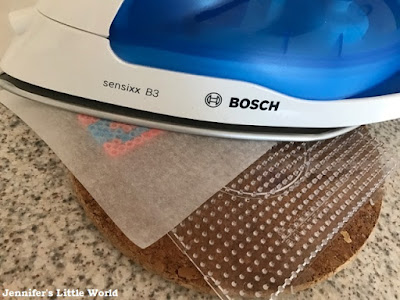
Then just lay a sheet of ironing or baking paper over the beads and press lightly with an iron to fuse the beads together.
I've shared some detailed tips for ironing Hama beads here - Ironing tips for Hama beads. In general you want to make sure that the iron is not too hot, that you keep the iron moving continously over the beads, and that you don't iron the design for too long - just a few seconds is enough before doing a quick check. When you can see the colour of the beads showing through the paper then that's a good indicator that it is ready.
It's a matter of personal preference as to how much you iron the beads. I like to leave the holes in the beads visible but some people like a smoother look. Just be careful not to over iron as this will make the beads impossible to remove from the board, and may warp and damage the board.
I like to iron my designs on both sides to make them more sturdy. Once I've ironed my design I place it underneath something heavy for a few minutes. This ensures that the finished design lays flat, which is particularly important for larger pieces.
How to store your Hama bead supplies
I like to sort my Hama beads by colour, and I store them in segmented storage boxes. I like the ones that can vary the sizes of the compartments, depending on how many beads I have in that colour. You can find some more of my tips here - How to organise Hama beads. If you want to sort your beads by colour it can be quite a tedious task, albeit a satisfying one! I found a brilliant tutorial for a simple Hama bead sorter which definitely looks worth a try!
I store my Mini Hama beads in pill organiser boxes which I find are the perfect size and make it easy to remove the beads.
I store my pegboards upright in a shoebox so that I can easily flip through to find the one that I need.
Some simple Hama bead projects to start with
I have loads of ideas for Hama bead projects right here on my blog! You can take a look at my dedicated Hama beads page for some inspiration.
You might like to make a start with some Hama bead mandala style patterns on a circular board, maybe experiment with some different Hama bead coaster projects or perhaps have a go at some Hama bead emoji magnets.
Hama beads for adults - Mini Hama beads
If you are an adult looking to craft with Hama beads you might be interested in taking a look at the Mini Hama beads. I've written a full guide on working with the Mini beads which you can read here - Mini Hama bead crafts - a guide
Because the Mini beads are so small they allow you to create some really detailed and intricate projects, and are a very satisfying craft to work on.
I hope that this article has been helpful if you need some help using Hama beads, or if you are thinking about trying them!


No comments:
Post a Comment
I love reading your comments!