Ad - I received some craft items in exchange for this blog post.
I was recently challenged by Viking to celebrate World Book Day. I was asked to recycle pages from old books in a craft that brought one of my favourite books to life.
My mind flew immediately to a book which I particularly love - Gone With the Wind. I had an ancient paperback on my shelf, which was losing its pages and impossible to read. Having recently repurchased the book for my Kindle the old paperback was redundant anyway, so I decided to celebrate some of my favourite passages by upcycling the old pages into two simple recycled book crafts - a set of bookmarks and a framed picture.
Bookmarks made from old book pages
Bookmarks are the obvious choice when it comes to a book related craft! They are great to use yourself or to give away as gifts. I made a set of three bookmarks using pages from the book, embellished with silhouette images that relate to the pages that I chose.
I tried to choose pages from the book that resonated with me, and that I felt conveyed a good sense of the book. So I have the page with the famous quote 'My dear, I don't give a damn', a page describing Scarlett O'Hara as she chooses a dress for the barbecue gathering, and a page describing Scarlett as she surrounds herself with admiring beaux, in order to make the one that she has her eye on jealous. This gave me three themes for the bookmarks - Scarlett and Rhett as a couple, her collection of extravagant dresses, and Scarlett herself.
My book pages were very thin, so I mounted them on some black card to make them sturdier, using the same card that I used for the silhouettes. I used a glue stick, as this is a dry glue that won't make the paper warp. You don't need much glue as the lamination will hold it all in place.
Then I found some silhouette images that matched the themes that I had in mind. For the page about the dresses I used a punch in the shape of small bow which matched the theme perfectly.
To see how I transferred the silhouette images to the card see my short tutorial below. They are then cut from thin black card and glued into place.

Then I laminated the bookmarks and cut them out, making sure that the corners were rounded so they aren't too sharp.
Finally I punched a hole in the top of the bookmark and looped through some red ribbon. A blob of glue on the knot of the ribbon will make sure that it stays firmly in place.
Postcard size book page artwork with silhouette
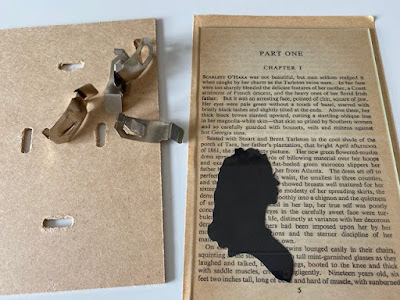
For my second recycled book craft I decided to make a small framed picture using a page from the book. I chose to use the very first page from the book as it mentions Scarlett O'Hara immediately and is a good introduction to the book.
I found a silhouette image of Scarlett, or you could easily create your own using art from a book or film. To transfer the image to the paper I used the same method as for the bookmarks, detailed below, then I cut it out using small sharp scissors.
To assemble the picture I carefully removed the glass from my clip frame and used it to work out where I wanted to position the page from the book and the silhouette. Then I glued the silhouette image carefully in position using a glue stick, before cutting the rest of the book page to size.
I'm really pleased with my recycled book crafts, they are a great way to see some of the most famous pages from one of my favourite books every day.
You can see how others have interpreted the challenge by taking a look at the #VikingWorldBookDay hashtag on social media.
Tutorial - How to transfer an image to create the silhouettes
This is a method that I remember from school! The black card that I used is white on one side which helps, but it will still work with coloured paper or card.
1 - First trace your image onto tracing paper (you can also use baking paper from the kitchen), either from a printout or directly from a computer screen. Make sure that you have a nice strong outline.
2 - Turn the paper over, place it onto some scrap paper, and scribble over the back of the outline that you have drawn.
3 - Turn the tracing paper back the right way up and position it where you want to transfer your image.
4 - Draw back over your original lines. You should be left with a faint impression of your drawing, which you can go over again if necessary. The tracing paper image can be reused several times, handy if you make a mistake!
I was given a box craft supplies by Viking to inspire me with my crafting.


No comments:
Post a Comment
I love reading your comments!