Pages

Wednesday, 26 February 2020

Gone with the Wind - Recycled book crafts for World Book Day

Ad - I received some craft items in exchange for this blog post.

Recycled book crafts using Gone with the Wind

I was recently challenged by Viking to celebrate World Book Day. I was asked to recycle pages from old books in a craft that brought one of my favourite books to life. You can see a sweet example from Viking here - Aslan the lion book craft.

My mind flew immediately to a book which I particularly love - Gone With the Wind. I had an ancient paperback on my shelf, which was losing its pages and impossible to read. Having recently repurchased the book for my Kindle the old paperback was redundant anyway, so I decided to celebrate some of my favourite passages by upcycling the old pages into two simple recycled book crafts - a set of bookmarks and a framed picture.

Bookmarks made from old book pages


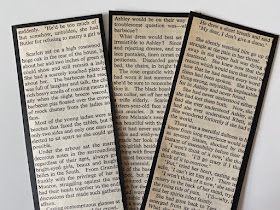
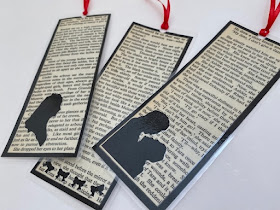
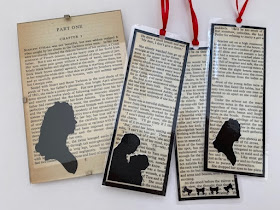
Bookmarks are the obvious choice when it comes to a book related craft! They are great to use yourself or to give away as gifts. I made a set of three bookmarks using pages from the book, embellished with silhouette images that relate to the pages that I chose.

I tried to choose pages from the book that resonated with me, and that I felt conveyed a good sense of the book. So I have the page with the famous quote 'My dear, I don't give a damn', a page describing Scarlett O'Hara as she chooses a dress for the barbecue gathering, and a page describing Scarlett as she surrounds herself with admiring beaux, in order to make the one that she has her eye on jealous. This gave me three themes for the bookmarks - Scarlett and Rhett as a couple, her collection of extravagant dresses, and Scarlett herself.


How to make bookmarks from old book pages

My book pages were very thin, so I mounted them on some black card to make them sturdier, using the same card that I used for the silhouettes. I used a glue stick, as this is a dry glue that won't make the paper warp. You don't need much glue as the lamination will hold it all in place. 

Making bookmarks from old book pages

Then I found some silhouette images that matched the themes that I had in mind. For the page about the dresses I used a punch in the shape of small bow which matched the theme perfectly. 

To see how I transferred the silhouette images to the card see my short tutorial below. They are then cut from thin black card and glued into place. 
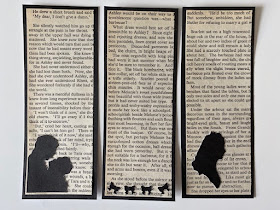
Gone with the Wind themed bookmarks


Then I laminated the bookmarks and cut them out, making sure that the corners were rounded so they aren't too sharp.

Making book marks from old book pages

Finally I punched a hole in the top of the bookmark and looped through some red ribbon. A blob of glue on the knot of the ribbon will make sure that it stays firmly in place. 

Laminated book marks made from old book pages

Postcard size book page artwork with silhouette


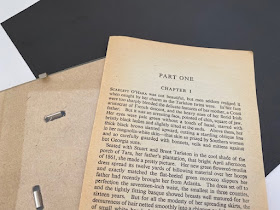
For my second recycled book craft I decided to make a small framed picture using a page from the book. I chose to use the very first page from the book as it mentions Scarlett O'Hara immediately and is a good introduction to the book.

Using old book pages for crafting

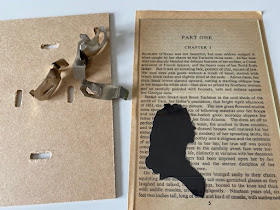
I found a silhouette image of Scarlett, or you could easily create your own using art from a book or film. To transfer the image to the paper I used the same method as for the bookmarks, detailed below, then I cut it out using small sharp scissors.

Gone with the Wind book crafts tutorials

To assemble the picture I carefully removed the glass from my clip frame and used it to work out where I wanted to position the page from the book and the silhouette. Then I glued the silhouette image carefully in position using a glue stick, before cutting the rest of the book page to size.

Gone with the Wind framed book page craft

I'm really pleased with my recycled book crafts, they are a great way to see some of the most famous pages from one of my favourite books every day.

You can see how others have interpreted the challenge by taking a look at the #VikingWorldBookDay hashtag on social media.

Recycled book crafts - Gone with the Wind

Tutorial - How to transfer an image to create the silhouettes


This is a method that I remember from school! The black card that I used is white on one side which helps, but it will still work with coloured paper or card.

1 - First trace your image onto tracing paper (you can also use baking paper from the kitchen), either from a printout or directly from a computer screen. Make sure that you have a nice strong outline.

2 - Turn the paper over, place it onto some scrap paper, and scribble over the back of the outline that you have drawn.

3 - Turn the tracing paper back the right way up and position it where you want to transfer your image.

4 - Draw back over your original lines. You should be left with a faint impression of your drawing, which you can go over again if necessary. The tracing paper image can be reused several times, handy if you make a mistake!

How to transfer an image using tracing paper tutorial

I was given a box craft supplies by Viking to inspire me with my crafting.

Friday, 21 February 2020

Simple crafts to celebrate Spring

Simple crafts to celebrate Spring for children and adults alike

I always cheer up when I begin to see the signs of Spring, and a great way to celebrate the return of warmth and colour to the world is by working on some simple crafts which you can use to cheer up your home, and to celebrate with some Spring flowers before they appear in the garden! I've rounded up some of my favourite Spring crafts which are perfect for working on with young children, or even for yourself.

You can see the pictures below, and just click the links to be taken to the full instructions.

I love this Hama bead flower wreath, made using the small Hama bead flower board. I used a selection of pink and purple pastel beads, then finished the wreath with some green craft foam and a ribbon for hanging.

Hama bead Spring flower wreath

These Decorative bird planter sticks are great for brightening up your plant pots and can be as simple or as intricate as you like! You just need some cardboard, feathers and sticks, it's a great craft for toddlers.

Decorative bird planter sticks craft

Another use for the Hama bead small flower peg board, these little Hama bead flower bouquets are very sweet and would look great as a Spring decoration or perhaps on the front of a greetings card.

Hama bead Spring flower bouquet craft

If you are planning a Spring picnic, why not use the Hama beads to make some Spring themed napkin rings in a selection of cheerful colours! It's really easy to shape the Hama beads into the form of a ring, and you can come up with all sorts of different patterns and designs.

Spring themed Hama bead napkin rings

I love my Fabric covered decorative plant pots, made using old flower pots and scraps of flower patterned fabric. Finished with a ribbon and some embellishments they are a great way to brighten up a windowsill or sheltered corner of the garden.

Fabric covered plant pots craft


This Spring themed pen and pencil pot is a classic toilet roll upcycle craft and makes a really useful desktop accessory. It can be blinged up using cheerful stickers and sequins to bring some colour to your desk.

Upcycled cardboard tube pen and pencil pot craft

Finally, this Mini pot of Spring flowers craft might keep you going until you can find some real Spring flowers to put in a vase! It's really easy to make and can be as simple or as garish as you like!


I hope that I've inspired you to add some Spring crafting cheer to your life!

Sunday, 16 February 2020

Not yet too old...

...for a teddy bear's picnic in the front room!

Circumstances have seen us spending a lot of time at home as the half term holiday starts. Sometimes when everyone is climbing the walls you need to mix things up a bit, so for lunch I did a throwback to something that I used to do when the children were tiny - a living room picnic!

I call this patchwork quilt our indoor picnic blanket. It's a mini duvet cover that my Mum made for me when I was a baby! I spread it out on the floor, put out the cakes and biscuits we made earlier in the day, and then I just laid out some little bowls of chopped fruit and veg. I let the children set themselves up on the blanket while I made them some sandwiches, and I came in to find them sitting there with Harry reading a story to Mia and the favourite teddies.

After we'd finished, Mia asked if we could have a picnic for lunch every day and I heard Harry saying something that he's heard me say - that it wouldn't be as special if we did it every day! Now I just need to think of more ways that we can do the usual daily things differently to make it special!

Picnic in the front room with teddies

Monday, 10 February 2020

Some books to keep you going through the Winter

This post contains Amazon affiliate links

Winter isn't my favourite season. I have lots of ways that I try to keep myself happy and motivated when it's cold and rainy - I even made a list of my favourite things to do in Winter.

Something that I really love to do is to snuggle up under a blanket with a good book, and I have a few non-fiction favourites that I regularly turn to for inspiration, gorgeous pictures, and motivation. I thought I'd share some of them here - these are all books that I can personally recommend as I own them and have re-read each of them many times!

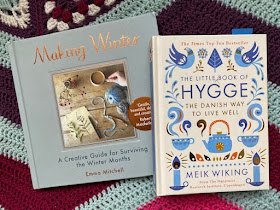
Making Winter: A Creative Guide for Surviving the Winter Months by Emma Mitchell (affiliate link). This lovely book was recommended and bought for me by my sister. It's a chunky hardback packed with beautiful pictures and creative activities for Winter, including recipes, crochet patterns and drawing. It presents a good balance between getting yourself out into the fresh air to spend time enjoying nature at this time of year, and then retreating into your snug home under a blanket with a hot drink and some baked goodies. It inspired me this year to pull out a sketchbook and my old watercolours, and to appreciate the beauty of the season.

The Little Book of Hygge by Meik Wiking (affiliate link). I love reading books about Hygge and I love this author, I have his other books too which I can fully recommend! It's a small format book so easy to carry around the house with you, and it also has some lovely pictures. It's great to pick up and put down if you just fancy a quick browse, and there are some lovely tips for introducing Hygge into your life, not just during the winter but all year round. I particularly love the idea of creating a Hygge kit within easy reach containing favourite books, chocolates, comfy socks and so on.

Books to keep you going through the Winter

The Life-Changing Magic of Tidying by Marie Kondo (affiliate link). I've written several times about how I've used the Marie Kondo method in my home, and even though I feel like I'm fairly decluttered I still enjoy picking up the book from time to time and having a look through. It's helps me to feel inspired for the decluttering urge that I usually find is stronger over Winter, after the excess of Christmas and spending more time in the house.

The Year of Living Danishly by Helen Russell (affiliate link). I love this book about the author's first year spent in rural Denmark, when her husband takes a new job with Lego. It begins appropriately in January during a long, cold and dark winter with a chapter about discovering Hygge and Home, and as I follow her journey through the year it gives me hope that the warmer months are on their way!

I hope that you enjoy my suggestions, I would recommend each and every one of these books!

Friday, 7 February 2020

How to Break up with your Mobile Phone by Catherine Price - book review

How to break up with your mobile phone book review

Recently I've been reading How to Break Up With Your Phone: The 30-Day Plan to Take Back Your Life by Catherine Price (affiliate link), and it struck such a chord with me that I thought I'd share my thoughts about the book here.

I've written many times about my relationship with my phone, taking part in Scroll Free September and so on, but it was reading this book that really made me understand how addictive smartphones can be, how they are designed to keep you scrolling, and the impact that this has on your life and your relationships with those around you.

The slim book is divided into two halves - The Wake Up and The Break Up. The first half of the book is fully designed to shock and scare you. Very early on you are encouraged to take the Smartphone Compulsion Test, 15 questions about your smartphone usage. You can take the test for yourself here - Smartphone Compulsion Test. As the author agrees, it's a dramatic test, and the vast majority of people will answer more than 8 questions with a 'Yes' and discover that they qualify for psychiatric evaluation. But it doesn't mean that it's not useful in making you think about how you use your phone.

The Wake Up section continues by discussing topics such as how phones are designed to addict us and the tricks that are used by app developers to do so, how your phone affects your attention span, messes with your memory, causes stress and anxiety. It's a frightening read, as it's designed to be, and it definitely gave me plenty to think about. My children are getting to the age when they will be getting phones soon, and I'm going to make them read this section before they get one!

The second half of the book - The Break Up - is a 30 day guided plan to create a new relationship with your phone, and I followed it pretty closely all the way through. It's a simple plan to follow, and it doesn't require much of a time investment each day. In fact I had already taken some of the actions required, like turning off notifications and using a tracking app.

The plan eases you in very gently, and it really encourages you to think about your relationship with your phone. For example, what you love about your phone and what you don't love, what changes do you notice in yourself when you spend a lot of time on your phone, and thinking about why you are reaching for your phone at certain points during the day or when you are experiencing various emotions.

One of the key parts of the plan is to have a Trial Separation, a full 24 hours away from your phone. I must admit that this is something that I didn't do. It fell over a weekend when we were very busy with my son's birthday treat out, and it wasn't possible for me to turn my phone off completely. I would feel very anxious without access to my phone at any time in case of a family emergency. But I made sure to only use the phone for calls and messages.

I found the plan a lot easier to follow than I thought that I would. I do use my phone for many useful things throughout the day - my shopping list, camera, the FitBit app and so on - but I was astonished to find how much I noticed the time that I wasn't spending on my phone.

The biggest single thing that worked for me - and for many others according to the case studies in the book - was deleting the social media and news apps from my phone. When I knew that there was nothing on the phone that I could scroll through mindlessly, the urge to check it faded completely.

To my surprise, the days suddenly began to feel so much longer. I had plenty of time to carry out my daily tasks, and one thing that really picked up was my reading. I've read an astonishing number of books so far this year! And I've been able to concentrate on them fully, no reading a few pages and then picking up my phone to see what's new. I've also been working on my craft projects, and spending more time one on one with the children, particularly at bedtime.

In addition, I discovered that although I spend a fair bit of time at my computer as part of my work, the urge to check Facebook had faded even though I had put no restrictions on my use of social media from the PC. I had got into the habit of opening up another window to check social media when I got bored with what I was doing, but I found that I no longer needed to or wanted to.

Having completed the 30 day programme I really do feel that my relationship with my phone has changed incredibly. It's not that I'm having to concentrate on not using my phone, I just don't feel the urge to pick it up as much as I used to and I'm perfectly content to leave it in another room where I can't see it. I'm really hoping that I can keep it up, because I think that it would be very easy to slip back into old habits. So I'm recommending this book to everyone, and I'm keeping it handy by my desk to act as a reminder to continue being aware of my phone usage!

If you are concerned that you may be spending too much time on your phone and are missing out on the real world, or you are concerned for someone else in your life, I would absolutely recommend giving this book a read. 

Wednesday, 5 February 2020

Hama bead heart bunting decoration

Hama bead heart bunting tutorial

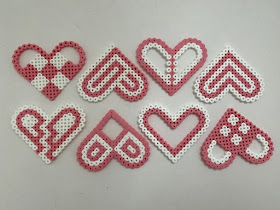
A few years ago I made a selection of Hama bead hearts and put them together to create a Hama bead heart hanging decoration. This year I decided that my Valentine's Day decor was in need of an update, and so I reused some of these Hama bead hearts, along with a few new ones, to create some simple Hama bead bunting that I can use to decorate our mantelpiece.

Hama bead heart bunting on the mantelpiece

These Hama bead hearts are made using the small Hama bead heart board (affiliate link). The board doesn't use too many beads and can be used for both simple and more complex designs. It's a great activity for young children to help improve fine motor skills and let them come up with their own imaginative designs. I made my heart designs using pink and white beads, red beads would also work well.

I find that the best value way to buy Hama beads is to buy a large tub of mixed Hama beads (affiliate link) and along with other colours this tub contains the pink and white beads that I have used. But if you only want beads in certain colours you can also buy bags of colours individually. 

I ironed the designs on both sides so that they were firmly fused together but still had open holes in the beads.

Related post - Ironing tips for Hama beads

Hama bead heart completed designs

Then I looked through the designs and came up with a layout that I thought would work well with a balance of colours and shapes.

Hama bead heart patterns

I used some narrow red ribbon (affiliate link) to join the hearts together. I used a sharp needle to thread the ribbon through the top of the heart in two places. I had tried to leave the holes as large as possible while ironing, but I've found that even if the hole is closed on one side the beads are usually soft enough that you can push a needle through them.

Hama bead hearts threaded on to red ribbon to make bunting

On my mantelpiece I have some small Command hooks (affiliate link) fixed up permanently which I use to hang fairy lights and bunting throughout the year. All I needed to do was to make a small knot in the end of the ribbon and hook it through to display the bunting.

Hama bead heart bunting tutorial

I love the way that I've been able to re-purpose my Valentine's Day themed Hama bead hearts and make something pretty to gaze at while I'm sitting in the living room!

If you liked this Hama bead craft, you might also be interested in my other Hama bead crafts for Valentine's Day

Monday, 3 February 2020

My January completed project - Heart cross stitch

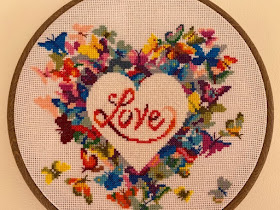
When I wrote about my crafting plans for the year ahead, I shared how I was intending to work on one unfinished project each month, with the goal of completing it during that time. I'm pleased to say that January got off to a good start with my first project finished - the Heart Love cross stitch by Awesome Pattern Studio

I only started this project in mid December so I've not been working on it for long, but I bought the pattern a while ago at the beginning of last year and was waiting until I'd finished my Christmas cross stitch sampler before I started it. 

The design is a simple heart surrounded by butterflies, but it wasn't so simple to work on at first - there are lots of different colours which make up random groups of stitches and it was very easy to miscount and make a mistake! I used thread from my stash, trying to match the colours in the pattern as well as I could, so it looks slightly different to the original. I'm really pleased with how well the colours work together.

Awesome Pattern Studio cross stitch heart completed

I agonised for ages over how to frame the finished work. When I originally saw the design it was displayed in a circular hoop, but when I bought the pattern the image on the front of the pattern shows a square frame. I decided on the circular frame but I haven't cut the fabric at the back I've just sewn it across, so I could re-frame it as a square in the future if I want to. My photos really don't do the piece justice, the colours are really vibrant and I love seeing them.

Heart cross stitch by Awesome Pattern Studio

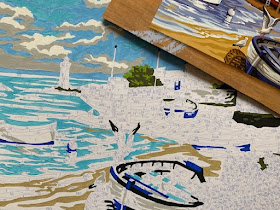
Now I can go for a complete change of craft and work on completing my next unfinished project - this paint by numbers seaside scene! I find painting very relaxing, and although the paint by number kits can be quite fiddly and don't end up looking quite like the picture on the box, I am enjoying the process of painting it. Hopefully I'll be back with a completed post at the end of February!

Paint by numbers seaside scene in progress