This post contains an Amazon affiliate link.
I'm busy working through my crafting to do pile, and this weekend I picked up a mini Hama bead kit which I've been looking forward to working on - the Small Mini Bead Owl Kit (affiliate link). Although I often come up with my own Hama bead designs I also like working from kits - there are some really sweet ones out there!
The Owl kit contains everything that you need to make the four different owl designs - a hexagonal mini Hama bead pegboard, ironing paper, easy to follow pattern and plenty of beads. Enough beads in fact to make a few more owls, so you don't need to worry if you lose any. The only other thing that you would find useful for the craft is some tweezers, as they make positioning the beads much easier. You can find lots of tips for using the mini Hama beads, as well as a tutorial video, in my blog post here: Mini Hama bead crafts - A guide
Mini Hama beads can be quite tricky to iron and even though I've used the beads before I still had a few mishaps! It's important to have the iron on a low setting and not heat the beads for too long as they melt very quickly. Unfortunately I have a tendency to be over cautious and not iron for long enough, meaning that the beads fall apart when I remove them from the pegboard - it's a very fine balance to get it right!
Related post - Ironing tips for Hama beads
Once finished, these owls would make lovely magnets, or you could even turn the smaller ones into pin badges like these Mini Hama bead heart badges. But I wanted to have them on display, as I like the fact that there are two adult owls and two child owls, reminding me of the members of our family.
I cut a small piece of poster board to an appropriate size (it measures about 18cm by 8cm), and mixed some acrylic paint to a shade of green that coordinated well with the colours of the beads. I painted a couple of coats, and when it was all dry I stuck the owls to the board using glue dots, which I've found work really well for mounting smaller and lighter Hama bead pieces. When mounting ironed Hama bead pieces, make sure that you choose the best side as sometimes the beads on one side will look better than the other.
I wanted to display the picture on my magnetic white board so I used some magnetic tape on the back, but you could just use blu tack or similar to stick it up as it's still very light.
I'm really pleased with my sweet little owl picture!
If you liked this mini Hama bead craft, you might also like my Mini Hama bead Russian Doll picture which is made using mini Hama beads in a wide variety of colours, and mounted on a cardboard background in a similar way.
Pages
▼
Wednesday, 30 October 2019
Monday, 28 October 2019
Hama bead gifts for adults
With Christmas approaching fast, if you want to get creative and craft some of your own Christmas presents it's definitely time to be thinking about it. A few weeks ago I shared a blog post with some Hama bead projects that children can gift to their friends, and so I thought that I'd follow this up with a post on Hama bead projects that make great gifts for adults.
Some of these crafts are brilliant for children to make for the adults in their life, but there are also some projects, particularly those using the tiny mini Hama beads, that are fun to make for your own adult friends that can be both useful and decorative!
Related post - Ironing tips for Hama beads
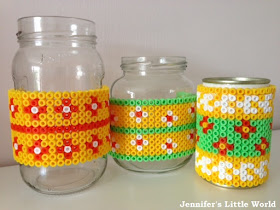
These Hama bead covered pen holders are really easy to make, and take advantage of the way that an ironed Hama bead piece is pliable while still warm and can be moulded into different shapes. The Hama beads are ironed as a flat design, and then curved to fit the shape of the jar or tin before being glued into place. They are a fun way to brighten up the desk, and also make useful storage.
I love the Tiled Russian doll picture that I made a few years ago, and it sits on a small wooden easel above my desk. It's a really nice decorative piece, and the mini Hama beads make for a really intricate design. I think a picture like this would make a lovely and unusual gift!
Related post - A guide to mini Hama beads
I also used mini Hama beads to make these Mini Hama bead decorative plant markers. They were fun and simple to make, and a great way to brighten up plant pots.
Another decorative piece that I love is my Hama bead quilt style picture. This picture was a way to use up the odds and ends of Hama beads in different colours that we had left over from various kits. I keep it in the bathroom and it makes me smile while I'm brushing my teeth! A small child could easily put together a picture like this which would look lovely framed, and you could help them out by letting them choose from a selection of Hama beads in colours which work well together and which suit the recipient's decor.
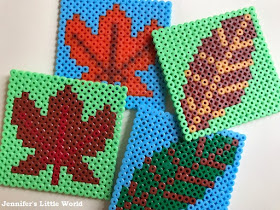
Coasters are always useful, and I've written a whole post with lots of different designs for Hama bead coasters, also with different themes like Halloween or Easter. A set would make a lovely gift!
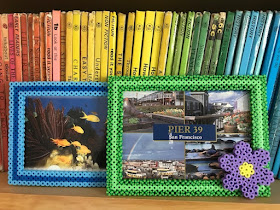
Hama bead photo frames are another good present that children can make for adults, and they can then be gifted containing a photo of the child, or a relevant print or postcard. I've made several different types of Hama bead frames over the years, and I think that these cheerful summer themed ones are my favourites so far.
And if you think that your adult recipient would also enjoy crafting with Hama beads themselves, you might like to point them towards this blog post - Ten Hama bead projects for adults!
Friday, 25 October 2019
A Halloween picture with Hama bead sugar skulls
I love using Hama beads for seasonal crafting, especially when I can make something decorative that can be brought out and reused year after year. Inspired by my Hama bead witch display which was created using some spare Hama bead witch designs, I decided to make a similar spooky picture featuring some Hama bead sugar skulls.
First I made lots of these simple Hama bead sugar skulls, using just the square pegboard and a selection of different coloured beads. It's a good way to use some odds and ends of different colours that have been accumulated from various kits!
Related post - Ironing tips for Hama beads
Then I chose my favourite four skulls to use for the sugar skull picture, trying to pick ones with a nice balance of different colours. I placed them onto some white poster board and measured a suitable size for the background. Then I cut it out and painted it black. I used children's poster paint, and painted a couple of coats.
When the paint was dry I used glue dots to attach the Hama bead skulls firmly to the background - two per skull should be plenty. It's best to lay the design out first and work out the best position for the skulls before you start sticking them down, as they need to be lined up as well as you can. Also make sure that you are displaying the best side of the Hama beads, sometimes some of the beads melt more than others which can make it look uneven.
This setup works perfectly for me, but if you wanted a more permanent display you could use a glass photo frame to keep the Hama bead picture dust free and to make it look more professional.
It will look great on the mantel piece this Halloween!
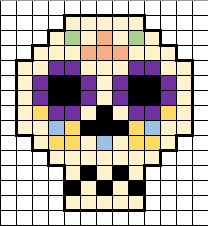
Here is the design for the Hama bead sugar skull:
If you liked this craft you might also like my other sugar skull themed crafting posts:
And if you are looking for more spooky Halloween crafts using Hama beads then you might like this post - Hama bead crafts for Halloween
Wednesday, 23 October 2019
My ten most popular Hama bead craft posts
I've been writing about Hama beads for a long time on this blog. Recently I was sorting through some old posts and decided to have a look and see which ones were my most popular!
I discovered that I've written over 50 posts which are solely about Hama beads, and many many more where they get a mention. Interestingly, the most popular post of all isn't a Hama bead craft post. It's my post full of Ironing tips for Hama beads!
So here, all in one place, are my ten most popular Hama bead crafts.
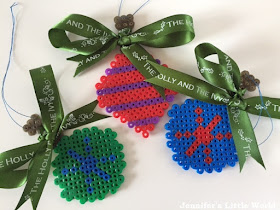
10 - In tenth place are my Christmas ribbon and Hama bead bauble tree ornaments. These are simple to make and look really effective on the Christmas tree, especially when teamed with some festive ribbon.
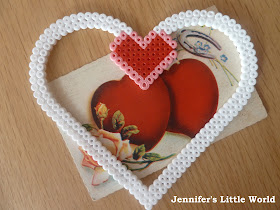
9 - Hama bead heart frames. A great way to display a favourite photo, or to send as a Valentine's Day gift. You can add a magnet to the back so that it can be displayed on a fridge or other magnetic surface.
8 - Minecraft Hama bead keyrings. These were very popular when we used them as party bag gifts for my son's Minecraft themed party. We've also used the same designs to make fun magnets.
7 - Different Rangoli to make with children for Diwali. This post isn't solely about Hama beads, but it does contain a variety of different designs in different sizes so I thought that it was worthy of inclusion. We use these rangoli designs as coasters and food mats for Diwali.
6 - Mini Hama bead decorative plant markers. I love these little plant markers for cheering up plant pots around the home. Working with mini Hama beads lets you make some really intricate designs, it's a great craft for adults.
Related post - A guide to Mini Hama beads
5 - Hama bead Roman mosaic border designs for children. My daughter is studying the Romans this term, we may have to make some of these for her creative homework!
4 - Some more mini Hama bead projects. Again finding out that the mini Hama beads are popular with crafters too! These were my first mini Hama bead projects, made using a couple of kits and an ideas booklet.
3 - Hama bead elephants. My Hama bead elephant designs have always been popular, especially this version of Elmer the elephant!
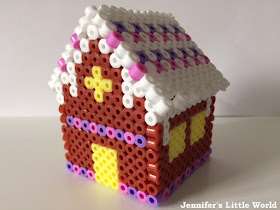
2 - A 3D Hama bead gingerbread house. My Hama bead gingerbread house always sits on the mantelpiece at Christmas, I keep meaning to get around to making a whole village of them! In my post you can see instructions for the different parts that you need to make and assemble.
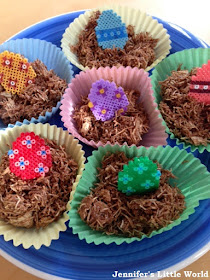
1 - And in first place, we have the Mini Hama bead Easter Egg cake toppers! This was a really quick craft that I made one Easter when I had lots of mini Hama beads in different colours and was looking for a fun way to use them. They could also be used as embellishments for Easter cards or decorations.
You can find many more Hama bead projects on the Hama bead page of my blog!
Monday, 21 October 2019
Simple iced Halloween gingerbread biscuits and cookies
I love gingerbread biscuits, and this Halloween I decided that I'd have a go at some Halloween themed iced gingerbread cookies. I must admit that I'm not very well practised when it comes to icing, so I was quite pleased with the results!
Below is the recipe that I used, it's the best one that I've tried so far. The dry and wet ingredients are in the correct proportions, and the biscuits keep their shape well while cooking.
Ingredients:
450g plain flour
2 tsp ground ginger
1 tsp bicarbonate of soda
115g unsalted butter
5 tbsp golden syrup
150g soft light brown sugar
1 large egg
Royal Icing sugar and water to decorate
Method:
Preheat the oven to 180C and grease baking sheets.
Sift the flour, ginger and bicarbonate of soda into a large mixing bowl.
Put the butter, golden syrup and brown sugar into a saucepan and heat until the butter has melted.
Stir the wet ingredients in to the dry ingredients, add the egg, then mix to a firm dough.
Roll out the dough and cut out your shapes. For these biscuits, I used a circular cutter (for the spider webs), a gingerbread man (for the skeletons and mummies), and and Easter Egg (for the skulls). Place onto the baking trays.
Bake for 10-15 minutes until golden brown.
When the biscuits are cool they can be iced. I used powdered Royal Icing and added enough water to make a thick icing, then I used a piping bag to ice. I came up with four different designs - the mummy and the skeleton use the gingerbread man base, and the spiders web is drawn on a circular biscuit. The sugar skull uses the Easter Egg cutter turned upside down, which I think works really well!
As I'm a bit of a novice when it comes to icing, I kept the designs very simple. The mummies were definitely the easiest, and once I'd got the hang of the spiders webs they weren't too tricky either. The sugar skulls took a bit more practice but I was pleased with them once they were done - I'd like to have another go at them using some different colours of icing!
These would be great to share at a Halloween party or as party favours for guests.
A whole heap of Halloween themed iced biscuits!
Friday, 18 October 2019
The children don't want my old books
As a child I was a voracious reader. I read many, many books, and each week at the library I would bring home many more. I had my favourites of course, which I would read over and over again. Many of my childhood books left a lasting impression on me, and I still remember situations and quotes from books which had a particular resonance.
So when I had children of my own I was naturally keen to foster a love of reading by sharing my favourite books. I kept whole shelves of my favourite books, and if I spotted others that I remembered in book shops or charity shops I would pick them up and put them to one side. Recently I've even been buying up some of my childhood favourites in the hope that I can entice the children to sit down with them.
Unfortunately I've discovered that they just aren't that interested. Harry did read a few of my Enid Blyton's when he was younger, but they never gripped him in the way that they did me. Instead, he has selected Rick Riordan as his author of choice, and will quite happy read through the Percy Jackson books with the same intense devotion that I had for Mallory Towers.
I've found a slight ally in Mia. Although she isn't very interested in reading the books herself, she's quite happy for me to read them to her. Very possibly she is just humouring me, and making the most of my undivided attention, but I'm going to milk it for as long as I can. We've just finished Charlotte Sometimes and are now working through Tom's Midnight Garden - both books which I loved and I hope that she enjoys too. Otherwise, most of my old books have been banished to a separate bookshelf upstairs.
The only books of mine that Harry has shown an interest in are the books aimed at children which I bought and enjoyed as an adult. For example the Harry Potter series and the His Dark Materials trilogy by Philip Pullman. I am a bit surprised. I know that I read lots of books that belonged to my parents, and was always interested in books that I found around the house. Maybe they just have so much exposure to books of their own and at school that they aren't stuck for things to read.
Did you keep your old books for your children? And do they read them?
Wednesday, 16 October 2019
Crafting for a Halloween Disney cruise
This year we are lucky enough to be enjoying a themed Disney Cruise - Halloween on the High Seas! These Halloween cruises take place each year across the Disney cruise ships over the Halloween period. There will various live shows and entertainment on board, along with some trick or treating, and although we've experienced a Disney themed Halloween before at Mickey's Not So Scary Halloween Party and at Disneyland Hong Kong for Halloween, this will be our first themed cruise.
I've written before about how much I have enjoyed crafting for this Disney cruise. Disney cruise line is definitely set well apart from other cruise lines when it comes to decorating stateroom doors or organising gift exchanges with your fellow passengers, and I've had a lot of fun entering into the spirit of it all. I've tried to make a special effort by putting a Halloween twist onto the things that I've made, and so I thought I'd share them here in once place.
Related post - Disney Halloween cruise pixie dust ideas
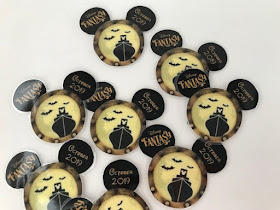
I'm planning to distribute lots of Pixie Dust on this cruise. Pixie Dust is a small gift which is given out to fellow cruisers without the expectation of receiving something in return. I started by making these little magnets. Each one measures about 6cm across and I came up with the designs myself. I used the Halloween on The High Seas logo and added the ship name and cruise month. They are printed on glossy paper, cut out and then laminated, with a small magnet glued to the back. I'll be going around with the children and sticking these on to random doors.
Related post - Crafting for a Disney cruise
I've written before about how much I have enjoyed crafting for this Disney cruise. Disney cruise line is definitely set well apart from other cruise lines when it comes to decorating stateroom doors or organising gift exchanges with your fellow passengers, and I've had a lot of fun entering into the spirit of it all. I've tried to make a special effort by putting a Halloween twist onto the things that I've made, and so I thought I'd share them here in once place.
Related post - Disney Halloween cruise pixie dust ideas
I'm planning to distribute lots of Pixie Dust on this cruise. Pixie Dust is a small gift which is given out to fellow cruisers without the expectation of receiving something in return. I started by making these little magnets. Each one measures about 6cm across and I came up with the designs myself. I used the Halloween on The High Seas logo and added the ship name and cruise month. They are printed on glossy paper, cut out and then laminated, with a small magnet glued to the back. I'll be going around with the children and sticking these on to random doors.
I used similar graphics to make these laminated Halloween on the High Seas bookmarks. Again they feature the logo, the ship name and dates. Then I punched a hole in the top and threaded through some orange and black ribbon, knotted in place and secured with a blob of glue. Some of these will be given as gifts to specific families, others will be handed out to random staterooms.
I've never really got into Disney pin trading, which is a very popular hobby. However on our last cruise I did take a few pins along and enjoyed swapping them with people that had created a pin trading board to hang outside their stateroom door. I was inspired to create my own and came up with this fabric Disney pin trading board. The fabric means that is quite light, so it should hang easily on the front of the door, even with the weight of the pins. I've added Halloween ribbons and pumpkins, but these could be removed if we are lucky enough to enjoy a different cruise in the future. Although the fabric isn't a Disney print, I think that the subdued tones match the Halloween theme quite well.
It works on an honesty system so I won't leave too many pins out at once and I may bring it in overnight - hopefully people will enter into the spirit of it fairly and won't take a pin without leaving one!
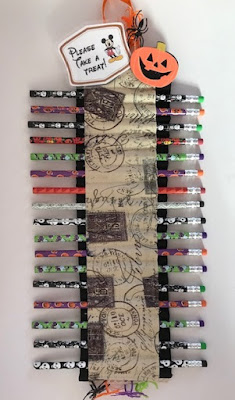
I used some similar fabric to make this pencil and treat holder. I stocked up on Halloween themed pencils in the sales last year, but the holder can also be used for lollipops, glow sticks, straws, or any kind of candy that is long and thin. I hope that people have fun choosing something to take!
I can't wait until our cruise, and having all this crafting to keep me busy has certainly helped me to enjoy the long wait that we've had!
Related post - Crafting for a Disney cruise
Monday, 14 October 2019
Mini Hama bead sugar skull earrings
I love working with mini Hama beads. The mini Hama beads are tiny, about a third the size of the standard beads, and they are placed onto specially sized boards. It's difficult to manipulate the beads with your fingers so I use tweezers to set them down into place - once you've got the hang of the technique you can work very quickly. The mini Hama beads are available in a huge range of colours, and you can use them to create some really intricate designs.
Here's how I used mini Hama beads to make some Sugar Skull earrings. This is the design that I used, once you've put the skull features in place you can use a range of different colours to complete the design.
When ironing mini Hama beads you need to take a little extra care as they melt very quickly. I use the iron on the lowest setting, and I don't hold the iron on the beads for very long. For this project you need to make sure that the hole at the top remains open so that you can push the earring pieces through.
Related post - Ironing tips for Hama beads
I turned the Hama bead sugar skulls into earrings by adding a simple earring hook. The ones that I use have a curved shape that fits perfectly into the top of the beads and holds it nicely in place.
Here is the design for the Hama bead sugar skull:
If you like this craft then you might also be interested in my other sugar skull themed crafts:
If you are searching for Halloween crafts using Hama beads then look no further, I have also published a complete a round up of Hama bead Halloween project ideas.
You may also like these other mini Hama bead projects:
Mini Hama bead decorative plant markers
Mini Hama bead Russian doll tiled picture
Friday, 11 October 2019
When the children start to go to bed later
Since the summer holidays there has been a change to our daily routine.
Since the children were babies we have always done our best to preserve our child-free evening time. From their first few months we've put them down in their own bedroom to sleep at around 7-7.30pm. I must confess that this idea was mainly prompted by that book about baby routines which I'm not going to mention, as it was not at all helpful for my mental health with small babies. But although it didn't work well when they were babies, by the time that Mia had reached her toddler years we did have a pretty good routine with both them fast asleep by 7.30pm or so and a whole evening ahead of ourselves.
But we always knew that it couldn't last forever. We started a new routine a few months back where we still put them to bed at that time and let them read in bed for a bit before they went to sleep, and that worked really well. The bedtime routine was fairly straightforward, because they knew that the quicker they said their goodnights and got ready for bed, the longer they would have to read.
Over the summer however they got into the habit of staying up later most nights. Sometimes they would have a movie night, sometimes they'd be just chilling out reading or watching videos. Now that they are older they are more pleasant and fun to be around in the evenings, and especially with them at school all day I'm not quite so desperate for my alone time.
For the time being we have a bedtime of around 8.30pm, but I can see that it won't be long before it becomes 9pm, then 9.30pm, and soon they'll be going to bed after we do! It does rather mean that our evenings of watching television together are becoming much less frequent. Quite a lot of what we watch is not at all suitable for little eyes and ears, and I need to start watching something early enough that I can not be too late to bed myself!
I'm not looking forward to the teenage years when I can see us having to facilitate their social lives by dropping and picking them both up throughout the evening!
Wednesday, 9 October 2019
Non-edible treats for Halloween trick or treaters
Halloween celebrations here in the UK seem to get bigger and bigger every year. When I was young the only people that went trick or treating were teenagers up to no good, but these days it's very common for parents to take their children trick or treating around the local streets. I live on an estate which over the last few years has become very well known locally as a great place to go trick or treating. Many people go to a great deal of effort to decorate their houses, and the trick or treaters are very respectful, making sure to only call at houses which are decorated and obviously open to visitors.
Not everyone wants to collect loads of sweets when they go out trick or treating though, and if you want to avoid giving sweets to children, or want to cater for children with allergies and dietary restrictions, it's nice to be able to offer something to trick or treaters that isn't sweets or candy. So I thought I'd hunt down some ideas for little gifts which you can hand out that are easy to get hold of and I think represent good value for money. They would also be great as party favours for a Halloween party.
I hope that you find some inspiration!
You might want to hand out gifts at a party, or present them in some kind of packaging. See through plastic bags are good because children and parents can easily see the contents, but if you want to cut down on the use of single use plastic you can also use paper bags - either Halloween themed or just a simple brown paper or stripy paper bag, maybe secured with a Halloween themed sticker.
I always like my children to receive stationery gifts, as they are useful and fun too!
Stickers can be handed out individually to children as a little extra gift, or you could give out entire sheets of Halloween themed stickers.
Trick or treating is more exciting when it's dark outside, and light up toys and accessories are a great way to be seen in the dark!
Halloween themed accessories like rings and bracelets can be re-used year after year.
Of course I had to include some Halloween crafts in my ideas list! There are lots of multi-pack craft items that can be easily split up and handed out individually, like masks and puppets to colour or scratch art kits.
Finally children always love small toys, and they don't need to be Halloween themed. I gave out the padded Emoji Keyrings below as party bag gifts once and the children loved them, I still see them attached to bags around the school!
I hope that I've given you some ideas if you are planning party bags for a Halloween party or looking for something different to had out to the trick or treaters this year!
Related post - Simple Halloween party ideas for children
Not everyone wants to collect loads of sweets when they go out trick or treating though, and if you want to avoid giving sweets to children, or want to cater for children with allergies and dietary restrictions, it's nice to be able to offer something to trick or treaters that isn't sweets or candy. So I thought I'd hunt down some ideas for little gifts which you can hand out that are easy to get hold of and I think represent good value for money. They would also be great as party favours for a Halloween party.
I hope that you find some inspiration!
Gift bags
You might want to hand out gifts at a party, or present them in some kind of packaging. See through plastic bags are good because children and parents can easily see the contents, but if you want to cut down on the use of single use plastic you can also use paper bags - either Halloween themed or just a simple brown paper or stripy paper bag, maybe secured with a Halloween themed sticker.
Stationery
I always like my children to receive stationery gifts, as they are useful and fun too!
Stickers and badges
Stickers can be handed out individually to children as a little extra gift, or you could give out entire sheets of Halloween themed stickers.
Light up toys
Trick or treating is more exciting when it's dark outside, and light up toys and accessories are a great way to be seen in the dark!
Costume accessories
Halloween themed accessories like rings and bracelets can be re-used year after year.
Crafts
Of course I had to include some Halloween crafts in my ideas list! There are lots of multi-pack craft items that can be easily split up and handed out individually, like masks and puppets to colour or scratch art kits.
Toys
Finally children always love small toys, and they don't need to be Halloween themed. I gave out the padded Emoji Keyrings below as party bag gifts once and the children loved them, I still see them attached to bags around the school!
I hope that I've given you some ideas if you are planning party bags for a Halloween party or looking for something different to had out to the trick or treaters this year!
Related post - Simple Halloween party ideas for children
Monday, 7 October 2019
Sleeping under a mountain of teddies
It's not an understatement to say that Mia loves her teddies. Well, not just teddies, soft toys of any description in fact. She's had a few dolls over the years, but she has never really taken to them in the same way as she has something cuddly. In fact, we once bought her one of those fancy dolls that cries and wets itself, and she was just scared of it.
Unfortunately we've rather got in the habit of indulging her with her collecting habits. My husband in particular got into the routine of buying her a teddy every time we went somewhere, and she'd often come back from holiday with two or three new stuffed friends. Not to mention the excessive number of visits that we've made to Build a Bear over the last few years.
The good thing is that she genuinely does love and play with the vast majority of these stuffed creatures. Harry never showed much interest in soft animals (in fact I had a successful cull around the time that Mia was born). But since Mia has been old enough to play properly they still have some lovely games with them, and Harry has brought out several old teddies that have been promoted to constant bed companions.
They both spent quite a bit of time over the summer making an enormous family tree for their soft toys, working out which ones are related to which ones (sometimes a little improbably) and have come up with histories for them. Mia has even written a factual guide to her favourite 'snow white bear', with information about its habitat and preferences.
It was getting to the point where I could hardly find Mia in her bed at night, buried under teddies on all sides. As for changing the sheets, it became such a mission to move them all out of the way and then put them all back, without sending a few through the machine for an accidental bath, that it often put me off even trying.
Things improved greatly when we bought this huge teddy hammock which fits neatly in the top corner of her room, and although there's no way they will all fit there is a fair bit of space for her many favourites. She has a loft bed so they are still within easy reach - although I'm not quite sure how she sleeps at night with all those little faces staring at her!
Friday, 4 October 2019
My new glasses
I recently decided that it was time for an eye test, it had been a few years. A new branch of Specsavers has just opened in my local Sainsbury's along with lots of advertising for free eye tests, so I booked myself in to see how my glasses were doing.
I remember exactly when I bought my old glasses because it was just before Britmums 2013. They are the ones that I'm wearing in all my social media profile pictures, and were a bit of a change from the rimless glasses that I'd been happy with for a few years previously. I wasn't sure at first about the dark frames, but they definitely grew on me and I was very happy with them, so when my prescription barely changed at my last eye test I didn't bother replacing them.
But when I saw the optician this time, she commented almost immediately on how old my glasses were which surprised me, as I didn't actually think they were that old. We went through the test and discovered that my eyes have barely changed - one eye remains the same and the other has got so marginally better as to barely register - but she still wrote me a prescription for new glasses. I had in mind that I wanted some new prescription sunglasses anyway as part of their two for one offer, so I was happy to go along with getting some new ones, although it did feel a bit unnecessary.
But when I went out into the showroom to choose the new frames I could see why she thought I needed new glasses. It turns out that glasses fashion has changed quite a bit over the last few years, and mine were desperately out of date. Glasses are no longer subtle, like they were in the rimless days. They are now enormous and definitely shout 'look I'm wearing glasses'!
I spent a long time agonising, trying to find something a bit less obvious. I finally settled on a pair from the petite range which have a hint of purple to the frames, my favourite colour. The sunglasses were a much easier choice, as at least in that case bigger is definitely better if you want to be able to see in the sun!
I don't like taking selfies, but I don't think that the glasses look too bad! And at least I know that for the next few months at least my style matches the latest in glasses fashion!
And at least they aren't quite as big as the ones that I used to wear once upon a time...


