Pages

Monday, 30 September 2019

Halloween pin badges using mini Hama beads


These little Halloween pin badges are made using mini Hama beads. Mini Hama beads are much smaller than the usual sized Hama beads and they are better suited for older children and adults. They can be a bit fiddly to use at first, but once you get the hang of them you can produce some incredibly detailed and intricate designs.

These Halloween themed designs make perfect little Halloween pin badges to brighten up your Halloween outfit, or to give as gifts to trick or treaters or party favours.

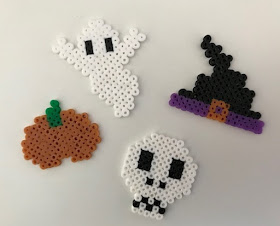
These are the four Halloween designs that I came up with - a ghost, skull, pumpkin and witch's hat.

To help make the designs I planned them out first using gridded paper.

Mini Hama bead Halloween designs

They are made using a square mini Hama beads pegboard and then ironed. The beads are ironed in much the same way as the larger beads, but you do need to take some extra care. I use my iron on its lowest setting and press down only briefly, it takes much less time to iron the beads than you would think.

Related article - Ironing tips for Hama beads

Hama bead Halloween patterns

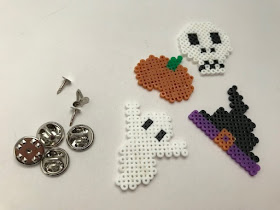
To turn the Hama bead designs into pin badges you need some Pin badge pieces (affiliate link). These come in two parts, a pin which is glued to the back of the ironed Hama bead piece and a butterfly clip which goes onto the pin.

Using pin backs to made badges

I used strong super glue to stick the backing pin to the Hama beads. Not all glue works well with Hama beads but I've found that super glue works well. You just need to be careful when applying it as the glue can leak through the holes in the beads - sometimes it's easier to apply the glue to the backing pin and press into place.

Homemade Halloween pin badges

And there we have it, some sweet little Halloween themed pin badges!

Halloween pin badges with mini Hama beads

If you liked this craft you might be interested in my blog post which is packed with Halloween inspired Hama bead crafts! Click the link below:


Hama bead crafts for Halloween

Friday, 27 September 2019

Settling into the new school year

The summer holidays seem like a very long time ago now!

We only got back from holiday two days before the start of term, so it felt like a sudden transition from sunny beaches and late nights to early starts and school uniform. But we are a few weeks in now and have settled back into our routine.

Harry starts this year in Year 6, which has been a big change for him. He has more responsibility within the school, and he has been made a library monitor which means that he has to go in every morning and do some jobs in the library. He has to take more responsibility for himself and his own things, making sure that he has everything that he needs for the day and coping with a more strict timetable. It's a great way to prepare him for secondary school, although he is finding it all a bit overwhelming at first while he gets used to it all.

Mia is going into Year 4 which is starting to feel quite grown up. She has a proper timetable too which she is really excited about and loves checking to see what she has coming up each day. We've had a few wobbles over the last couple of weeks due to shifting friendships within the class, but I'm hoping that it will settle down.

Children on first day of new term

There are lots of exciting things to look forward to this term. They've both had one school trip already with several more planned, and they are really excited to be taking part in the Young Voices choir at the O2 next year - Harry took part in 2018 and had a brilliant time.

We seem to have got into a routine of letting them stay up a bit later, which I suppose is only natural as they get older but it is impacting our evenings - gone are the days of having them both tucked up and fast asleep by 7pm! Luckily they can be left to read alone in their rooms now before bed, as long as I remember to tell them to go to sleep at some point.

I do like this time of year, the calm period before the madness of the Christmas season kicks in.

Wednesday, 25 September 2019

What minimalism means to me

Keeping on top of decluttering

I declutter clothes every time that I'm packing for a holiday, everything else several times a year. Both mine and those belonging to other people. I always have a charity bag on the go which I can drop off easily at the gym collection point when it's full. I try not to keep the things that have outlived their purpose or that don't make me happy.

Giving everything in the house a home

And returning it to that home when it's finished with.

Keeping the loft empty

All that we have up there is the Christmas decorations and a very few empty boxes for things that we might want to sell in the future.

Being surrounded by the things that I love

All these things combined mean that as far as possible the things that do surround me are the things that I want there - books that I love and will re-read, decorative items that make me smile and have a personal meaning, appliances that I use regularly. Nothing important to me is hidden away where I can't get to it.

Little tray of knick knacks in my home

A simple system for housework

I recently reviewed The Organised Mum book and it's been a game changer for me when it comes to keeping the house in order. Little and often is definitely the way to go, and by making the effort to do that little bit every day, over time I like to think that my house stays fairly tidy and clean.

Not being too fussy about the washing

We don't have many clothes, but I still seem to do plenty of washing! But I always put it away as soon as it's dry, and because our wardrobes and drawers are in pretty good order (apart from my husband's, but that's his business!) it's a lot easier to put things back where they belong. I only separate the white school shirts, with separate loads for bedding and towels just because they fill the machine. I don't bother with extra products like fabric softener or stain removers (unless it's really needed), and only a few shirts get ironed.

Not having many clothes to choose from

I tend to wear the same sort of thing most days - jeans and a t-shirt or jumper depending on the weather - with dressier clothes for special occasions. Because I declutter my clothes regularly, all the clothes in my wardrobe are ones that I am happy to wear. So I don't spend ages deciding what to put on each morning.

Keeping a clear schedule

Both for myself and for the family as a whole. We don't do too many clubs or after school activities (which suits the children very much too) and I don't have many regular commitments. I like to be flexible and make last minute plans, and I also like having the day stretching out before me to fill as I wish.

Diary page close up
Photo credit Eric Rothermel via Unsplash

Having a simple make up routine

Which basically means rarely wearing it, and not on a day to day basis. As I get older and more haggard perhaps I should up my game in this department a bit, but apart from attempting to hide the dark circles under my eyes I don't do a lot more.

Keeping to a meal plan

I don't mind cooking, but I don't like having to decide what to cook, and I worry about having everything that I need on hand. So I stick to a simple repertoire of meals that I can cook easily without too much fuss, while also attending to homework and general child care duties. Luckily the rest of the family are also happy to eat the same favourites over again.

Not having reminders around me of things that need to be done

Like piles of washing that need to be put away, letters that need to be actioned, or dirty plates that need to be washed.

Not forgetting about my digital life

This is just as important I think! I sort through e-mail regularly and use a filing system to keep only a few in my inbox at a time. I have unsubscribed from most mailing lists. I have notifications turned off on my phone, apart from calls and texts, and I keep my apps to a minimum. The photos from my phone are backed up regularly, and digital photos are stored by year, subdivided into holidays, and backed up to the cloud. I probably could do more when it comes to cutting down screen time, although Scroll Free September has been a good start!

You can see more of my thoughts on minimalism here - Minimalism

Monday, 23 September 2019

Hama bead sugar skull bunting

Hama bead sugar skull bunting tutorial

I love crafting for seasonal occasions using Hama beads. Hama beads are brilliant for children to improve their fine motor skills and patience, and I also find Hama bead designs relaxing to work on myself. These simple Hama bead sugar skulls can be adapted using any colours of beads that you have, and are a great way to use up any small amounts odd colours that you have around. I strung the sugar skulls together to make some colourful bunting to celebrate and decorate for both Halloween and Dia De Los Muertos.

Related post - Hama bead crafts for Halloween

Hama bead sugar skull designs

These sugar skulls are made using the square pegboard. Once you've created the white outline and added in the black features you can easily add your own coloured decorations. There's plenty of sugar skull design inspiration online, and I also referred to my diamond painting sugar skull while I was working out a pattern. The good thing is that you can use all sorts of different brightly coloured beads together, you don't need to worry too much about co-ordinating your colour combinations!

When you are happy with the design you need to iron the beads to fuse them. Make sure that you iron them firmly enough so that the beads are completely fused, but leave the holes open so that you can thread the ribbon through for hanging the bunting.

Related post - Ironing tips for Hama beads

Making Hama bead sugar skull bunting

I used a thin black ribbon to turn the sugar skull designs into bunting. You should be able to thread the ribbon through the holes in the top of the skull using a large needle. If the holes have narrowed due to ironing, the beads should still be soft enough that you can easily push the needle through. If not, try warming slightly with the iron to make the beads more pliable. 

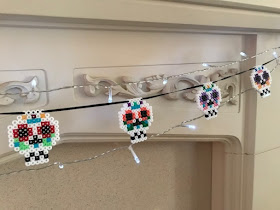
Hama bead sugar skull bunting on fireplace

I have command hooks fixed permanently to the sides of our mantlepiece for attaching different themed bunting throughout the year. The sugar skulls look particularly effective when strung alongside my battery powered fairy lights!

Hama bead sugar skull bunting designs

Here is the design for the Hama bead sugar skull pattern:

Free Hama bead pixel art sugar skull design pattern

If you like this bunting you might also like my other sugar skull themed crafts:


And if you are searching for more Halloween Hama bead crafts then look no further, I have published a full round up of Halloween Hama bead crafts!

Friday, 20 September 2019

Things that I'm currently using up

As I was going about my day to day life the other day, I suddenly realised how many of the consumables that I was using were things that I was working my way through in order to finish them off.

For example...

Shower gel - When the husband gets towards the end of a bottle of shower gel, he can't be bothered to use it up so he just opens a new one. I on the other had will extract every last drop from the bottle, so we usually have two bottles on the go in the shower, one nearly full and one nearly empty.

Shaving foam - I don't use shaving foam, I just use shower gel. But I bought Harry some value shaving foam for making slime with last year, and now that his interest has waned I couldn't bear to throw away the unused can, so I'm slowly working my way through it.

Using up old toiletries

Hot chocolate sachets - My Mum very kindly gave me her stash of hot chocolate sachets purloined from hotel rooms. I saved some to take on self-catering holidays, and I'm busy working my way through the rest. It's nice to try a few different brands!

Hotel moisturisers - Stocking up from hotel rooms runs in the family, and I find it difficult to turn down the toiletries, in particular the moisturiser. Luckily I'm not particularly fussy about the product that I use, and I can't remember the last time that I had moisturiser on my shopping list.

Hotel slippers - Another thing that I can't turn down when I see it in a hotel room. I always wear slippers, even in the summer, and the hotel ones last a surprisingly long time. Unfortunately the tread on the bottom doesn't always, which has led to a few near misses when encountering a puddle on the kitchen floor.

Slippers purloined from hotel rooms

Ryvita - I don't really like Ryvita. But the husband bought some when he was last a health kick which didn't last, so I've got a box to eat up before they expire.

Chocolate yoghurt tubes - I bought the wrong Frubes for Mia, an easy mistake to make I think, as they changed the packing for a recent promotion, and she only likes the strawberry ones. They make a nice snack, although they aren't large enough to be particularly satisfying.

Cling film - This is one that I feel very guilty about. Like most people I want to reduce my use of single use plastic, but a few years ago when I was doing large soft play birthday parties I used to use cling film to wrap up veggie sticks and so on to go in party food boxes. I was always worried about running out, so I used to buy a new roll for each party, leaving me with three 90m rolls to use up. I'm slowly working my way through it for lunchbox sandwiches, and when it's all gone I'll be buying some tupperware boxes that I can reuse.

Luckily these will all get used up eventually, although by then I'll probably have more things that I need to get through!

Related post - Things in the house that I have more than I need of

Disadvantages of not caring for tyres when driving in London (Ad)

This is a collaborative post

Tyre care is essential if you want to prolong the life of your vehicle and also want to save yourself from road troubles. The exterior and interior of car is also important, but that one aspect that makes the biggest difference in your car’s performance – is tyres. Let’s say you live in a local vicinity like London and want to make sure that your car is fit to be on the road – then you need to take special care of the way that you maintain your tyres. Worn out tyres are a hazard and although they might seem like a good cost cutting option in the beginning, if you continue to drive with them, they can put you at risk!

 Let’s see what disadvantages you will face if you choose to ignore the defects in your tyres. 

1. Exposure to penalty points 

The law requires you to maintain the optimum tread level – otherwise you will be exposed to a penalty. In order to be confident about your tyres, you can get help from professional tyre fitters. In London and its surrounding areas there are many different tyre providers and you can find someone closer to you. For instance, if you need tyres in London then visit DAT Tyres as they have good customer recommendations.

2. Your car will need more fuel 

Bad tyres cause the vehicle to increase the fuel consumption and you have to pay more for the fuel. Simple tyre care checks can save you time and money.

3. You’ll be risk prone to road accidents 

Tyres are a point of contact with the road’s surface and without proper grip – your vehicle will not be able to keep its balance. Every year there are so many road accidents triggered by faulty tyres.

Pile of car tyres
Photo credit - Goh Ryh Yan via Unsplash

Wednesday, 18 September 2019

Disney Halloween cruise pixie dust ideas

Pixie Dust ideas for a Halloween Disney cruise

We are very lucky to be departing shortly on a Halloween on the High Seas themed Disney cruise. This will be our fourth Disney cruise, and after dabbling with Pixie Dust on our last cruise, this time I've signed up for a variety of different gift exchanges. I just hope we'll have enough space in our suitcases!

I've written before about the ways that you can add some extra magic to a Disney cruise. To find out exactly what is going on, you need to join the specific Facebook group for your cruise. There will almost certainly be a Fish Extender exchange, where you arrange to exchange gifts with other specific cabins. These gifts have a higher value, and tend to be tailored to the recipients. There will very likely also be plenty of additional exchanges that you can sign up to, for example ornaments, postcards or candy.

Pixie Dust is separate to these exchanges. It's a small gift given without the expectation of receiving anything in return, a way of spreading the fun and excitement of a cruise, and either given completely at random or to people that you spot while on board. On our last cruise the group set up a list of people that were interested in receiving and giving pixie dust, and we also placed lots of magnets on random doors around the ship. People that are taking part in gift exchanges will usually hang a bag or hanging organiser outside their cabin so that gifts can be left easily.

You can see my Fish Extender here - Moana themed Fish Extender.

For this cruise I've made a bit more effort when it comes to pixie dust, so I thought that I'd share a few of the things that I've put together.

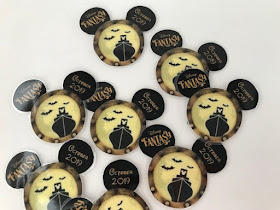
Hama bead Disney magnets - These magnets are part of the cabin gift for my Fish Extender exchange, but they'd also make great pixie dust. They are very simple to make and use only a few Hama beads. I used pictures of the ship we are sailing on, as well as the Halloween on the High Seas logo.

Hama bead Disney themed magnets

I used the same design, this time with Mickey ears in place, to make some simpler magnets. They are just printed onto glossy card, laminated, and with a small magnet attached to the back. They take up hardly any room and are very light, which is a bonus for packing. They are also easy to pop in a bag and distribute around the ship, perhaps to add to doors that take your fancy. All my pixie dust has a small label on the back to explain that it's a gift, along with our cabin number.

Magnets to make for Halloween themed Disney pixie dust

The laminator came out again for these Halloween on the High Seas bookmarks. Again printed on glossy card, they are just laminated with a hole punched in the top and ribbon threaded through. I added a blob of glue to the back of each ribbon to make sure that it stays firmly in place. I've included some of these in my Fish Extender gifts as well, with plenty left over to leave outside random staterooms. Like the magnets, they each have a note on the back to explain that the recipient has been pixie dusted.

Halloween on the High Seas cruise bookmarks for pixie dust

Finally, I've made up some little bags of goodies. I've not decided how to distribute these yet, I may just leave it up to the children! These bags contain a variety of different things that I picked up from Halloween last year and over the last few months - small Halloween trinkets like plastic spiders, erasers and mini notebooks, along with Disney themed bits and pieces like jewellery, nail stickers and nail polish. Each also has some Mickey Mouse head punched confetti in Halloween colours. I hope that they will make someone smile!

Pixie Dust to give out on a Disney Cruise


We had a very long countdown to this cruise, and the fun of preparing for the different exchanges and putting together little gift bags has definitely helped to build the excitement! I'd love to hear about your Disney cruise gift exchange experiences!

Related post - Crafting for a Disney cruise

Halloween themed Disney Cruise pixie dust

Monday, 16 September 2019

Hama bead projects that children can gift to their friends

Hama bead projects to gift to friends

My children and I love crafting with Hama beads. Over the years I've shared many different Hama bead projects that we've come up with, and I thought I'd round up a few of my favourite ideas that make great gifts for children to give to their friends. They can be used in party bags, like we did with our Minecraft themed keyrings, or they might be popular sellers at a summer fair or garage sale, like our Hama bead Emoji magnets. They also make great little Christmas or end of term presents.

Have fun Hama bead crafting!

Related post - Ironing tips for Hama beads

Hama bead covered pen holders

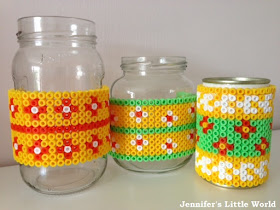
I love these cheerful pen holders, and they are really easy to make. You could choose colours that the recipient likes, or experiment with different designs to reflect their interest. For example you could incorporate some Minecraft characters or Emoji designs.

Hama bead pen pots tutorial

* Hama bead summer frames

I love making Hama bead frames because I think that it's a really fun way to display a photo or postcard. These frames are simple and made using bright colours that match the picture behind.

Hama bead bright coloured picture frames

* Hama bead emoji magnets

These Emoji magnets have been very popular with my children's friends. They are really simple to make, and there are lots of different emojis that you can base your magnets on so you can make a different one for everyone.

Hama bead emoji designs

* Melted Hama bead bracelets

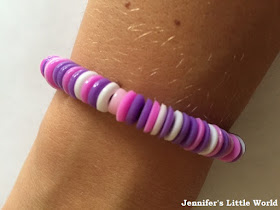
Melting the Hama beads is a fun way to make something a bit different using the beads. This one does require a bit of adult help as you need to use the oven, but the finished beads are really unique and fun to wear.

Melted Hama bead bracelet


* Minecraft themed Hama bead keyrings

We used these as party bag fillers and they were very popular. Minecraft lends itself really well to Hama beads and other pixel art, and there are so many different characters that you can choose from.

Hama bead Minecraft keyring designs


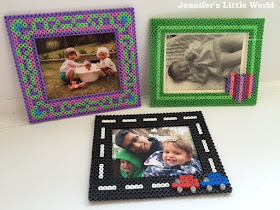
* Hama bead frames with different themes

Like the frames above, these Hama bead frames would be a fun way to gift a photo of a child and their friend, or a postcard of a place that they've enjoyed visiting together.

Hama bead themed photo frames


* Hama bead Tetris inspired magnets

These Tetris style magnets are really fun to play with and make a lovely gift all packaged up together.

Hama bead Tetris magnet designs

Related post - A year of Hama bead crafts

If you are looking for more Hama bead project ideas you can find many more on my Hama beads page!

Friday, 13 September 2019

Thoughts on scrolling for #ScrollFreeSeptember

With Scroll Free September 2019 now well under way, I thought I'd put down some of my thoughts about what scrolling is to me, and how I'm attempting to stop.

How do I define scrolling?

For me, scrolling isn't all time spent on social media. It's the time that comes after I've checked on what I need to, and yet I continue to scroll through the updates. It's when I find myself at a loose end around the house and I pick up the phone out of boredom or habit. It's when I'm doing something else, like watching a television show or reading a book, and catch sight of my phone and feel the urge pick it up to see if I'm missing out on anything.

What are my scrolling habits?

I find myself scrolling first thing in the morning and last thing at night. While I'm waiting in the car at school pick up time, while dinner is cooking or while I'm watching a swimming lesson. Also when I'm putting off something that I don't want to do, or I become distracted from something else that I'm doing. Most of this scrolling takes place on my phone, although some on my desktop PC as that's where I sit to do my work and it's so easy to just open another window.

Which apps do I scroll?

Most of my scrolling time is spent on Facebook. As well as the news feed, which is mainly filled with family and friends, I'm a member in lots of groups, some of them very active, so there is always something new to see. When I've exhausted Facebook I turn to Twitter with it's endless feed, and when that bores me I'll pop over to the BBC News app. I also use Instagram, although that tends to be on the desktop as I find it easier to leave comments with a keyboard, and I find it easier to limit my time as I'm more satisfied when sucked in by words than by images.

What do I gain by scrolling?

I feel that I do gain from spending time scrolling through social media. I enjoy reading through Facebook and seeing what other people have been up do - I like to see other people out and about doing interesting and exciting things. I get inspiration from Facebook craft groups, and I find out useful information about my other interests, like blogging, parenting and cruising.

On Twitter I find lots of links to blog posts that I want to read, as well as trending topics. I like to keep up to date with the news, and find that the BBC News app has a good selection of articles alongside longer reads on topics that interest me.

Photo credit Yura Fresh via Unsplash

What do I lose by scrolling?

Of course I lose time. It's very easy to get sucked in to reading just one more thing, and before you know it lots of time has gone by. I lose the time that I could spend in having a quick tidy up, working on a craft project, or spending time helping the children with something.

How do I feel afterwards?

Sometimes if I feel like I've spent too long scrolling in a day it's almost like a hangover. Especially if I've been on my phone late at night which sometimes happens when my husband is away. I inevitably feel a sense of wasted time that I don't get from reading a book or watching a television show.

What would happen if I stopped scrolling?

I always think that if I spend less time on Facebook then I'd start to lose touch with what is going on. But the truth is that if I do take a break from Facebook it's very easy to catch up with what I've missed. For example, you can read a whole group thread about a topic all at once rather than reading it over and over again as new comments are added.

What does scrolling replace?

I can't remember very well what I used to do before phones and social media became a thing, when I was a teenager or student for instance. I did use to spend longer talking on the phone and I was in the habit of carrying a book around with me, whether that was for a train journey or a waiting room. I did spend quite a bit of time as a teenager playing computer games like Civilisation or Tetris which perhaps satisfied the urge in my brain to do something mind numbing.

I remember when I first started living with my husband back in the early 00's he used to spend a significant portion of the evening scrolling aimlessly through the different television channels included in our cable subscription. I read somewhere that this was the modern equivalent of staring in to the campfire at the end of a long day out hunting and foraging and I think that there is something in this theory, with the television now being replaced by the smartphone.

What have I done to prevent scrolling which works?

Scrolling is a habit, and it's hard to break. I made a good effort during Scroll Free September last year, but of course the bad habits crept back. But here are some of the things that I'm trying to do to help:

* Out of sight, out of mind. I try to keep my phone in a separate room, or if it needs to be with me I turn it face down so I can't see the screen, or even better I place something else over it like a book so I can't see it. It sounds a bit silly but it does work!

* I don't post very much on social media, so I don't need to keep going back and checking for updates and replies to my comments or tweets.

* I attempt to keep my scrolling limited to particular times. For example having a quick catch up with Facebook while I eat my lunch or while I take a break, with a set time limit.

* I'm a big fan of timers. I find that timers are a brilliant way of helping with procrastination, and I don't use them nearly enough. If I have set myself a timer, even if just for 20 minutes, it's much easier to be accountable and actually do something productive during that time, whether it's writing a blog post or cleaning the kitchen. It really helps me to focus and to see how much I can achieve in a short space of time as well as getting me in the mood to continue the task once the timer has stopped.

* I like to have a hobby available with easy access that I can work on for a short period of time at once. Reading is ideal as I can read a few pages at a time, and so I always have a book or two on the go. I also like to have a jigsaw out that I can turn to for a few minutes.

* I also have a longer project on the go, like a long term craft project, that gives a goal to work towards and a sense of satisfaction and accomplishment when it's complete. Currently it's my Persian Tiles blanket, and I have a deadline in mind which I'm working towards.

I will readily admit that I'm not perfect and I don't stick to Scroll Free September absolutely, but I really do feel that I've made some changes this month which I hope to carry forward.

Scroll Free September logo

Wednesday, 11 September 2019

Ad - Book Review - Easy Paper Projects by Maggy Woodley

I received a copy of this book in exchange for review, post contains Amazon Affiliate links.

I've been a big fan of Red Ted Art for a long time, so I was delighted to be asked to take a look at Maggy Woodley's new book - Easy Paper Projects. This brilliant book is packed with 60 different crafts that children can wear, gift, use and admire.

The projects in the book are designed to be worked on by children independently, using a small range of materials which are easily found around the home - for example coloured paper and card and basic office supplies like pens, scissors and glue. 

Mia is 8 and loves crafting, and she's now at the age when she's happy to work on something by herself. I gave her the book to have a browse, and she immediately spotted several crafts that she wanted to try out straight away. She loves making things that feature cute animals, and decided that her first project would be a "Hug a Book" Bookmark. 

Review - Easy Paper Projects by Maggy Woodley


I really liked that the way the book is bound means that you can open it flat to see the pages clearly while crafting, without damaging it. A simple thing maybe, but it really makes it easy to work on the projects. The crafts are grouped by theme, for example seasonal crafts like Halloween and Christmas, and other topics like wearable crafts and cards.

Each page is clearly laid out, with a photo of the finished product and plenty of step by step instructions and photos. Mia worked mainly from the photos, which gave her a clear image of the different pieces that she needed to cut from coloured paper and assemble.

Making a paper panda craft

She was so proud of her finished panda, created entirely by herself with no help - she even cleared up after herself when she was finished!

Child holding their panda craft

Harry aged 10 was also really interested in the book. He enjoys crafts that have a purpose and do something, so he had a lot of fun making a simple Helicopter using just paper and paperclips. He loved watching it fly down from the top floor of the house, and he worked out how to tweak his design to make it fly perfectly! 

I particularly love all the themed crafts in the book, and I'll definitely be turning to it in the run up to Christmas. There are lots of really sweet ideas which would make lovely decorations and gifts.

If you have crafty children I'd definitely recommend this book. The projects are great for children to work on by themselves and create a finished product that they can be proud of. They'll love looking through and choosing which projects to try, and you'll see their imagination fly as they adapt the crafts to suit their own interests and tastes.

Easy Paper Projects by Maggy Woodley - selection of crafts

Friday, 6 September 2019

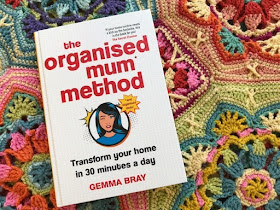
Ad - Book review - The Organised Mum Method by Gemma Bray

I received a copy of this book in exchange for a review. This post contains Amazon Affiliate links.

Today I'm sharing a review of a new book - The Organised Mum Method: Transform your home in 30 minutes a day by Gemma Bray. Gemma Bray believes that there is more to life than housework, and she has been sharing her perfected system - The Organised Mum Method - on her blog and social media channels since January 2017. There has been a phenomenal response to her method, and this book contains the tips, tricks, cleaning schedules and more which will help you to get your housework under control and completed quickly and efficiently, leaving you plenty of time to do the things that you'd much rather be doing.

The Organised Mum Method book review

Despite being familiar with the method and already a subscriber to the blog, I must admit that I hadn't actually embarked on the plan myself. With my review copy arriving at the beginning of our school summer holidays, I decided that now was the time to make a proper start, and I've been following the routine for over 8 weeks - enough time to work through the plan in its entirety.

What is the Organised Mum Method?

In a nutshell, the Organised Mum Method involves completing Level 1 daily jobs (which should take 15 minutes), Level 2 jobs in one room each week (which will take 30 minutes), and a Friday Focus where you concentrate thoroughly on one room or area (again for 30 minutes). The Friday Focus rooms rotate through an eight week schedule so that each room receives a deep clean during that time. You are encouraged to use a timer to keep yourself within the time limits and to prevent distraction, although you can spread the cleaning throughout your day in smaller chunks, depending on your personal schedule.

So why buy the book if all the information is available on the website?

Well, I think I can answer that from personal experience. As I said, I was familiar with the method and subscribed to the blog, but I hadn't actually done anything about it. I just needed something to get me started, and for me this book was the kick.

For a start, I found it really helpful to have all the information organised in one place in a sensible order, rather than having to jump around different parts of the website. It's really easy to find what you are looking for when you need to refer back to something.

The book also has plenty of supplementary discussion about the method. For example, I found that the explanation of the rationale behind the method, and why certain rooms are scheduled for particular days, really made sense and helped the plan to stick in my mind.

For me, I find information in book form rather than online much easier to digest. I took the book on holiday with us at the beginning of the summer and made notes about how I was going to use the schedules, ready to go when I got home. Reading the book in advance meant that I was fully familiar with the process before I got started, and I found the tips and advice really motivating.

If I hadn't read the book, I doubt I ever would have started.

The Organised Mum Method review

What was particularly helpful about the book?

Reading the book helped me to understand what stage I was already at when it came to housework. Luckily I do keep my home fairly decluttered so I was able to jump straight in with the method. If your house is quite messy then you are encouraged to complete a one week 'Boot Camp' first to get your house into a state that you can work with.

It also helped to cement the reminder that it's much easier to clean quickly if you don't have to tidy up first. For example, wiping down the kitchen counters only takes a few seconds if they are already clear, so it's an incentive to keep things tidy as you go along so that you can clean more efficiently and stick to the time limits.

How I adapt the method to work in my larger house

One of the things that had first put me off this cleaning method was that I have quite a large house. As all the rooms need to be divided over just four days, I didn't think that I would have time to fit everything in, and it all felt too overwhelming. However I sat down with a pen and paper and came up with a timetable that I felt I could make work for me. Gemma's suggested daily rooms are in italics, and I've added in my extras.

Monday - Living room and dining room
Tuesday - Bedrooms - Master bedroom, Harry's bedroom and en-suite, Mia's bedroom (clean sheets are alternated weekly between ours and the children)
Wednesday - Hallway, cloakroom, study
Thursday - Kitchen
Friday - Focus Day - a rotation of eight different rooms
Weekend - Family bathroom and master bedroom en-suite.

You'll notice that the bathroom/toilet is missing from Gemma's plan. This is because the bathroom comes under the Level 1 jobs and should be cleaned daily. However as our house contains four bathrooms/toilets there is no way that I can clean them all thoroughly, along with the other daily jobs, in just 15 minutes.

So I add the downstairs toilet to Wednesday as our hallway doesn't take long to clean, and I do Harry's en-suite bathroom on Tuesday as it doesn't get much use. Then at the weekend I give the family bathroom and our en-suite a thorough clean. I do clean the toilets more frequently and I wipe down the surfaces in all bathrooms daily.

I have a couple of extra rooms - a dining room and study - which are added on to Monday and Wednesday respectively. I also have two guest bedrooms at the top of the house. These rooms aren't used regularly so I clean them properly as part of the Friday Focus Miscellaneous Rooms (or if we have guests using them!).
Hand holding a cleaning spray
Photo credit JESHOOTS.COM via Unsplash

How realistic is the 30 minutes of cleaning a day?

I do have to accept that along with appreciating the benefits of a larger house I need to spend a little more time cleaning it. So I must admit that it does take me longer than 30 minutes to do my Level 2 jobs. However it's not usually longer than 45 minutes, and if I was stretched for time I could finish within the half hour. I also don't include tidying in my room cleaning, I try to make an effort to keep things tidy daily anyway throughout the house, rather than leaving it until I'm concentrating on a particular room.

Because of my extra bathrooms I do need to spend a short amount of additional time cleaning at the weekend. I could probably fit this cleaning in during the week, but it wouldn't be at the standard I want it to be.

The thirty minutes of daily room cleaning doesn't include the Level 1 jobs, and it also doesn't include things like washing up and wiping surfaces after making a meal, as these are all things which are part of running a home.

Do you still need the book if you follow the method already?

Many people have been following this method for a while now, having used the information on the blog and in the Facebook group, and may feel that they don't need the information in the book. However while I feel that the book is aimed more at people that are new to the system, I think that it would still be of interest to people who are familiar with the method. It helps with understanding more about the method and why it works, and there are lots of really useful tips and pieces of advice.

Has this method worked for me?

My answer to this question has to be yes! There is no doubt that since I started following this method my house has become cleaner. It's a little and often method of cleaning which really does work, and there are so many benefits. For example, when you are dusting the same ornaments every week you start to think about whether you really need them, or whether you could do a little decluttering. When you actually set a timer, you discover just how much you can actually get done in a short period of time if you concentrate and don't allow yourself to be distracted.

I've started to take more notice of my home, and do something about the parts that were bothering me. When you spend the time to care for your house you start to think of ways that you can improve your storage or just make things look a little nicer.

I really felt the benefit a couple of weeks ago before we went away. Normally the week before we go on holiday I'm running around like mad trying to clean everything because I like to come home to a clean house. This time I found myself at a loose end, because everything was already clean!

Obviously there is no escaping the fact that in order to be successful with this method you do actually have to get on and clean, no-one else is going to do it for you. But if you are someone that likes seeing tasks broken down into easily manageable chunks and enjoys the satisfaction of ticking things off a list, then this could well be the system for you.

You can buy the book here -   The Organised Mum Method: Transform your home in 30 minutes a day

Wednesday, 4 September 2019

The stages of eating on an all inclusive holiday

We've just returned from a lovely all-inclusive break in Lanzarote. I do like an all-inclusive holiday, it's nice not having to worry about all the stress of firstly deciding what to eat, preparing it, and finally having to clean it all up, repeated three times a day. Now that the children are older they can be responsible for choosing and fetching their own food, so we can actually sit down to eat ours, and they will sit still happily for long enough that we can finish what is on our plates.

I don't know about you, but I definitely go through several distinct phases when it comes to the all-inclusive holiday buffet experience.

Stage 1 - Arrival

There's so much food! At home we don't eat a huge variety of different foods, and I often eat pretty much the same thing for breakfast and lunch at least. So it's very exciting to see different food stations on offer at each meal, and to select my favourites from each one. I always find it necessary to make several trips back to the buffet over the course of the meal - I want to try the things that other people have returned with, and I don't want to miss out on anything.

Stage 2 - In full flow

Much of the food has re-appeared, albeit possibly in a slightly different format, but there is still plenty to be eaten. I can slow down a bit and take a bit more time choosing what I want to eat, and I have also found some favourite items that I can concentrate on loading my plate up with.

Child with treats from a breakfast buffet in a hotel

Stage 3 - Overstuffed

The novelty of eating three different types of cake for breakfast has worn off and I'm starting to think that my skimpy holiday clothes are feeling a bit tight. I begin to wonder if it's time to slow down a bit, although a trip to the dessert station usually reveals my lack of will power.

Stage 4 - Diet day

For me this often occurs around day 5. I'll eschew the cake at breakfast and stick with juice and muesli, followed by a small sandwich for lunch. At dinner time I may eat a little more as a main course, but I'll limit myself to just the one dessert.

Stage 5 - No point stopping now

The holiday is nearly over, and since I'll definitely be starting a new diet and exercise regime the minute that I arrive home, there's no point in missing out. It's back to the cake for breakfast, along with trying out a few new types of cheese and rolls, and enjoying my vegetables coated with cheese along with a plate of nachos on the side. Diet tomorrow!

Monday, 2 September 2019

Scroll Free September 2019

Once again the RSPH has launched Scroll Free September - a chance to step back and take a break from personal social media accounts for the entire month, or at least for as long as you can. It's a very flexible challenge, with lots of different options to choose from to help you make the break. You can sign up to choose your plan and find some great Scroll Free September top tips here.

You can also read my wrap up post from last year to see how I got on - Scroll Free September 2018

I find approaching this challenge a little difficult as I have quite an overlap between using my social media channels socially and for my blog work. So I need to observe the distinction between logging in to Twitter to send a blog post related tweet, and wasting time scrolling aimlessly through the never ending list of irrelevant tweets. So I'm not banning myself from all social media entirely, but I'll be making a big effort to only log in on the desktop PC when I need to do something, and to keep away from my phone for the majority of the day.

Scroll Free September graphic
Image created by Evelyn Basch

September is a great time for this challenge, as I have plenty to do this month once the children are safely back at school. I'm hoping to free up my time to get the house back together, to get back on track after holiday with my exercise and healthy eating, and to make some good progress on my Persian Tiles Blanket. We also have a big holiday coming up over October half-term, and I have lots to prepare and pack as well as getting back in to blogging and writing and scheduling blog posts for when we are away. With such a long to do list to work through I should never find myself at a loss without Facebook to scroll through.

I'm hoping that this challenge will make me think more about my scrolling habits, the reasons that I use social media, and what I gain and lose from my use of it.

Scroll Free September logo

Are you taking part in the challenge? It's never too late to start!