Friday, 28 June 2019

Tips for going on holiday with a fussy eater

We have been blessed with a child that is a fussy eater. At home he eats a reasonable amount across the food groups, so I'm happy with his diet in general, but the trouble is that not only will he not try new food when out and about, he also won't eat food which isn't exactly like the food he eats at home. So he'll quite happily eat a bagel and cream cheese for breakfast at home, but is suspicious of a different brand of bagel or spread if he sees it in a breakfast buffet.

Family tips for travelling with a fussy eater

This can be frustrating at times, because we travel and stay away from home a fair bit, and we definitely don't want to limit ourselves to self-catering holidays in this country every time.

To a certain extent we don't stress too much about it. I do feel that it's not the end of the world if he only eats bread, butter and ice cream for a week while we're away, as I know that I can feed him up again when we get home. But sometimes we go away for a bit longer and it can be annoying when we are out and about and can't find anything that he will eat, and of course it can feel like quite a waste of money when he returns from an extensive buffet with a few slices of cucumber and a bit of bread on his plate.

So here are a few tips that we've picked up over the years, to make things easier for all of us when travelling with a fussy eater:

When booking


Think about what you will eat while away. An accommodation option with a buffet is usually a good choice, or you may want to stick with self-catering and the option of eating out from time to time.

Some types of holiday, for example a cruise, will allow you to take food back to your room, so you can take extra from a buffet and always have a snack or drink in the room to rely on. Check if your room will have a fridge for storing a wider variety of food.

Suss out shopping and restaurant options near where you'll be staying to make sure that there is somewhere you can get something to eat when you need to. For example a cafe where you can pick up a simple breakfast that you know will be eaten, or a supermarket for buying snacks.

When packing


Take some favourite food with you from home. You'll need to check carefully the restrictions for countries that you are travelling to, but generally if food is factory sealed in its original packaging then it will be fine to take in your luggage. We often pack biscuits, plain fajita wraps, breakfast cereals, cereal bars, bread sticks and so on.

Pack sandwich bags, plastic snack boxes and a knife (in your checked luggage). This way you can buy food at the supermarket to make sandwiches for lunch, cut up fruit, and prepare other snacks that your child will eat. This also saves money on buying food that won't be eaten while you are out! Depending on your holiday arrangements you might even want to take more cutlery and plastic plates or bowls with you so that you can eat your own food comfortably in a hotel room.

If you are travelling by plane, prepare your own food and snacks for the journey, or eat at the airport before you leave. This goes for adults too - I'm less fussy than I used to be but I've quite often been served a meal on the plane that doesn't take my fancy at all and been grateful for the pizza that I ate before boarding.

While you are away


When you arrive, stock up on snacks that you can keep in the room or the fridge if you have one. Look for portable options that you can take around with you.

Always carry snacks and a drink in your day bag. That way if you are stopping for a meal and your child can't find anything that they like you'll be able to keep them going until you can find something.

If you will need to find somewhere to eat out, make a plan in advance and line up some suitable options. This might be the same chain restaurant that you eat at when you're at home - maybe not that exciting but worth it if it reduces the tension!

And finally don't get too stressed about it. We relax the rules a little bit and we aren't too strict about, for example, demanding that a meal is finished before dessert, as long as something filling has been eaten. We also heap on the praise for trying something new, even if they only have a tiny bit, and we reinforce how important it is to fill themselves up so that they'll be able to enjoy themselves. Then when we get home I'll cook favourite meals for a few days to fill them back up!

Child eating at open air terrace on holiday

Wednesday, 26 June 2019

Our summer holiday task list 2019

Every year as the school summer holidays draw closer I like to come up with a list of things that I want to do with the children. We have eight weeks to fill, and although we will be spending a week in the Isle of Wight at the beginning of the holiday and a week in Lanzarote at the end, there is a lot of holiday in the middle to fill.

I'm not one for organising lots of exciting days out over the holidays. I don't like my husband to miss out, and we tend to save our money to put towards going away so I try not to spend too much on entertainment at other times. We'll do a few outings with friends I'm sure, but we'll also spend lots of time going out locally, to the beach, the playground and the library.

So I try to come up with long term projects that can be completed over time at home. My big task for the summer is a thorough sort out of the children's bedrooms. I want to empty them completely apart from the large pieces of furniture, then give them a good clean and really think about what goes back in. I'm sure there are lots of things lurking at the backs of cupboards that no longer have a place there. Mia is really excited to start, in fact she wants to start straight away, but I know that we need to have a couple of free days to devote to it!

They both receive lots of craft kits for birthdays and Christmas that I've put aside to work on. Mia has a lovely unicorn diamond painting kit that we've been working on together, and we've already bought a frame and chosen a place in her room to hang it. We are over halfway through, and I know that we can easily finish it.

Unicorn diamond painting kit in progress

Another project that is currently taking up far too much space on our dining room table is the Lego Taj Mahal. This amazing set was passed on to the children by a friend, and after a massive sort through and ordering of missing pieces they have begun to assemble it. As far as I know it's the second largest Lego set available with nearly 6000 pieces, so it's quite a task. People have been asking me where we will put it when it's finished and my answer is 'back in the box', which receives a wail of protest from the children, but we definitely won't have the space to keep it out on display!

Lego Taj Mahal in progress

As a part of this job we also need to sort out our Lego. I'm quite good about keeping the individual sets separated and stored neatly in boxes, but we have a massive box of mixed bricks in our living room that looks really untidy. I need to reorganise our storage a little bit so that it's still handy to play with (it's played with every day) but can be put away out of sight when not in use.

I'm going to build the children a proper reading den for the holiday. We have a cheap indoor wendy house that we bought a few years ago, and I'll help them set it up with cushions and what not inside so that it's nice and cosy for them to chill out in.

Harry is working on a large timeline poster and adding in all sorts of historical dates and facts. He's measured out his bedroom wall to work out where it will go, so I want to encourage him to get as much done as he can, then we'll hang it up so he can add to it as he discovers more dates that he wants to add.

Finally, maybe I'll have some time to myself as well while they are busy! I've been working on a Christmas ABC Sampler which I received for Christmas 2017, and am hoping to have framed and ready for display in Christmas 2019. I'm pleased to say that the main cross stitch part is coming along really well, and I'm currently about halfway through the final letter - A for Angel. I need to go back to each letter and add in some metallic thread parts (I was worried that I'd run out so I finished the main areas first) and then there are lots of beads to put in before I ask my Mum to help me frame it. It would be wonderful if I could get it finished and framed before they go back to school in September!

Christmas cross stitch sampler in progress

What are your plans for the school summer holidays?

Monday, 24 June 2019

Marie Kondo doesn't want you to get rid of all your books

I've written before about Marie Kondo and how much I enjoy her books. Although I've never felt cluttered enough to complete an entire Marie Kondo festival, I definitely use her techniques when it comes to arranging my home. In particular I follow the essence of her method, which is gathering and decluttering items by category rather than by room or storage area.

Related post - Working out my own interpretation of Marie Kondo's method

I've always loved reading, and I've always loved buying, collecting and displaying books. Fortunately I've always also been good about passing on books once I've finished with them. Even books that I've bought new, if when I've finished them I don't feel that I'll want to read them again I'll pass them on to either friends or family, or to the charity shop.

Earlier this year, after the Marie Kondo documentary was broadcast on Netflix, people got very cross at the suggestion that Marie Kondo advises that one should keep fewer than 30 books. I don't remember this quote featuring in the series (although I'm happy to be corrected if it was!) and I didn't remember it from the books either. All I remembered was her opinions about which books to keep, and how important it was to really think about the books that truly deserve a place in your life.

Marie Kondo book meme
I had a look through Kondo's first book, The Life Changing Magic of Tidying, and found the section that this 'quote' comes from. Under the sub-heading 'Books to keep - Those that belong in the hall of fame' where Marie Kondo discusses books, she says "I now keep my collection to about 30 volumes at any one time, but in the past I found it very hard to discard books because I love them."

So she is most definitely talking only about herself, and saying is that 30 books is the right number for her, and she emphasises everyone is different when it comes to how many books you want to keep around the place. I definitely have more than 30 books, but every book there is one that really does spark joy to me, and when I look at my bookshelf it makes me feel happy, not overwhelmed by a mass of books that make me feel guilty because I've not read them.

Related post - My Marie Kondo approach and Sparking Joy

I also found another quote in that section which I really loved - "The moment you first encounter a particular book is the right time to read it. To avoid missing that moment, I recommend that you keep your collection small." It's so true - when I spot a book that I want to read I want to read it immediately, not put it at the bottom of a to be read pile and lose that enthusiasm.

So which books belong in my Hall of Fame? I actually shared a blog post about my fiction bookshelf a few years ago, and more recently I shared a list of the books that I can read over and over again. Some of them are rather battered and scruffy copies, but they have definitely earned a place on my bookshelf.

Rows of colourful books on a bookshelf
Photo credit Nick Fewings via Unsplash

So don't be put off the Marie Kondo method if you think that she wants you to get rid of all your books, her advice really is excellent and will help you to think carefully about the books that you do want to keep, however many that is, and your reasons for doing so!

Related post - The Life Changing Magic of Tidying by Marie Kondo

Friday, 21 June 2019

Hama bead Disney magnets - ideal Fish Extender gifts

Disney Cruise Fish Extender magnets idea

Later this year we will be setting off on our fourth Disney cruise and I can't wait! Each time we've cruised with Disney we have taken part in a little more of the magic on board, and now for the first time I've signed us up for a Fish Extender gift exchange as well as a couple of other exchanges. As part of a Fish Extender gift exchange you swap small gifts as part of an organised group. The gifts can be bought or homemade, Disney themed or not, and are a way of adding a little extra magic to your cruise.

Related post - Our Disney cruise - Adding some magical extras

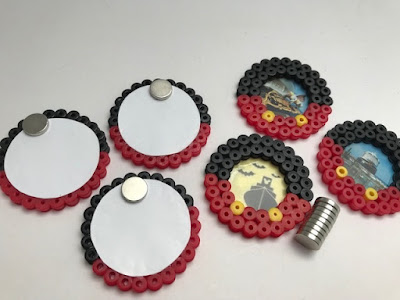
I designed some Hama or Perler bead magnets to use as part of a cabin gift, or they could also be used for a dedicated magnet exchange. They are really easy to make! I made them with three different designs, two are my own photos from a previous cruise on this ship and the third is the Halloween on the High Seas logo, as we are cruising on a Halloween sailing.

If you want to take part in a similar exchange on your Disney cruise you can find the details on your dedicated cruise Facebook page - just search for your ship name and dates and ask to join. Read on to see how I made these simple Fish Extender magnets!

Related post - A Disney Cruise Fish Extender with a Moana theme

Disney Cruise Fish Extender magnet gift ideas

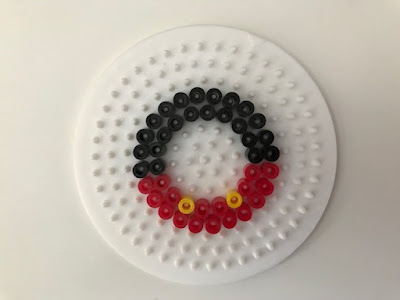
To make these Disney themed Hama bead magnets you need a circular Hama bead pegboard (either the small board or the large board will work) and a selection of Hama beads. My design uses 23 black beads, 17 red beads and 2 yellow beads. You also need a picture to use for the frame, printed on sturdy paper or card if possible, as well as some magnets for the back.

When placing the beads on the circular pegboard make sure to line the beads up correctly - you want to position the board so that the centre line of pegs is horizontal, and it's easiest to start by placing the black Hama beads along that line.

Here is the design that I used:

Hama bead Disney pattern

Iron the beads on both sides so that you have a nice solid frame. Of course you can adjust the size of the frame if you want to make them a little larger - these measure about 4.5 cm in total diameter and the inner circle has a diameter of about 2.5 cm. It might be nice to make one larger frame which the recipient could use to display their own photo.

Related post - Hama bead ironing tips

Hama Perler bead Disney designs

Cut out your printed inner design so that it is slightly larger than the hole in the middle of the frame.

Fish Extender Hama bead magnets

Then glue the picture to the back of the frame. It's worth having a quick look at each frame and deciding on the side that you want to face outwards, as sometimes the ironing process can distort the beads. Leave the magnets to dry fully.

Disney Cruise Hama bead magnet

Then you can apply a magnet to the back of each frame. I bought some strong small magnets (affiliate link) to glue to the back. These magnets are very strong, so you'll need to use a strong glue like super glue to stick them down. I learned that it was necessary to glue the magnets towards the top so that they are behind the part made from Hama beads, otherwise the paper might not be strong enough when you try to pull the magnet away from your magnetic surface! Also wait until the glue has dried completely before you test them. Try out a few different magnets, and if you do find that your magnets are too strong then you can use magnetic tape instead.

Hama bead magnets with a Disney theme

These magnets will form part of a cabin gift for each stateroom taking part in our Fish Extender exchange. Each cabin will receive one each of the three different designs, along with a Disney themed Christmas ornament.

Related post - Disney Cruise Ornament Exchange idea - Felt Christmas stockings

I really enjoyed making these magnets and I think they turned out well! It's making me even more excited for our cruise, even though we still have several months to go yet - it's definitely a way of making that Disney magic stretch a little bit further as the anticipation builds!

Related post - Disney Cruise craft ideas

I hope that the recipients like them!

Wednesday, 19 June 2019

My working from home essentials

I love being able to work from home. As well as my blogging and social media work I do some part time work for a home working company, and although I don't earn a fortune it's very nice to have the extra money for something that I can easily fit around looking after the children and the home, as well as having time to myself.

But it's not always easy working from home. There are plenty of distractions - washing to be put away, a dishwasher to be emptied or a drawer full of snacks. Here are my working from home essentials:

A reliable internet connection and the associated technology - It goes without saying really, but I need the internet for most of my work. I can make notes in a notebook, but I always find myself wanting to check facts or just have a quick browse for some inspiration. Luckily our set up is fairly reliable, but it's so complicated that when it goes wrong I have no idea how to fix it!

Peace and quiet - I work much more productively when I'm on my own in the house. Even when other family members are quietly occupied, I'm always on edge waiting for someone to come in and disturb me. Luckily I'm on my own most days at home!

A kettle, biscuits and snacks - I don't drink much tea or coffee but my morning is fuelled by a daily hot chocolate, and it's always nice if there's a biscuit or ten to accompany it.

Laptop open on a tidy desk with yellow chair
Photo credit Kari Shea via Unsplash

Temperature control - A nice hot radiator in the winter, and a window to open in the summer.

Desk and comfy chair - All my written work is done at my desktop PC. I have access to a laptop but I just can't get comfortable anywhere else, I need a proper clicky keyboard and a big screen with plenty of desk space.

A window with a reasonable view - The window in my study looks out over our front path and hedge. I can't see much, but it's nice to stare out sometimes when I'm stuck for inspiration. As long as the hedge doesn't need a trim, as then I'm just reminded that I need to get out and cut it!

Space to work on crafting projects - and space to lay things out without them being disturbed when I'm not working on them.

Some social interaction - I don't need much as I'm generally quite happy in my own company, but I do like to meet up with friends regularly for hot chocolate and cake (and quite often our chats provide me with blog post inspiration!)

Do you work from home? What do you need to help you through the day?

Monday, 17 June 2019

I want to live inside Unsplash

Sometimes when I'm writing a blog post I don't have a good photo of my own to illustrate it, and so I turn to Unsplash. Unsplash is a fantastic website filled with high resolution photos that you can download to use for your own projects, even commercial ones, for free, without asking for permission and without the need to credit (although I always do). I've found some beautiful photos there which fit my posts perfectly, especially when I'm writing about some of my favourite topics like organisation and minimalism, reading, travel or blogging.

Woman reading seen from above
Photo credit Thought Catalog via Unsplash

I've spent a fair bit of time browsing photos through these categories, sometimes because I'm trying to find the perfect picture, but other times because I just really enjoy scrolling through the pictures and imagining living the lifestyle that they depict.

The other day I was sitting on a comfortable seat in my tidy garden with a hot drink in my hand and a book on my knee, and it dawned on me that for just a few seconds I was experiencing what I decided to call my own 'Unsplash moment'.

Notebook by a pot plant
Photo credit Kyle Glenn via Unsplash

Because for me Unsplash has started to become the embodiment of a perfect life. In the world of Unsplash there are endless cups of tea, alongside notebooks laid open with a pen at the ready to fill them with ambitious plans and innermost thoughts. There are pretty things to look at while you are working, like beautiful views, well cared for houseplants, and posters with motivational quotes.

Blogging flatlay with laptop and accessories
Photo credit Chris Adamus via Unsplash

The surroundings are minimalist and tasteful, mixing old and new successfully, and everything fits together perfectly to create a calm and relaxing workspace.

Houseplants in stone planter
Photo credit Jessica Lewis via Unsplash

There is so much potential for creativity and relaxation, without the distractions of mess, clutter and general family life.

Pile of books with glasses on top
Photo credit Nicole Honeywill via Unsplash

Of course I know that the majority of photos on Unsplash are posed, and they don't represent anyone's actual real life. Maybe I'm cheating a little bit to use someone else's staged photos to portray a world that's different from my reality. Or maybe using the lovely pictures also acts as an escape from reality for the readers of my blog. I'm sure that no-one really wants to see my messy bookshelves and floors covered in Lego!

So if you see a photo on my blog that makes it look as though my life is perfect, there's a reasonably good chance that it's just a glimpse into a world that I sometimes wish I could inhabit!

Friday, 14 June 2019

Our Ooni Koda outdoor pizza oven

Today I'm sharing a short review of our recent fantastic purchase - a Ooni Koda Pizza Oven. If you follow me on Instagram you may have noticed me sharing a few delicious pizza photos, and we've enjoyed using our new outdoor pizza oven so much that I wanted to share it with any other pizza aficionados! I'll warn you that this isn't a particularly technical review, I'll be chatting about how we have been using it, sharing a few tips that we've picked up, and generally showing off our pizza making skills!

We eat a lot of pizza, and have been making our own pizzas at home for years. We started with pre-made bases, then began making our own dough using a mix before moving on to making the dough from scratch. It's been quite a journey, and over the last few years we've tried various different ways to create the perfect pizza. The most successful by far were cooking pizza on the barbecue using a pizza stone, and purchasing an indoor pizza oven which still receives regular use.

This summer we decided to take things even further, and we purchased a Ooni Koda Gas-Powered Outdoor Pizza Oven (affiliate link). Ooni make a variety of different pizza ovens, some are gas fired, some are wood fired, and some are a combination of the two. We chose the gas fired oven which was definitely the best choice for us as it's so easy and quick to get up and running. It's also very portable if you want to take it out and about with you, especially if you are visiting someone that has a gas cylinder.

Ooni Koda outdoor pizza oven review

We have been using our Ooni Koda on a wooden garden table and it's been absolutely fine as the temperature underneath the oven doesn't get that high. You definitely do need a raised surface for it to stand on. Because you need to constantly check and turn the pizza while it's in the oven it would be very awkward to have it placed at floor level. 

Ooni Koda outdoor pizza oven

Once you have turned the pizza oven on it takes about ten minutes to fully heat up. We bought an Infrared laser thermometer (affiliate link) which makes it really easy to check the temperature of the pizza stone inside the oven (and it's also quite fun to play with in general!). We've found that the Ooni takes longer to heat up if it's windy, and if the wind is very strong you need to keep an eye on it to make sure that the flame hasn't been blown out, so it's best to find a sheltered spot for the oven if you can.

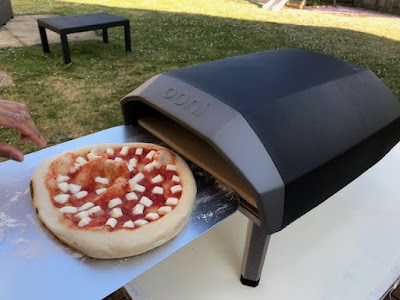
When you have prepared your pizza and it's ready to cook, you just need to slide it into the pizza oven onto the hot stone inside, and the flames will cook the pizza from the back and the top. During cooking you need to turn the pizza to make sure that it is cooked evenly all the way around, and so for this you need a pizza peel. When we started using the oven we used the short wooden pizza peels that we use with our indoor pizza oven, but we quickly upgraded to a Ooni branded metal peel which is much easier to use. We still prepare the pizzas in advance on the wooden peels to put into the oven (we have four so we can make all the pizzas for our family together in advance) then turn them during cooking using the metal peel.

Putting pizza into the outdoor Ooni Koda pizza oven

We've found that a sprinkling of semolina flour on the peels underneath the pizza really helps with a smooth transfer to the pizza oven. Once the pizza is in the oven it will cook very quickly (it usually takes just over a minute to cook the pizza completely) so you need to be stood there keeping an eye on it and turning it every 15-20 seconds or so. Some heatproof gloves are really handy for moving the pizza around on the peel!

Cooking pizza in the Ooni Koda pizza oven

It takes a bit of practice to learn how quickly the pizza will cook. At the moment we are still using a timer while cooking, but it won't take long for us to get used to the oven and realise when the pizza needs to be rotated. 

Ooni Koda outdoor pizza oven

We have been so impressed by the quality of the pizzas produced by the Ooni Koda. It's definitely worth taking some time to research how to make a good quality dough - there are plenty of apps to help with recipes, and videos demonstrating how to roll and form the dough into bases. We've also invested in some good quality ingredients - we use Caputo flour and have recently started buying Fior Di Latte mozzarella. They need to be bought from Italian food stores or online, but they really do make such a difference to the taste of the pizza. 

We are so pleased with our purchase and now have our fingers crossed for a lovely, long and hot summer like last year, filled with plenty of delicious pizza!

Delicious pizza from the Ooni Koda pizza oven outdoors

If you want to see the Ooni Koda pizza oven in action I can thoroughly recommend this YouTube channel - Got2EatPizza - for plenty of Ooni pizza making demonstrations and recipes.

 Related post - The G3 Ferrari Delizia Pizza Oven review

Wednesday, 12 June 2019

Marie Kondo, and managing without things that you've decluttered

I'm constantly organising and decluttering my home. Even though I like to think that I'm fairly minimalist, I'm always on the hunt for things that are unnecessarily taking up space and can be moved on. I can honestly say that there are very few things that I regret getting rid of, but that doesn't mean that there aren't a few annoyances.

Related post - The Life Changing Magic of Tidying by Marie Kondo

For example, in my recent blog post Decluttering 100 things in a week I listed all the things that I'd removed from my home, including some plastic food trays with separate compartments which went in the recycling. Then a couple of days later we were given a huge Lego set with many, many pieces which needed to be sorted. The plastic trays would have been perfect for organising some of the pieces, and I was so cross that I'd thrown them away!

But then I remembered a passage that spoke to me from Marie Kondo's book Spark Joy:

"I have bid farewell, at least temporarily, to countless things that didn't bring me joy and, to be frank, the absence of a discarded item never caused a catastrophe. There was always something in the house that would serve as a substitute." - Marie Kondo - Spark Joy: An Illustrated Guide to the Japanese Art of Tidying.

She describes how she discarded a chipped vase, only to need it the very next day. Instead of going out and buying a new vase she covered a plastic bottle with cloth to use instead, with the bonus that it could be recycled and removed from her home once finished with.

Glass vase of flowers on a stool
Photo credit - NorWood Themes via Unsplash

It's so true, whenever I've found myself missing something that I've decluttered, I've always been able to find an alternative. And when I'm debating over whether an item deserves it's place in my home, I find it easier to let go of it if I imagine what I would do if I didn't have that item. There are very few things that you can't find a substitute for, and they are definitely the things that spark joy.

In the case of the Lego sorting trays, I remembered a stack of plastic cups that I bought for parties years ago, and I started putting aside plastic food containers and the punnets from our fruit and veg, all of which can be reused or recycled once finished with.

Related post - My Marie Kondo approach and Sparking Joy

Now I just need to get the children to build that Lego set so that I can have my dining table back!

Lego pieces sorted into cups and boxes ready to build with

Monday, 10 June 2019

How to make simple tin can lanterns for the garden

Tutorial for repurposed tin can lanterns

Last summer we bought a fire pit for the garden, and this year we've bought a pizza oven, so I'm anticipating plenty of warm, summer evenings sitting outside with food, drink and good company. Fingers crossed we have another lovely summer like last year!

To brighten up our patio during the evening, I've been making some tin can lanterns. They are easy to make, so I thought I'd share how I made them in case they inspire you to make something similar for your garden! All you need are some tin cans, a hammer and a nail.

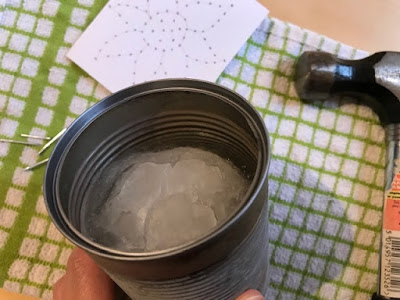
First, wash out the cans and remove any labels. Then fill almost to the top with water and freeze. This means that the can will keep its shape while you make the holes.

Freezing ice to make tin can lantern

Then take a hammer and a nail, and bang the nail into the can where you would like the holes to be, removing it once you are done. You can mark out a design on the can with pen, tape a piece of paper to the can with your design that you can punch through, or just go for a random approach and cover the can with holes.

Designing a tin can lantern

When the ice has melted, your lantern is ready to use, just pop in a tea light candle! I decided to decorate the rims of my cans with some beads. I made two holes at the back of the can, then I threaded coloured and glass beads onto a piece of wire, securing it firmly through the holes in the can. For my sunflower themed lantern I kept the colours to greens, yellows and oranges, and for the other cans I used bright and cheerful colours. Then the lanterns still look pretty, even when they aren't lit!

Lanterns made from old tin cans

Here they are once dusk has fallen. They look so beautiful sparkling away in the dark. I'm going to be making lots more, and I can't wait for the warmer evenings when we can sit outside surrounded by them!

Tin can lanterns with candles at night

If you like these lanterns you might also like to see my festive Christmas lanterns.

Friday, 7 June 2019

Reading the same book over and over again

At the moment, Harry is obsessed with a particular series of books. It's the Percy Jackson books by Rick Riordan, which he was introduced to at school. From what I understand it's about a teenage boy who is a Demigod, and he has many adventures with his friends which involve various Gods, good and evil. We've bought him several of the sets - initially I baulked at the price for a whole series but they have turned out to be an excellent investment as he has quite literally read them all over and over again. When he reaches the end of a series he starts back again at the beginning.

I must admit that I get a bit frustrated seeing him constantly re-reading the same books. I take him to the library to try and tempt him with books by other authors, and I've researched authors with similar styles. As it's a popular series there are plenty of other books that are in the same genre and cover the same subject matter, and he's rejected all the alternatives that I've offered. I feel it's a shame because he's such a confident reader and I want him to broaden his horizons a bit.

I've tried to read the books myself to see why he likes them so much, but I must admit that I can't see the appeal myself, I guess because I'm not in any way the target audience! I know that he's interested in the stories of the Greek myths that the stories base themselves around, and I think a lot of it is that he's 'comfort reading', using them to relax and escape at the end of a busy day surrounded by people.

But then I remember that I used to read the same books over and over again when I was younger. For me it was mainly Enid Blyton, starting off with the younger Famous Five stories and moving on to Mallory Towers, and I can still vividly remember many of the books. I have many books on my bookshelf that I've read numerous times and could easily pick up now and re-read without being bored, and many books that when I re-read them they take me back to all the times in my life when I previously enjoyed the book.

So maybe it's not a bad thing and he'll move on from them at some point, I just wish that he'd at least entertain the idea of reading a book by a different author!

Child reading a Rick Riordan Trials of Apollo book

Wednesday, 5 June 2019

Mini Hama bead crafts - a guide

This blog post contains Amazon affiliate links.

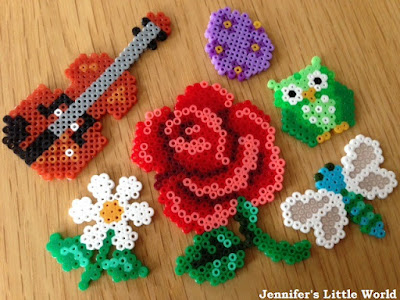
Mini Hama beads are tiny versions of the standard Hama beads which I use for many of my Hama bead crafting projects. They are about a third of the size of the standard beads. As a craft material, Mini Hama beads are much better suited to older children and adults as they can be quite fiddly to use, but once you've got the knack you can use them to create some really intricate designs and projects. In this blog post I'll give you some hints and tips for working with mini Hama beads, and share some of the projects that I've created.

Mini Hama bead projects

Mini Hama bead equipment


Mini Hama beads can be bought both in bags of mixed colours and as individual bags of beads in particular colours. You just need to be careful when shopping that you are buying the Mini beads and not the Midi or Maxi beads which are also available. I find that the mini beads are generally cheaper to buy than the larger beads.

A good place to start is with a bag of Mini Hama beads in mixed colours (affiliate link) and a couple of mini Hama bead boards - for example a Square Mini Hama bead pegboard (affiliate link) and a Circular Mini Hama Bead Pegboard (affiliate link). There isn't the same range of shaped boards available for the mini Hama beads as there is for the larger beads, but there are still plenty of colours available.

You can find plenty of inspiration for projects online, or have a look through my mini Hama bead projects which are linked at the bottom of this post.

Related article - Mini Hama bead projects

Mini Hama bead kits


An excellent way to get started with mini Hama beads is to buy a kit. Some of my first mini Hama bead projects were made using a kit which contained the patterns for flowers and dragonflies. Kits are great because they contain the boards that you need for the project and plenty of beads, sometimes enough to make the designs a few times.

Mini Hama bead Christmas kit

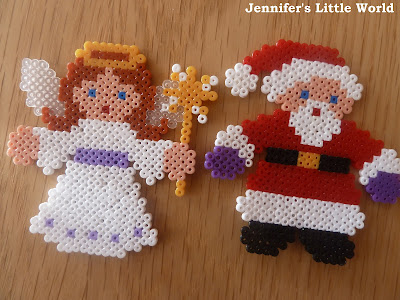
I also made some sweet Christmas ornaments using a Christmas mini Hama beads kit, and I have a Hama Mini Bead Owls kit (affiliate link) lined up ready to start.

Storing mini Hama beads


I like to sort out my Hama beads by colour. It does take a little bit of time, but it makes things so much easier when you can find the bead that you want and you can see how many of a particular colour you have. It's a task that is best done in daylight, as some of the mini Hama bead colours can look very similar. You can find a useful colour chart for Hama beads here to help!

I store my mini Hama beads in a container similar to these Weekly Pill Boxes (affiliate link). Each compartment fits many tiny beads, and you can open one lid at a time to remove the beads that you want to use.

Mini Hama bead storage in pill boxes

Tips for working with mini Hama beads


Because the beads are so tiny it can be difficult to place them into place on the board. It's almost impossible to do using just fingers, so I prefer to use tweezers. I place the beads next to my board, then use the tweezers to flip a bead upright, then pick up and place on the board. You can see my technique in the video below!

It's important to have an undisturbed space if you won't be able to complete a project in one go, as it's very easy to knock the board and ruin all your hard work. Depending on your project, it's also a good idea to work in daylight so that you don't mix up similar looking colours.

Tips for ironing mini Hama beads


Mini Hama beads are very delicate when it comes to ironing. You place a piece of ironing paper over the beads and iron in the same way as the larger beads, but you need to use the iron on the lowest setting and carefully pass the iron over the beads for only a few seconds. Make sure that all the beads have fused before you remove the ironing paper so that you don't dislodge any beads that have not stuck together.

Related article - Tips for ironing Hama beads

In this short video I take you through the process of making some mini Hama bead hearts, from placing the beads on the pegboard through to ironing.


My mini Hama bead projects


First mini Hama bead projects

Christmas mini Hama beads

Mini Hama bead decorative plant markers

Mini Hama bead decorative plant markers

Easter Egg cupcake toppers

Mini Hama bead tiled Russian Dolls picture

Mini Hama beads tiled Russian Dolls picture

Mini Hama bead hearts

Mini Hama bead heart pin badges

Mini Hama beads heart pin badges craft

Monday, 3 June 2019

Hama bead Tetris inspired magnets

Tetris Hama bead magnets tutorial

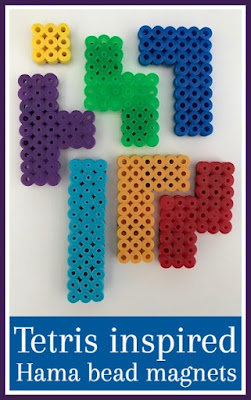
Hama beads lend themselves really well to pixel art, and I love using them for different computer game related designs. So I decided that I'd have a go at making some Tetris shape inspired magnets. These magnets are really fun to keep on the fridge and rearrange into different designs and shapes - the children love playing with them! Tetris was one of my favourite computer games as a child, and I would spend hours playing it. A set of these magnets would make a lovely retro gift for a friend.

These are the designs that I used for my Tetris shapes. I realise that the yellow square should really be larger, but I was suffering from a shortage of yellow beads! Of course you don't need to just have one magnet for each shape, you can make as many as you like, and you don't need to stick to the official colours because there have been so many different versions of Tetris that pretty much any colour goes.

Tetris Hama bead shapes design

Here are the pieces once they've been ironed. Because they are quite small you don't need to worry too much about them warping as they cool, but make sure that you iron them well so that the beads are firmly fused.

Related article - Tips for ironing Hama beads

Tetris shapes made from Hama beads

To turn the Hama bead shapes into magnets I used some magnet tape. I've used various ways of adhering magnets to Hama beads and this magnetic tape has worked the best so far. It's sticky on one side so you don't need to use any glue, and it's easy to cut to size. If you don't have any magnetic tape you can also use pieces cut from magnetic sheets which can be glued on, or stuck using a Glu Dot. I used two pieces of tape for most of the pieces to make sure that they will stick evenly to the magnetic surface.

Using magnet tape to make Hama bead magnets

When you are sticking on the magnets be careful because in order to be completely correct some of the shapes are not reversible, so you need to make sure that the magnets are going on the back side!

Hama bead Tetris pieces

It's such fun to try and fit them together in different ways!

Hama bead Tetris shapes

If you liked these magnets you might also like these posts:

Hama bead Minecraft keyrings - I've also used these Minecraft designs to make some fab magnets

And if you are looking for more Hama bead inspiration you can find lots of posts on my Hama beads page, including lots of seasonal ideas. Happy Hama beading!