Friday, 29 March 2019

Small things that make me happy

Photo credit Nick Fewings via Unsplash.

* When my children come into bed with me first thing in the morning for a cuddle.

* A mug of hot chocolate, whether at home on my own or shared with a friend.

* Picking the children up from school and hearing them chatter away about what they've been up to that day.

* Being the right size to fit into all my clothes

* A hot shower after exercise

* Stepping outside and feeling warm air on my face.

* Taking off jeans and putting on comfy pyjama bottoms.

* Watching my children reading.

* Clear and clean surfaces.

* Putting the last piece into a jigsaw.

* A pile of new books to read.

* Passing things that I've finished with on to an appreciative new home.

* Trying a new recipe and it being a success.

* A hot water bottle.

* An empty inbox.

* A good pen that writes nicely.

* Marmite on toast.

* Baking and eating cake.

* Eating outdoors when it's warm.

* A box of chocolates just for me.

* Sitting under a blanket.

* Hearing my son play the piano.

* Rain on the windows when I don't need to go out.

* Warm brownies with ice cream.

* Watching the sea.

Wednesday, 27 March 2019

My 2019 goals update

Back in December last year I wrote a blog post about my goals for 2019 - so I thought I'd do a quick update and see how I'm getting on so far!

My fitness goals

I've definitely upped the fitness this year so far. We pay for our gym membership a year in advance in February, which is very good motivation to remind us how important it is we go regularly - it's a huge amount! I've been trying to get to the gym twice a week, and also going out for an outdoor run once a week.

Last week I even managed a 10 km run which I'd not done for ages and found it relatively easy, so I'll be looking to continue with that distance outdoors once every couple of weeks. Then I'm aiming to increase my speed on the indoor treadmill runs. I love running outdoors at this time of year when it's warm enough to not need lots of layers, but cool enough that I don't get too sweaty and uncomfortable.

My crafting goals

I'm making good progress on my main crafting project, my Christmas ABC sampler which I want to finish by the end of the year. There are 27 boxes, one for each letter plus an extra one, and I have just three and a half to finish. Then it needs beads added and a few gold accents and it will be done. I'm hoping to get the stitching done by the end of June, and I think I can manage that if I make an effort to get on with it.

Another of my goals was to do some craft evenings with friends, and I'm pleased to say that has been very successful! I hosted an evening where we did diamond painting and then we made beaded bracelets at another friend's house. I love my bracelet and matching earrings, I'd never done any jewellery making before so it was really fun to try, and it's given me some ideas for new projects.

My homemade beaded bracelet

My blogging goals

I've slacked off a bit with my blogging lately. One reason is that I have picked up some work from a home working company which has been filling my time, and also I've been suffering a bit from bloggers block. Sometimes I feel that there are so many bloggers out there now, saying more than I could ever say and putting it much better than I can.

I'm also finding it more difficult to blog about the children and family issues. I don't want to embarrass the children as they get older, and don't want everything about their lives shared online. I need to have a good brainstorm and think about the direction that I want to go in!

My home goals

We've not made much progress here yet, although I've started calling some fencing companies as we need some repairs done, and hopefully we can get some quotes for a new side gate. The trouble is that we'd rather spend our money on travelling than home improvements! I do continue to declutter and the house isn't looking too bad at the moment, although it could definitely do with a good spring clean!

Did you set 2019 goals? How are they going?

Monday, 25 March 2019

The pros and cons of a holiday without the children

Later this week, my husband and I are lucky enough to be going on holiday without our children. Lucky because its an all expenses paid trip thanks to his work, but mainly lucky because we have lovely grandparents that are willing to look after our children while we jet off to the other side of the world. Being an anxious person, while I'm very much looking forward to our trip I'm also finding the build up a bit stressful. So I thought I'd write a post starting with the cons of travelling without your children - and then I can look forward to the pros!

Cons


It's mainly the guilt - guilt at going away and leaving the children, guilt in case they miss us, guilt for my parents having to give up their precious time to look after them.

Making sure that every detail of the daily routine is covered and that I've remembered everything that needs to be done while we are away and thought about all the logistics.

Having to have a thorough tidy up and clean so that the house is left in a reasonable state for my parents to live in! 

Pros


A chance to spend time with my husband away from the children, when we might actually be able to talk to each other without being interrupted!

The children will have lots of fun spending time with their grandparents, and I'm sure they'll spoil them!

I only have to pack for myself, which is easy.

There's lots more space in the suitcase, and we'll probably only need to take one case. I might even pack a choice of outfits rather than recycling my clothes to save space.

It's a very welcome break from the daily routine - the school run, the supermarket trip, the swimming lessons, the lunch box making and all the washing.

I can enjoy a whole 12 hour flight to myself without needing to worry about whether all the teddies have made it on board, does anyone need the toilet, did I bring enough snacks, are they wearing their seat belts properly, what if their children's meal doesn't arrive, will they sit quietly for the whole flight, and so on and on.

We'll be able to use the faster smart gates at airport passport control.

I've bought and packed some exciting brand new books, under the reasonable assumption that I'll have the opportunity to read them.

We'll be able to eat a meal out that isn't pizza, because it's the only thing that the children will reliably eat in a restaurant.

We can even enjoy a few drinks with the meal without worrying about having to get the children to bed and up again early in the morning.

And of course I can spend the whole time looking forward to seeing the children again when I get back.

As you can see, once I've got over the guilt, the pros far outweigh the cons! It should be an amazing trip, look out over on Instagram for some photos later this week but here's a sneak peek of where we are off to...

Rio de Janeiro scenery
Photo credit Raphael Nogueira via Unsplash

Wednesday, 20 March 2019

A family of glasses wearers

A couple of weeks ago, a trip to the optician revealed something that wasn't entirely unexpected - Mia now joins the rest of us in needing to wear glasses pretty much all the time.

I was about Mia's age when I got my first pair of glasses and I remember it being quite an unusual thing then, I was definitely the only person in my class to wear them. It seems much more common these days, I don't know if parents are more likely to take their children to the opticians or whether an optician is more likely to give a child glasses even if they only have a slight prescription. Luckily Mia has been desperate for glasses for ages and she is thrilled, although I can't help being a bit disappointed for her - wearing glasses can be quite a pain sometimes!

We go to Specsavers for the children - they give you two pairs of glasses for children which is really handy, and they have a nice selection of free ones too. We've already managed to send her to school without them and temporarily leave them behind at the swimming pool! She had a great time picking out a pink and purple pair for home and a more muted pair to wear to school, and she takes great pride in cleaning them with the special cloth and putting them away safely in the case. Harry has also started wearing his glasses more, he is only supposed to need them for board work at school and for watching television, but he says that he finds it more comfortable to just wear them all the time.

I do think that the glasses suit her, and when she teams them with a headband like I used to wear sometimes I find it's like looking at a little version of myself!

So here we are, a family of glasses wearers!

Family wearing glasses selfie

Monday, 18 March 2019

Get Your Kids to Eat Anything by Emily Leary - book review

I received an advance copy of this book in exchange for a review on my blog.

Get Your Kids to Eat Anything book review

Fussy eating is a bit of a problem in our family, and I'm fully prepared to admit that it's my fault. Although I started out well with lots of different foods, when they started to show food preferences, over time I ended up sticking with the things that I knew they would eat. My husband and I don't eat a very varied diet ourselves, usually eating the same thing for breakfast and lunch and rotating through a small number of evening meals, so as long as I'm covering all the food groups I tend to stick to the things that I know and can cook easily.

But now that the children are older and I have a little more time to spend thinking about and preparing meals, I'd love to introduce a bit more variety into our diets. In particular, as frequent travellers, it can become a problem when we want to eat out somewhere, and the children would rather simply not eat than try something new.

So I was very keen to try the new book Get Your Kids to Eat Anything by Emily Leary. Emily has been blogging at A Mummy Too since 2011, and her blog is a fantastic resource for family recipes, with plenty of vegetarian choices - I've used several of her recipes in the past! Get Your Kids to Eat Anything is a 5-Phase programme that aims to change the way your family thinks about food.

Phase 1 puts the unfamiliar into the familiar, working with the food that your children already eat happily and introducing some new elements. In Phase 2 you experiment with texture, taste and smell as well as understanding where food comes from and growing your own. Phase 3 helps you to discover the fun in food with some creative and exciting dishes, and Phase 4 pushes the food boundaries with some unusual flavour combinations. Finally in Phase 5 you learn techniques to make sure that these new habits stick and keep your family mealtimes varied long-term.

Each of these phases includes a clear explanation of what you will learn and achieve along with two weeks of delicious recipes and activities to try with your family.

It's early days yet, but I can really see how this approach is going to work. For example, my children eat a lot of pasta. In fact, they eat pasta for dinner most nights, rotating through a variety of sauces, perhaps with some peas on the side. I always use the same type of pasta - macaroni pasta - and I just get in the habit of chucking a couple of bags in my trolley each week. In Phase 1 you are encouraged to take a look at the food that your child will happily eat and think about different ways that you could vary that dish. Even something as simple as thinking about making the food a different shape, making a food a different colour, or adding a little extra flavour.

It might sound basic, but it's honestly something that I'd never thought about before. So the very first thing that I did was to buy a bag of pasta in a different shape and serve it with the same sauce - and they ate it all up without a fuss!

Healthy chocolate cookies

I've also been enjoying going through the recipe section and picking out a few to try. I couldn't resist trying the simple recipe for Healthier Chocolate Cookies above - with just a few simple ingredients they make a great, healthy alternative to a chewy bar or biscuit and were very quick to make. There's a huge selection of dinner recipes too, and being vegetarian I was really pleased to see how many suitable recipes there are, using a wide range of ingredients.

I have a full recipe from the book to share with you. This recipe for Strawberries and Cream Pasta comes from Phase 4, so it's a little ahead of us yet, but the reason that I chose it is that it is based around a cheese sauce, which I can make easily and my children eagerly eat, but with a bit of a twist - roasted strawberries, again a fruit that my children love but served in a different way. Enjoy!

Strawberries and Cream Pasta 


Strawberries and Cream pasta recipe by Emily Leary
Photo credit - Tom Regester
SERVES 4 PREP TIME: 15 MINS • COOK TIME: 30 MINS

For the balsamic strawberries 

300g (10½oz) strawberries, hulled and quartered
1 tablespoon balsamic glaze

For the pasta

180g (6oz) butternut squash
300g (10½oz) macaroni
30g (1oz) plain flour
30g (1oz) slightly salted butter
450ml (16fl oz) whole milk
30g (1oz) Parmesan cheese, or vegetarian alternative,
Finely grated salt and pepper

Preheat the oven to 200C (400F), 180C fan, Gas Mark 6. Place the strawberries on a baking tray, season well with pepper, then drizzle with balsamic glaze. Stir, then place in the oven for about 15 minutes until the glaze bubbles. Set aside to cool.

Put the butternut squash into a pan of cold water. Bring to the boil and simmer for 10–15 minutes until tender, then drain and set aside to cool. Meanwhile, cook the macaroni according to the packet instructions, then drain.

Put the flour, butter and milk into a saucepan and place over a medium heat, whisking regularly for 5–10 minutes until thickened, then season. Tip the squash, Parmesan and white sauce into a food processor and whizz until smooth. Stir the hot, drained pasta into the sauce. Divide equally between 4 bowls, top with the strawberries and serve.

Get Your Kids to Eat Anything: The 5-phase programme to change the way your family thinks about food by Emily Leary, is published by Mitchell Beazley in March 2019, RRP £16.99

Monday, 11 March 2019

How to make a simple Egyptian costume for a child

Simple child Egyptian costume tutorial

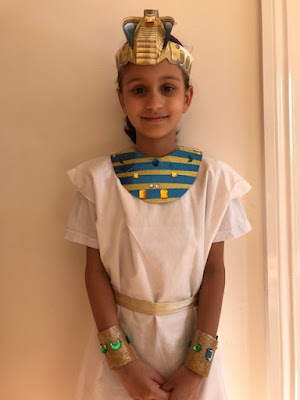
This term my daughter's class assembly is based around her Egyptian topic, so I thought I'd share how we made this simple Egyptian costume for her to wear.

I'm a big fan of basing a costume around a pillowcase. Since I made our shepherd's outfit from a pillowcase, that particular brown pillowcase has been reused twice as a Stone Age costume and also as a Viking outfit. I've now added a white pillowcase outfit to our collection - it was initially used as a Greek costume and has now been recycled to fit in with our Egypt theme. All you need to do is cut a hole in the top for the neck and two holes at the sides for the arms. For the purpose of modesty, Mia is wearing a white t-shirt and white shorts underneath!

Homemade Egyptian costume for a child

The look is completed with a ribbon around the waist, a headband, some cuffs, and a wide necklace. Here's how we put together the accessories:

Headband

This headband is available to download from the Twinkl website here - Egyptian Snake Headband. It's a premium resource so you'll need a subscription to download, or else you could make something similar with gold cardboard and gems. It's easy to put together - you just print it out in colour and fold and glue it together.

Twinkl Egyptian headband to print

Cuffs

To make the cuffs we used cardboard tubes with a slit down the side and shortened slightly to fit Mia's wrists. The cuffs were painted with gold acrylic paint, then a coating of glitter paint was added. We used Glu Dots to stick some plastic gems around the sides, then I threaded some elastic through so that they can be removed easily and stay in place for her Egyptian dancing.

Homemade Egyptian wrist cuffs

Necklace

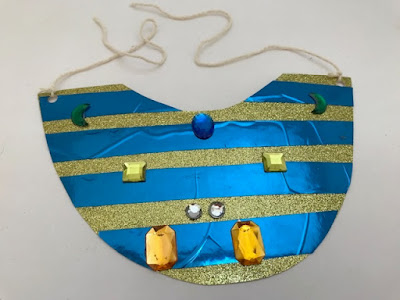
The necklace is made from a piece of gold glittered card, cut to size and shaped to fit around the neck. The blue stripes are made from shiny blue paper glued in place, and then it's decorated with plastic gems, again stuck down using Glu Dots. I used a hole punch to make holes in the top of the necklace and then threaded some string through so that it can be tied at the back of the neck.

Egyptian necklace craft for a costume

I think that she definitely looks the part!

As a Twinkl blogger I've been provided with a Twinkl subscription in exchange for sharing their resources on my blog and social media.

Saturday, 9 March 2019

World Book Day 2019

I love World Book Day. I know that not everyone is a fan of the costumes, but I love scrolling through my social feeds on World Book Day and seeing all the children dressed up, whether it's a shop bought costume or one that has been painstakingly homemade.

I was really pleased with the costumes that my children chose this year, not necessarily because of the creative skill involved, but because both costumes reflect the books that they are really enjoying at the moment.

Mia is currently working her way through the Harry Potter books, and I'm very proud of her because up until a year or so ago she was quite a reluctant reader and found it difficult to move onto more challenging chapter books. She is loving Harry Potter and seems to have a really good understanding of the story (although she's seen the films too which I'm sure helps!). She's taken a quiz somewhere which has sorted her into Hufflepuff house, so we bought her some Hufflepuff robes. The costume came with a notebook cover, and she's found a notebook to put inside which she's filled with handwritten spells and illustrations!

World Book Day costumes - Hogwarts and Percy Jackson

Harry was introduced to the Percy Jackson books at school last term, and since then he has devoured every book that he can find by Rick Riordan. We bought him one series of the books to take on holiday, and as soon as he'd finished them he started them again. There is something about them that has really struck a chord which is wonderful to see! For his costume, he already owns a Camp Half-Blood t-shirt, an important location in the stories, and a Camp Half-Blood medallion necklace. He teamed it with trousers and a pen which is apparently a sword in disguise. A super simple costume!

I love that their costumes were such a snapshot of their current reading obsessions!

Friday, 8 March 2019

Trees you can use to create a stunning centrepiece for your garden

This is a collaborative post

My recent Dubai trip included a visit to the beautiful Miracle Gardens. To say it was stunning is an understatement. It is amazing what they have done with plants and trees. My camera was going constantly and it was almost impossible to take everything in.

Now that I am home, I have decided to write one of my rare gardening posts. The other day I was looking at The Tree Center website and was stunned by how many different varieties were available for homeowners to buy. There are plenty that are small enough to use in your own garden to create interest and provide your family with something beautiful to look at year round. Below are some of my favourites, all of which you can use to create stunning centrepieces for your garden.

Stunning Red Maples 

The first one I am going to suggest may be a little big for use as a centrepiece for a family garden. Although it can be pruned to keep it relatively small, unfortunately that will ruin the structure of the branches and so in the winter it may not look that great. But if you have space, this is a good choice.

Red maple tree leaves against sky
Photo credit Ian Matyssik via Unsplash

Using crab apples as garden centrepieces 

Crab apples are nice looking trees. In the spring you benefit from a proliferation of lovely soft blossom followed by beautiful bright leaves, and by the summer you can also enjoy the lovely looking fruit. If you really want to, you can use some varieties to make crab apple jam. It is not to everyone’s taste, but it makes for an interesting addition to all kinds of meals.

Redbud trees 

The Redbud is another flowering tree, with the added benefit that in the autumn you get to enjoy the golden yellow heart-shaped leaves. It will thrive in a sunny spot.

Crape Myrtle 

If you would like a tree that flowers twice a year, the crape myrtle is for you. Many varieties also have interesting foliage that goes through a series of colour changes.

Flowering dogwoods

These trees do well in shady positions. So it is an especially good choice for urban gardens where the shadow from buildings and neighbour’s hedges can make it difficult to grow other varieties. Again, you are treated to several different displays from this tree. In the spring, every inch is covered in tiny flowers. By late summer, you get the bright red fruit. As the autumn wears on, you can enjoy the purple-red foliage.

Photo credit Rebecca Malone via Unsplash

Tree buying checklist 

Hopefully, the above suggestions will inspire you to go out and buy a tree for your garden. But before you do so, it is wise to go online and find yourself a good tree buying checklist or tree finder wizard. Doing this is the best way to ensure that you do not inadvertently end up buying a tree that is not suitable for your garden. They are not cheap and digging up and disposing of a tree once it has matured is not easy.

This is a collaborative post

Monday, 4 March 2019

Mini Hama bead heart pin badges tutorial

This post contains Amazon affiliate links

DIY Hama bead heart pin badges

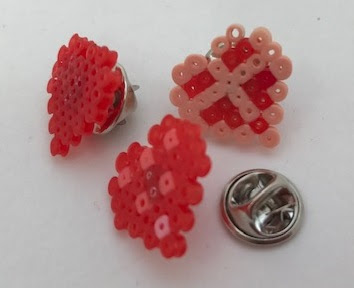
A little while ago I made some mini Hama bead hearts using tiny mini Hama beads, and this week I finally decided what to use them for - some heart pin badges!

Here's how I made them:

To make the mini Hama bead hearts

Mini Hama beads are tiny, and can be a bit daunting to work with at first. I used the beads in a selection of red and pinks on the square board as below and placed them on the board using tweezers. You can see a video of my technique below.

Mini Hama beads used to make hearts on peg board

When ironing the beads you need to be very careful as they don't require as much ironing as the larger beads, just a few seconds on each side.

Mini Hama bead heart craft

Here's a video showing how they were made:


To assemble the badges

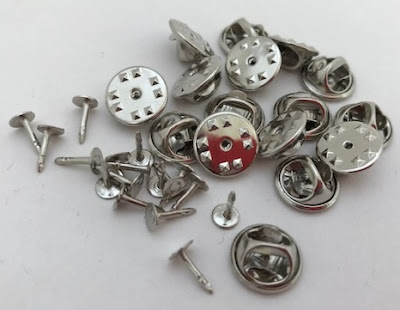
To make the badges you will need some pin badge backing pieces. They come in two parts - a pin which is affixed to the back of the heart, and a backing piece which clips on when you are ready to wear or display the badge.

Pin backs for crafting

You need to use a strong glue to fix the backing pins to the Hama bead hearts, any kind of strong superglue will work well. Hama beads can sometimes be tricky to glue as the plastic they are made from can be a little soft, but the smaller beads seem to be firmer once ironed and stick better.

Sticking a pin back to make your own pin badge

Depending on the glue that you use you may need to wait for it to dry, and then your pins are ready to wear!

Make your own pin badges

These little badges would make a lovely Valentine's gift for children to give out to their friends. And now I've discovered how easy these pin badge backs are to use I'm thinking of lots of other crafts that I can use them for!

Tutorial - mini Hama bead heart pins

I've used Hama beads to make lots of other Valentine's Day themed crafts, and you can find them all here - Hama bead crafts for Valentine's Day.

They include:

Hama bead heart hanging decoration
Hama bead heart spinning decoration
Hama bead heart photo frames
Mini Hama bead heart pins
Mini Hama bead hearts

Valentine's Day themed crafts using Hama beads