You need:
Craft foam sheet
Clear cellophane or plastic - printed with snowflakes if you have any!
Small star sequins
Bostik Fine and Wide Glu Pen
Wadding or cotton wool
Silver card or a card blank to mount it
Blu Tak Glitter Pens to decorate
Instructions:
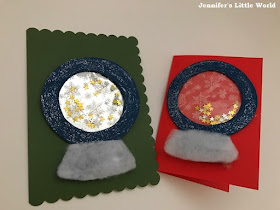
Using the craft foam, cut out a snow globe shape. I drew around a bowl and a cup to create the shape of the globe, and made a stand at the bottom. Then cut out enough of the printed cellophane to cover the circle in the middle. Use the Bostik Fine and Wide Glu Pen to make a circle of glue around the edge and press the cellophane down firmly. Add a small sprinkle of tiny star sequins into the centre, then make another ring of glue and add a circle of clear cellophane. Wait until the glue has completely dried.
On the front of the snow globe, cut some wadding to size and glue into place to make snow at the bottom. Then mount the snow globe onto a card blank or some silver cardboard. For a bit of extra sparkle, squeeze some glitter from the Glitter Pen around the outer edge and spread it around evenly with a paintbrush.
This festive season I'm taking part in Vlogmas, and aiming to publish a video each day to my YouTube channel. Today's post marks Day 12 of Vlogmas, and I've created a video tutorial for this craft which you can see here!
The box of craft materials was provided to me free of charge by Bostik as part of the Tots100/Bostik Craft Bloggers Club.


No comments:
Post a Comment
I love reading your comments!