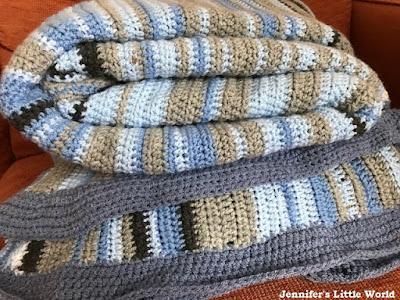
As the end of the year approaches, my Sky Blanket project draws to a close. Although I'll finish my daily rows at the end of December, I'm planning a big border so I've a way to go yet before I share a picture of the finished blanket. I love my blanket, but working on this project over the last year has given me a few ideas about what I would do differently next time, and so I thought I'd share them.
Firstly, I would use a wider range of colours. I was adamant that I wanted to stick to the basic sky colours of blues and greys, but with hindsight I could have made a much more colourful blanket if I'd chosen some pinks and oranges for the sunsets, or a rainbow yarn. Having said that I do quite like the simple palette of my blanket so perhaps too many colours would have been a bit much.
Next time I'd definitely use a wider variety of greys though, and I'd also look for some sparkly grey yarn to make all those grey rainy days a bit more interesting!
I could have also varied my stitches a bit. I did this to a certain extent, and I do like the uniform quality of my blanket, but I've seen some fantastic examples of blankets that are almost like samplers with all sorts of different stitches.
Next time I wouldn't get too hung up on which exact colour to use. In a country like the UK with such a variety of weather, to be honest on most days I could have chosen any colour to represent the sky. As I went through the project I tended to lean towards a colour which represented the colour of the sky for most of the day, rather than looking at the sky at a strict time that day. If I'd spent a reasonable amount of the day outside, for example if we'd had a day out or I'd been for a run, then I chose a colour that represented the sky at that time.
It was a very rare day when the sky stayed the same colour for the majority of the day. I've seen some blankets where the knitter or crocheter has used a couple of different yarn colours for each row or square, and I think that works really well, I was just worried about how much yarn the blanket would end up using!
My blanket did end up very long and skinny. This meant that it was very easy to keep on top of, as each row only took me about 10-15 minutes to crochet. Perhaps next time I'd add in a few extra stitches. My blanket had a starting chain of 200, perhaps I'd up that to 250 or 300.
I could have got around this by making a blanket with different squares instead of rows. Then I could have planned the blanket right from the beginning and I would have been able to work out the rough size of the finished blanket. It would also have been more portable to take away with me. I would have to sew them up as I went along though, I can't imagine trying to sew together 365/6 squares all in one go!
Finally, I would have kept a close eye on my stitch count as I went along. Being relatively new to crochet I'm still learning, and discovered at the beginning of November that I'd lost almost 40 stitches from the row. Having only started with 200, there was a significant difference between the two ends of the blanket. I was able to catch up and add them back in, but it would have been better if I'd checked every month or so and sorted it out as I went along!
I hope that these tips were helpful! I posted about the progress of my Sky Blanket monthly throughout 2016, and you can links to each monthly post here - My completed Sky Blanket.
If you are looking for a long term craft project to keep you busy for a year but aren't sure whether a Sky Blanket is the one for you, you might like the different projects that I rounded up in my blog post Ideas for a Long Term Craft Project.


