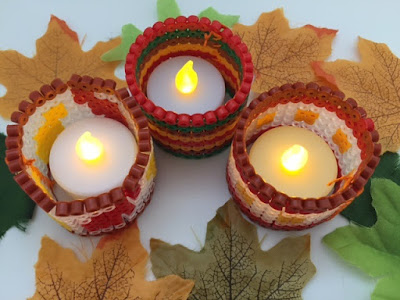
With Autumn approaching and the evenings drawing in, I like to have a few candles lit around the house. With young children about these days I often go for battery powered ones as they are so much safer, and it doesn't matter if you get distracted and leave one burning! It's been a while since I made anything with Hama beads, so I pulled them out to make some curved holders for battery powered tea lights with a seasonal Autumn theme.
Please note that these tea light holders are intended for battery powered tea lights only, it would not be safe to use them with a real flame.
You need:
Battery powered tea light candles
Something to shape your tea light holders with - I used a cardboard tube but anything a similar size and cylindrical would work, perhaps a rolling pin or even a chair/table leg
Hama beads in Autumnal colours
Hama bead peg board - I used two large square boards clipped together but you can get away with just using one if you don't mind it not wrapping all the way around the tea light
Thick thread and needle
Instructions:
I found that a strip the length of 29 Hama beads was the perfect size for my tea lights, great because this is the size of the largest peg board! If you are making holders for wider candles then you'll need to clip two boards together. In terms of height it's up to you, I found that a height between 8 and 10 pegs worked well to cover the height of the tea light.
Create your design on the pegboard. When you iron your creation there will be small holes that the light can shine through, or you can create holes as part of the design so that the light can shine out. Alternatively you can use transparent Hama beads like I did.
Related post - Ironing tips for Hama beads
Iron one side of the design so that the beads are well fused together. Remove from the pegboard and place on a heatproof mat, then iron the other side of the design, but ironing slightly less on the second side.
While it is still hot, wrap the Hama bead strip around the cardboard tube with the more ironed side facing inwards, it should bend easily around, and hold firmly in place until it has cooled.
When cool enough to handle comfortably, use a thick needle and some coloured thread to sew the two sides together to make sure that the candle holder will keep its shape. Even if the holes in the beads are very small after ironing, the plastic should be soft enough that you can easily push a needle through, especially if you do it while it is still warm.
Place the candle holder around your battery tea light candle, and enjoy!
Are you looking for some more fun Autumn crafts, activities and recipes? Here are some fab ideas from other bloggers:
A fab Autumn craft for young children is this lovely Hedgehog Craft by Joy from Pinkoddy. She's also included loads of helpful information about who to contact if you find a hedgehog that is injured or needs help - very pertinent for this time of year as in fact I rescued an ill hedgehog the other week by taking it to the vet! Another lovely craft for Autumn is this Handprint Tree Craft by Otilia from Romanian Mum Blog, an easy craft which is great for children of all ages.
It's a great time to make the most of seasonal produce, and with plenty of apples around I love the look of this German Style Apple Autumn Cake by Emma from A Bavarian Sojourn, it looks delicious! On the savoury side, Cat from Yellow Days has a simple but tasty recipe for a warming Roasted Butternut Squash and Sage Soup. If you fancy a treat, then these Sticky Toffee Apple Breadsticks from Jenny at Mummy Mishaps look amazing.
If you fancy heading out and about to find your own seasonal produce, Michelle at Mummy From the Heart has shared some tips on Foraging for Beginners, and why it's great to get your kids foraging with you.


This an adorable autumn craft and they look so effective.
ReplyDeleteWhat a lovely idea, so pretty! Thanks for sharing my soup recipe.
ReplyDeleteThese are so cute, I never realised you could sew hama beads up to make them go round. I love it! Mich x
ReplyDeletethese are fab Jennifer and would make such lovely gifts x
ReplyDeleteThese are such a great idea. Mine are just getting into Hama Beads and we could have lots of fun with this idea over half term.
ReplyDelete