Friday, 30 September 2016

Planning my next crochet blanket - some crochet blanket inspiration

As the end of the year approaches rapidly, and I can see the end of my Sky Blanket in sight, I'm starting to think about a new project for next year. The Sky Blanket will be my third crochet blanket, having already completed the Patons crochet afghan and my granny square blanket. All three are quite different in terms of style and colour combinations, and I'm trying to work out what I'd like to try out next.

Planning a project - some crochet blanket inspiration

I have quite a lot of white yarn at the moment so it would be nice to use some of that up, although I want to include plenty of bright colours too. A pattern that I've had my eye on for a little while is the Granny Stripe blanket from Attic 24:


It looks as though I might be able to manage it, and maybe I could alternate the coloured rows with white ones, something like this:


On the other hand, after tentatively trying out a few different stitches on my Sky Blanket, I do quite like the idea of just going completely random with a whole mix of different stitches. I've seen some lovely examples like the one below, I could either make it up as I go along or follow a vague pattern, again alternating white rows with coloured ones.


I also like this similar idea using different sizes and shape of granny square, either in a random pattern or one with more structure to it:


To incorporate the white yarn I could use white for the backgrounds to the squares, something like this:


So it looks as though my big decision is really whether to go with stripes or squares! I'm leaning towards stripes at the moment because I quite like the more sturdy look of my stripy blanket, I worry about how well my granny squares will hold together if the blanket becomes well used. I'm hoping that I can come up with something that is an amalgamation of all the inspiration that I've picked up!

I hope you liked all these gorgeous blankets - this is my Blankets inspiration board on Pinterest, I've been adding to it for a long time now and it is stuffed full of more colourful crochet blankets, along with a few hints and tips!

Wednesday, 28 September 2016

Crafty uses for a comb binding machine at home

Over the summer I was lucky enough to receive a electric comb binder (affiliate link) to review, and we used it to make our fabulous summer holiday scrapbook.

Crafty uses for a comb binder around the home

I have lots of other crafty projects in mind for using my comb binder, both for myself and projects for the children, so I thought that I'd share them here in case anyone is looking for inspiration! My comb binding machine is an electronic one which makes it really easy to cut holes in thicker materials like laminated paper or cardboard.

Hobbies and crafting


Patterns - for knitting, crochet, cross stitch and so on, either to keep safe or to use while working on, as the bound sheets will lie flat for easy use

Recipes - again as the sheets lie flat it's the perfect way to organise the recipes that you use regularly for easy access

Inspiration file - with cuttings from magazines, to keep them all together

Blog planner - I'm still collecting ideas for this but there are loads of free blog planner printables about, and although I do a lot of my planning electronically I do like to be able to write things down as well

Portfolios - a way to store and display your best pieces of written work, or sketches, or photographs and so on

For the children


A colouring book - print out free colouring pages and bind them together for a personalised colouring book that you can take travelling with you

A way to collect together stories and artwork - children can write and illustrate their own stories and bind them together to make books, or else keep a diary of what they've been up to or a special day out or holiday, like our holiday scrapbook

Laminated scrapbook made using a comb binder

Worksheets - perhaps they could be laminated so that they can be worked on again and again, for example for handwriting practice

School information - like class lists, contact details, schedules, after school club information, lunch menus, curriculum information

School work - bind together some of the favourite writing and drawing from the year to create a series of books showing their development. You could also add in certificates that they've received over the year and school photographs

Around the house


Instruction manuals - you could include manuals that are different sizes and make a handy book to flip through

Takeaway menus - for handy access and comparison!

A cleaning schedule - perhaps with laminated pages so that you can tick off chores as they are completed

A babysitting manual - with information for babysitters such as emergency contact numbers, details of your routine, where different things (like the chocolate biscuits!) are kept and so on


How would you use a comb binder at home? I'm sure there are lots of other ideas!

Monday, 26 September 2016

Autumn Activities from the Forestry Commission

This Autumn, Forestry Commission England wants to get everyone out and about enjoying their local forest.

We were sent some crafty bits and pieces so that we could try out some of the activities ourselves. We started with a canvas tree picture, using colours that we found in nature. Mia collected together as many different colours as she could - green grass and leaves, coloured flower petals, berries, and some dirt mixed with water. Then she used them to paint the canvas. The mud worked best, but the coloured petals also worked really well, and she produced a fantastic background for her art. 

Making a picture using colours from nature


Then she painted a tree outline and used white glue to stick down different shapes and sizes of leaf that she found to make the outline of the tree. She was so proud of her finished picture that she took it into school to show her class!

Picture made with natural colours

Then I tried my hand at making an Autumn themed dream catcher. I found some instructions here - How to Make a Dreamcatcher - and used a small wooden hoop, twine and beads to weave it together. I decorated it with some Autumn leaves that Mia had collected.

Dream catcher with natural materials


Finally, Mia and I enjoyed some adult colouring sheets which you can download here - Autumn colouring sheets - a great way to spend some quiet time together.

Colouring pages from the Forestry Commission

We were provided with some crafty bits and pieces to help us complete these projects.

Saturday, 24 September 2016

Book review - Lesser Spotted Animals by Martin Brown

Martin Brown is the illustrator of the extremely popular Horrible Histories series of books, and Lesser Spotted Animals (affiliate link) is his first foray into writing and illustrating. When Brown was little he loved drawing animals, and in fact he had the initial drawings for this book stashed away for 30 years!

Lesser Spotted Animals is a fantastic book for chidren that are bored with reading about the usual handful of different animals and want to find out about animals that we never get to see. I immediately knew that this book would appeal to Harry, he loves reading non-fiction books and learning fun and quirky facts that he can share with us. I was right, he has hardly put it down!

Each page introduces us to a new animal - the Dagger-Toothed Flower Bat, the Cuban Solenodon and Speke's Pectinator to name a few. Each double spread page contains a gorgeous illustration, information, fun facts and plenty of humour. Some of the animals seem familiar, and others are completely new. There's a little fact box for each one and I loved the way that it's written to appeal to little ones, for example Size - 'as big as a very tall, fat man lying down' or 'bit smaller than a guinea pig but with a long sturdy tail' - it's really easy to visualise! Some of these animals are plentiful but many are endangered, and there is very little known about some of them.

It's a great book that a child can pick up and put down to read in small chunks, great for bedtime, and packed with plenty of useful and fun information.

I received a copy of this book to review. Amazon link is affiliate.

Thursday, 22 September 2016

September - Lately I've been...

I feel as though I've not written anything personal on my blog for a while, so I thought I'd share a few of the things that I've been up to lately! I've been...

Thinking about - The children started a new school in September. Fortunately after a couple of small wobbles they seem to be settling in really well, and are really excited about their topics this term and are making new friends. But I'm always thinking about them when they are at school, wondering what they are doing, and I look forward to hearing all about it at the end of the day.

Worrying about - The new school is close to a town centre a little way away and comes with a few challenges, like lots of traffic on the school run and tight parking spaces. I've found a couple of roads close by though that are just a few minutes walk away and where I can always find easy parking, so hopefully I'll get used to it over time!

Crafting - The Sky Blanket continues to increase rapidly in size, and it is now becoming rather unwieldy. I'm not looking forward to adding the border, it's going to take a very long time! The blanket has a lovely smooth texture and is a nice weight to sit underneath, there are going to be some lovely family snuggles under it (there will be plenty of room for everyone!)

Watching - We don't have a television series on the go at the moment which is very unlike us, and because Ram was watching the Olympics and Paralympics over the last few weeks I've not watched a lot at all. I finished watching Outlander over the summer, I thought the second series as a whole was generally just okay, but the last episode was fantastic, so I'm really interested to see where the story goes.

I have been watching a bit of YouTube at the PC lately though while working on my Sky Blanket, and I recently discovered Cruising the Cut, a fab channel by television journalist who quit his job and bought a narrow boat to go cruising around the UK canal network. It's a little (very unlikely!) dream of mine, sparked by watching the canal boats go by at the bottom of my in-law's garden, and I'm avidly working my way through his videos. I particularly love the boat tours!

Canal boat at the bottom of the garden

Eating - I'm trying to watch what I eat for a little while as my jeans were starting to feel a little too tight. I've cut down all the biscuits that I was eating over the summer holidays, and the other treats that I buy when I'm left alone in a supermarket, but it's slow going. So I've been eating a lot of Ryvita and diet chewy bars, although I do still build in a few treats like the cake I had this morning!

Reading - I seem to have been reading quite a few books lately. I've worked through a lot on my Kindle, both books that I bought in the sales back in January and others that I've found in the free bestseller list. The trouble is that although I can remember the plots, the author and title are less memorable when you aren't picking up a physical paperback! The latest book I re-re-read was The Loving Spirit by Daphne Du Maurier, her first novel and not one of her most popular, but for some reason it's my favourite. I really like it and I've read it over and over. It tells the story of the Coombe family over four generations, beginning in 1830, and I didn't know until just now that it is actually based on real events and places. It's put me in the mood to re-read some of the other favourite physical books on my bookshelf, I might go back to The Poisonwood Bible by Barbara Kingsolver, another favourite.

Listening to - I don't listen to music very much, but with a longer school run I've been finding myself in the car quite a lot with the radio on. I really need to get organised and put some Spotify playlists together because I'm always hopping about between channels trying to find something that I can sing along to. A current family favourite to belt out is Shut Up and Dance by Walking the Moon.

Planning - I've been trying to get organised and plan some blog posts for the rest of the year. I've got lots of posts planned out that I'm really looking forward to getting on and writing. I use Trello for my blog organisation and it's great, I have different boards for posts that are published and those in progress, as well as a board for general things To Do that I use to plan my daily tasks and recurring tasks like housework.

Looking forward to - My longest friend from school is getting married in a couple of weeks, which I'm very excited about! I'm also looking forward to half-term as we have a few fun things planned, and I'm sure that Christmas will creep up fast!

Tuesday, 20 September 2016

Review - Aquabeads 3D Animal Set

As an Aquabeads blogger I was recently set an Aquabeads kit to review -the Aquabeads 3D Animal Set (affiliate link). This set comes with a special 3D layout tray that allows you to make the 3D animals, as well as over 500 beads in a variety of colours and four template sheets. This is a refill pack, so in order to complete it you will also need a flat Aquabeads tray and a sprayer, and a pen for placing the beads is also helpful.

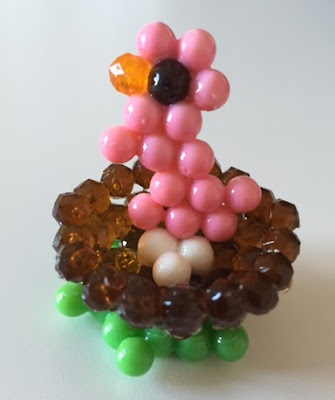
The set comes with enough beads to make five different animals - a panda, lion, a bird in a nest, tortoise and a ladybird. The ladybird is made entirely using the 3D template so doesn't have a flat template sheet but there is a picture that you can copy. For the other animals, the template sheet is inserted underneath the transparent flat layout tray meaning that you can easily see where the beads need to be placed.

Mia chose to start with the bird in a nest. The patterns are simple to follow and she managed to place the beads with her fingers, although it was a bit fiddly.

Review - Aquabeads 3D Animal Set

When you've finished placing your beads you need to spray them with water and wait a few hours for the individual pieces to dry, then you can use more water to stick the different parts together. We found that you need to use plenty of water to really saturate the beads to make sure that they stick properly.

Because they need to be left to dry for several hours you can only make one animal at a time as the 3D template will be in use. When fully dry we found that the finished product was very sturdy and held its shape well. Some of the beads in the set are jewel beads which make a nice contrast. I thought that this 3D set made a much nicer finished product than a previous set that we have tried out.

Review - Aquabeads 3D Animal Set

The set does contain only just enough beads to make all the animals with a couple in each colour left over, so you need to make sure that you don't drop any! The children were able to make the separate pieces quite easily, although they did struggle with the ladybird as it needs to be assembled entirely in the 3D layout tray, so I made that one (I'm not sure that I got it quite right though as it was quite difficult to follow the picture!). It was also tricky to remove the beads from the 3D template, and I found that you needed to wash it thoroughly between uses to prevent a build up of stickiness. The beads do take quite a while to dry, so it's best if you can to place them in the sun or over a radiator to speed it up a bit. When fully dry the finished animals are very solid and can be played with without breaking.

Review - Aquabeads 3D Animal Set

We had a lot of fun with this set, it was nice that the children could both complete a lot of it on their own and they really loved the animals that they made.

I was sent this product in exchange for a review. Amazon link is affiliate.

Monday, 19 September 2016

The School Reviewer website

This website is no longer available

School Reviewer is an invaluable online resource, designed to help parents and pupils through their educational journey. Parents can already use the website to access information and stats about over 42,000 schools, nurseries and colleges within the UK, as well as leave reviews of schools to help out other parents, and now the website has been relaunched with even more resources added.

As well as information about a school, including location and contact details, OFSTED reports and academic results, School Reviewer has now been granted the use of information about schools that pupils attended in the previous school year. This allows the website to display representative heat maps in order to infer the catchment area for the school, especially useful if you are moving house and need to find a nearby school.

Review - School Reviewer website

School Reviewer aims to have the largest Tutor Database on one site in the UK. Tutors are able to upload their details free of charge, enabling parents to search for a local tutor that meets their need.

Every educational establishment on the website has a Parents Forum, to ask questions and to share information. Each one also has a Buy/Sell Marketplace where parents can advertise items that they are selling to other parents at the school. It's especially ideal for selling school specific items such as branded uniform or text books, but anything can be uploaded for sale, and the website allows seller and buyer to communicate securely and arrange details of the transaction - and of course the school playground can be used for the exchange of goods, thereby saving on postage fees. Alternatively there is a national platform too if you want to reach a wider audience.

Review - School Reviewer website

A key feature of the School Reviewer website is the ability to download question by question videos for GCSE maths which show how to to score a 100% grade. These videos are dowloadable for a minimal fee which is put towards the continued creation of new material. Other tutorial videos are available, but what makes those offered by School Reviewer unique is the question by question walkthrough. For example, for the GSCE Maths paper each walkthrough has its own video, meaning that the information is presented in soundbite portions, perfect for a child to watch whenever they have a spare few minutes.

With the SATS tests generating a lot of interest this year, School Reviewer is offering a free service to help both parents and children working towards the Keystage 2 SATS. School Reviewer will be creating downloadable videos, launching with two bespoke papers with the original papers being published when they are no longer within the national school curriculum.

Finally the site will also launch with two bespoke 11+ papers, again offering a video walkthrough of questions from the papers. Most schools set their own papers, so these bespoke papers will give parents an idea of what to expect, with more papers to be created in the future. There will be a minimal fee for this.

These new features mean that the School Reviewer website is a fantastic resource for parents and children at all stages of their school journey.

This is a sponsored post.

Thursday, 15 September 2016

Halloween laminated battery candle covers

This month, the theme for the Bostik Bloggers craft box was Halloween, and having seen the lovely Halloween sequins that were included I decided to use them to make some covers for battery powered tea lights to create some spooky Halloween decorations.

Please note that these tea light holders are intended for battery powered tea lights only, it would not be safe to use them with a real flame.

Halloween laminated lanterns craft

You need:

A laminator and pouches (or clear sticky contact paper)
A5 foam sheets
Halloween themed sequins
Halloween themed ribbons
Glitter
Bostik Glu Dots
Stapler and tape

Instructions:

Use the laminator to make a sheet of spooky Halloween plastic for the lantern window. Spread the sequins and glitter out inside the laminating pouch, not too close to the edges, and laminate. If you don't have a laminator you can use two pieces of clear contact paper to sandwich the sequins and glitter together, but it won't be as stiff as laminated plastic so you may need to make the window on your tube smaller.

How to laminate sequins

Use a craft knife to cut a large window in the foam sheet, then cut a piece of the laminated plastic to size to cover the window. Secure it in place with some Bostik Glu Dots at regular intervals around the frame.

Bostik Halloween craft

Bend the foam sheet around to make a cylinder. Secure it at the top, bottom and middle using a stapler.

Halloween lantern craft

Decorate the candle cover with some Halloween themed ribbons, and if you like some more sequins, once again sticking them in place with some Glu Dots to hold them firmly.

Halloween lanterns craft for children

Then place a battery powered candle inside and enjoy!

Halloween lanterns with sequins

Please note that these candle covers are intended for use with battery powered candles only, do not use with a real flame.


Halloween laminated lanterns

The box of craft materials was provided to me free of charge by Bostik as part of the Tots100/Bostik Craft Bloggers Club.

Wednesday, 14 September 2016

Review - VAX Dual Power Pro Carpet Cleaner

When we moved into our new house about four years ago the first thing that we did was to have the carpets cleaned - the carpets were already several years old, the previous owner had a dog, and with a crawling baby we wanted them to be as clean as they could. At first we were quite precious about our newly cleaned carpets, but over the next few years snacks found their way into the living room, there were inevitable drink spillages, and even though we take off our shoes as we come in there was still tracked in dirt in the entry way. It was high time that they had another good clean, and so the opportunity to review a VAX Dual Power Pro Carpet Cleaner (affiliate link) could not be turned down!

Vax Dual Power Pro Carpet Cleaner review

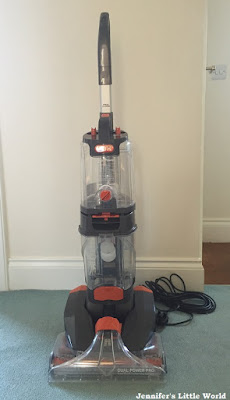
The VAX Dual Pro Carpet Cleaner is a powerful, deep cleaning and quick drying carpet cleaner. The cleaning system agitates and helps to lift deep down embedded dirt, and the carpet cleaner comes with a hose and hand held upholstery attachment as well as the SpinScrub powered hand tool for scrubbing stains and a hard floor squeegee tool. The accessories can be stored in the included handy bag.

Vax Dual Power Pro Carpet Cleaner review

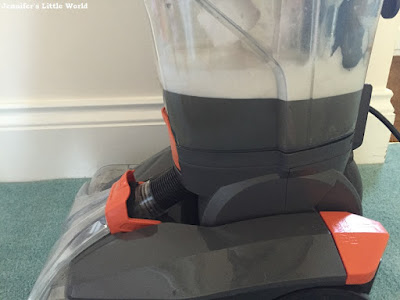
The carpet cleaner was easy to assemble. The handle can be easily removed for transport and so you can fit it all back into the box for storage. There are two removable tanks - one at the top for adding water and cleaning fluid and one at the bottom for collecting the dirty water. It has a long power cord and is easily switched on and off with a foot pedal at the base of the machine. There is a second foot pedal to tilt the machine backwards, which activates the brushes underneath for cleaning the carpet.

Vax Dual Power Pro Carpet Cleaner review

To set the machine up you need to add the cleaning solution and warm water. The carpet cleaner comes with two small bottles of cleaning solution (250ml each), and I would say that one small bottle is enough to do two medium rooms. It's easy to see where the different liquids need to go, and it was quite straightforward to set the machine up for cleaning.

Vax Dual Power Pro Carpet Cleaner review

When the water and cleaning fluid have been added you first need to set the machine to Wash and move the cleaner slowly forward over a small area of carpet, while depressing the trigger to release the water and cleaning solution. Then bring the cleaner back over the same area, this time without pressing the trigger, to suck up the dirty water. When you have covered the entire area of your floor, repeat the process but this time with the setting changed to Rinse. It's the same procedure when using the attachments, and you can see me using the cleaner in my video at the bottom of this post.

The carpet cleaner and water reservoirs do go down fairly quickly, and to clean one room you probably need to fill them up (and empty the dirty water at the bottom) at least twice, possibly three times. Each time I filled it with 80ml cleaning solution and 2 litres of warm water. The removable tanks for clean and dirty water are very easy to remove and to click back into place.

The machine isn't too noisy, and is quite easy to manoeuvre about. It did produce some gunky lumps of fluff/scummy bits that had to be picked up as I went along, so it's important to vacuum the area first as thoroughly as you can. The dirty water removed from the machine was quite disgusting!

Vax Dual Power Pro Carpet Cleaner review

It was a bit difficult to take accurate before and after photos due to the change in lighting, but here is my living room carpet. I think you can see that all the small grubby marks have gone.

Vax Dual Power Pro Carpet Cleaner review

After cleaning, it took a few hours for the carpet to feel dry enough to walk on, and you'd probably want to leave the carpet to dry overnight before replacing heavy furniture. The flattened pile on the carpet came right up again, and it felt lovely and soft to walk on as well as smelling nice and fresh.

Then I tried out the upholstery attachment on my stairs. The hand accessories are used while the machine is in the upright position, and it's easy to clip the hose to the front of the cleaner and then snap the attachment of choice on to the other end of the hose. It's a similar process to carry out the cleaning, pressing down the trigger in one direction to release the solution and releasing it in the other to suck up the dirty water.

I was really impressed with the difference to my stairs - the carpet cleaner instantly removed many small spots of dirt that I had learned to put up with! The hose only reached safely about two thirds of the way up the stairs - it would have reached longer but I found that the water and cleaner release wasn't effective enough as the hose wasn't straight. Luckily our stairs are curved so we have a larger stair in the corner where I could sit the machine while I finished off at the top.

Vax Dual Power Pro Carpet Cleaner review

Finally I used the SpinScrub powered hand tool for some stubborn stains. The brushes spin around while you hold the tool, and once again you press the trigger to release the water and cleaner. It didn't remove all the older stains entirely but it did a good job and I'll definitely be using it the next time I need to do some spot cleaning, especially when I can get to stains as soon as they occur.

Vax Dual Power Pro Carpet Cleaner review

I found the VAX Power Pro Carpet Cleaner easy to use and I was really pleased with the results. Below you can see a short video of the VAX Dual Power Pro in action, for cleaning a carpet and using the upholstery tool for stairs and the SpinScrub powered hand tool on a particularly grubby patch.


I received the VAX Dual Power Pro Carpet Cleaner in exchange for this review. Amazon links are affiliate.

Monday, 12 September 2016

Autumn Hama bead battery tea light holders

You can find all my Hama bead crafts on my dedicated Hama beads page!

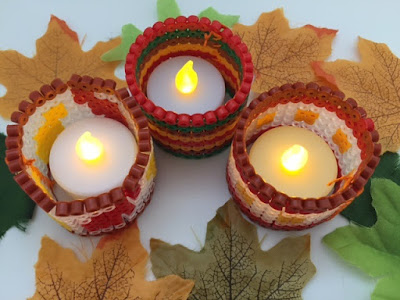
With Autumn approaching and the evenings drawing in, I like to have a few candles lit around the house. With young children about these days I often go for battery powered ones as they are so much safer, and it doesn't matter if you get distracted and leave one burning! It's been a while since I made anything with Hama beads, so I pulled them out to make some curved holders for battery powered tea lights with a seasonal Autumn theme.

Please note that these tea light holders are intended for battery powered tea lights only, it would not be safe to use them with a real flame.

Autumn Hama bead battery tea light holders

You need:

Battery powered tea light candles
Something to shape your tea light holders with - I used a cardboard tube but anything a similar size and cylindrical would work, perhaps a rolling pin or even a chair/table leg
Hama beads in Autumnal colours
Hama bead peg board - I used two large square boards clipped together but you can get away with just using one if you don't mind it not wrapping all the way around the tea light
Thick thread and needle

Autumn themed Hama bead craft

Instructions:

I found that a strip the length of 29 Hama beads was the perfect size for my tea lights, great because this is the size of the largest peg board! If you are making holders for wider candles then you'll need to clip two boards together. In terms of height it's up to you, I found that a height between 8 and 10 pegs worked well to cover the height of the tea light.

Create your design on the pegboard. When you iron your creation there will be small holes that the light can shine through, or you can create holes as part of the design so that the light can shine out. Alternatively you can use transparent Hama beads like I did.

Related post - Ironing tips for Hama beads

Iron one side of the design so that the beads are well fused together. Remove from the pegboard and place on a heatproof mat, then iron the other side of the design, but ironing slightly less on the second side.

How to iron Hama beads

While it is still hot, wrap the Hama bead strip around the cardboard tube with the more ironed side facing inwards, it should bend easily around, and hold firmly in place until it has cooled.

Making curved Hama bead project

When cool enough to handle comfortably, use a thick needle and some coloured thread to sew the two sides together to make sure that the candle holder will keep its shape. Even if the holes in the beads are very small after ironing, the plastic should be soft enough that you can easily push a needle through, especially if you do it while it is still warm.

How to sew Hama beads into a circle

Place the candle holder around your battery tea light candle, and enjoy!

Hama bead candle holders with an Autumn theme

Are you looking for some more fun Autumn crafts, activities and recipes? Here are some fab ideas from other bloggers:

A fab Autumn craft for young children is this lovely Hedgehog Craft by Joy from Pinkoddy. She's also included loads of helpful information about who to contact if you find a hedgehog that is injured or needs help - very pertinent for this time of year as in fact I rescued an ill hedgehog the other week by taking it to the vet! Another lovely craft for Autumn is this Handprint Tree Craft by Otilia from Romanian Mum Blog, an easy craft which is great for children of all ages.

It's a great time to make the most of seasonal produce, and with plenty of apples around I love the look of this German Style Apple Autumn Cake by Emma from A Bavarian Sojourn, it looks delicious! On the savoury side, Cat from Yellow Days has a simple but tasty recipe for a warming Roasted Butternut Squash and Sage Soup. If you fancy a treat, then these Sticky Toffee Apple Breadsticks from Jenny at Mummy Mishaps look amazing.

If you fancy heading out and about to find your own seasonal produce, Michelle at Mummy From the Heart has shared some tips on Foraging for Beginners, and why it's great to get your kids foraging with you.

Friday, 9 September 2016

Mystical Patterns - Coloring Pages for Grown Ups

Hello! I am Maggy and I usually write over at Red Ted Art! Thank you so much for having me share some of our Adult Coloring Pages with you today!!! Coloring for grown ups is something I discovered (along with the rest of the world) last summer! I found it was a wonderful way to be creative, in a clam, meditative “me time” sort of way. For me coloring is a time to switch off, let my mind wander, create something pretty.. without any pressure to create (if that makes sense!). There are now gazillions of books available to purchase…but there are also stacks of great coloring pages for grown ups that you can download for free online! We wanted to share some of our favourite ones with you today!

Mystical patterns colouring pages for grown ups


1. Flowers & Hearts – this could could be printed in A5 format and would make wonderful greeting cards – maybe on someone’s birthday or Mother’s Day?

2. With Autumn upon us, this leaf mandala (and bonus “Turkey coloring") is simply gorgeous. I can just see you using all those lovely yellows, oranges and reds!

3. A set of two Mandalas designed by the talented Hattifant.

4. 3 Dreams Matter Mandalas – an excerpt from the amazing Mindfulness Matters Book.

5. Plus 3 more meaningful Mandalas.

I hope you find these coloring pages for grown ups inspirational. I find it such a wonderful way to switch off and it is a great activity to do alone or in company. Quietly draw together, chat about your day or just enjoy each other’s company.

I also enjoy turning colouring pages I have completed into greeting cards (often printing them out in A5 format first and folding the paper in half.) Or printing a bundle of pages out, buying a set of felt tips and giving them as small presents to friends and family!

Hope you have enjoyed them as much as we do!!!

Wednesday, 7 September 2016

My Sky Blanket in August #skyblanket2016

My Sky Blanket is now complete! Here is a link to the completed Sky Blanket

Here is how my blanket progressed throughout the year - JanuaryFebruaryMarchAprilMayJuneJulyAugust, September, October, November and December.

If you have found this page because you would like to make your own Sky Blanket, you might like these posts:


Sky Blanket progress in August

Another month has passed, and my Sky Blanket is getting bigger and bigger! It has long outgrown the bag that I've been keeping it in and it has become rather unwieldy to work on! This means that I've been tending to save it up and do a few rows at a time rather than pull it all out every day. It's going to be very long and thin and will definitely need a border to even up the wobbly edges, I might make it a thicker border down the sides to widen it out a bit. Luckily I have lots of yarn in a different shade of blue that I've not used for the sky colours that will hopefully look good as a border!

Here's my latest blanket photo:

Sky Blanket progress in August

Here's how my blanket has progressed so far - January, February, March, April, MayJune and July.

I was hoping when I started the project that there would be a big difference between the winter ends of the blanket and the summer in the middle, and looking at it laid out it does look as though that might be the case. Although the summer hasn't been quite as blue as I had hoped!

Sky Blanket progress in August

I can't believe that I'm two thirds through the project already!

Sky Blanket progress in August

There was a group of us taking part in the Sky Blanket project throughout 2016, and you can find us across social media, in particular Instagram, using the hashtag #skyblanket2016. The project was started by Bug, Bird & Bee, The Boy and Me and You Little Sew and Sew.

If you aren't sure if a Sky Blanket is the project for you, you might like this blog post with some more ideas for a year long craft project.

With many thanks to Make it Coats for supplying me with the yarn for this project.

Tuesday, 6 September 2016

New Munch Bunch Squashums Huge Tubes

The children have started a new school this September, and as the new school doesn't have a kitchen I need to start preparing them a packed lunch each. I like to try and include a range of different items, and when I heard about the new Huge Tubes from Munch Bunch Squashums I knew that they'd be perfect to pop inside.

Huge Tubes are tubes of fromage frais, and with the packet being 50% larger than the existing fromage frais tubes on the market, they are aimed at older children in particular that find the standard tubes too small. This has definitely been a problem for us, the smaller tubes really don't contain very much, and these larger tubes are much more satisfying.

Squashums Huge Tubes are made from all natural ingredients and also contain fruit puree, making them a tasty dairy treat for children. The tubes are easy to open, and the packaging is perfect for lunch boxes because they can be easily opened and eaten without any mess.

Review - Munch Bunch Squashums Huge Tubes

The tube itself is transparent, meaning that it's easy for children to see how much fromage frais is left in the tube, and they can make sure that they've eaten it all so there won't be any left to leak all over the lunch box! The Huge Tubes are available in two fruit flavours - strawberry and raspberry - and feature the same cast of fruit characters that children will be familiar with from the other Squashums products.

Mia was very keen to try them out and they were a big hit, she eagerly slurped them down! The tubes are also great for an after school snack or for taking out and about with you, as they don't take up much space and are easy to transport.

Review - Munch Bunch Squashums Huge Tubes

Squashums Huge Tubes are available in the chilled dairy aisles of Asda, Morrisons, Tesco, Sainsbury’s, Waitrose and online at Ocado, priced at RRP £1.99 per 6 x 60g multipack. The multipacks contain either six strawberry tubes, or three strawberry and three raspberry tubes.

This is a sponsored post. 

Monday, 5 September 2016

Crafting is my Therapy September 2016

Welcome to September's Crafting is my Therapy linky hosted by myself and Me, You and Magoo - a place for you to share all the crafty things that you've been working on over the last month!

It's not been easy to get much crafting done this month with it being the school holidays - I didn't realise quite how dependent I was on my child free time to get things done! So most of the crafty activity around here has been that which involved the children - I wrote about our crafty summer here!

We've been doing all sorts - Hama beading, painting a porcelain tea set, gel stickers, making headbands, shrinky plastic crafts - it's been a lot of fun! Probably my favourite thing that we made together was these lovely little felt finger puppets/stuffed toys - Harry made his giraffe all by himself and Mia and I worked on the teddy/monster together!

Felt crafting with children

This month we have been working with Posca pens. These gorgeous pens are unique, water-based paint markers that can be used on almost all surfaces - fabric, glass, metal, paper, card, wood, stone...anything you can think of! The pens come in a range of vibrant colours and tip sizes, making them a brilliant pen for crafters.

I'm always collecting notebooks, and I have these two that my husband has brought back from conferences. With their black covers they are quite difficult to decorate, but the Posca pens worked brilliantly, even the white pen showed up beautifully. Mia decorated one notebook and I decorated the other one with a bit of help from Harry - I'm planning on using it as a notebook for us to write little letters to each other, an idea I've picked up from Pinterest!

Posca pen decorated notebooks

Then I used the pens for a bit of stone decorating. Our garden is full of stones that we've picked up from the beach, but I've never had a lot of luck decorating them with paints as it can get a bit messy. With the pens I was able to come up with some really intricate designs and the pens drew on the stone beautifully with lovely bright colours and no smudging.

Posca pen decorated stone

I'm looking forward to trying out the pens on some glass and plastic surfaces - you can see some more fab crafting with Posca pens over at Me, You and Magoo.

Friday, 2 September 2016

Our crafty summer 2016

The summer holidays are drawing to a close, and as I look forward to some peace and quiet next week I'm also looking back on a lovely summer. I'll admit it has been hard work at times, my attempts to send the children along to the free summer classes at the gym failed miserably, and there were many days when I was glad to pack them off to bed in the evening. Fortunately I was granted a few hours respite every now and then when Ram took them out on long Pokemon hunting trips, so I could at least run the hoover around and enjoy the silence!

But I do love having the children around at home, and I try my very best to limit their screen time as much as I can. Mia has never been that bothered about screens to be honest, which can be a bit annoying as sometimes I just need her to be occupied for a little while, but Harry would play Minecraft and watch YouTube all day if I let him. They can play nicely together for a reasonable amount of time when left to their own devices, and of course as you can probably guess we did lots of crafting together, so I thought I'd share some of our favourite crafts from the summer.

Our summer started with a fab trip away to Blackpool and Manchester, and we worked very hard on our holiday scrapbook. It really was a joint effort, and I was so impressed with how much time and effort the children put into it. We've been leafing through it over the summer and remembering all the fun we had.

Holiday scrapbook craft with children

Mia received lots of craft kits for her birthday in May and I kept lots of them in reserve for the holidays. So she was kept busy painting a porcelain tea set, making gel stickers and doing sequin art. There were also child initiated crafts. Harry had spotted a tutorial for fresco painting in one of his history books and had been asking to try it for a while so we gave it a go - you basically pour plaster of Paris into a flat mould (we used margarine tub lids) and before it has set completely you paint on it with water paints. He painted two designs, depicting a tree at different times of the day.

Fresco painting with children

Mia on the other hand was desperate to do some sewing, so I came up with some simple felt projects that we could do together and I loved the results, Harry made the giraffe finger puppet and Mia and I worked together on the red stuffed 'teddy bear'.

Felt sewing with children

We had fun colouring in together...

Children colouring together

and painting together - these are some blank masks which their Auntie brought back from Venice for them to decorate.

Children painting at the kitchen table

In the background you can see our checklist for the YouTube Kids summer reading challenge. I'm afraid that we didn't quite get all the way through the list but we gave it a good go. Harry has really gained confidence over the summer to tackle some longer books, and Mia's reading has improved a lot too, she is happy to try and read anything even if she doesn't always get it quite right!

We also turned to some of our old crafty favourites - we did Hama beads, made shrinky plastic crafts and did some crafting with Fimo. You may be able to spot a bit of a theme here going on!

Pokemon crafts for children