Pages

Friday, 29 April 2016

My Marie Kondo approach and sparking joy

"Discarding is not the point; what matters is keeping those things that bring you joy." - Marie Kondo, Spark Joy

Marie Kondo and sparking joy in my home

I've written a little bit before about Marie Kondo and the Life Changing Magic of Tidying and what an effect it had on me, and having recently purchased her latest book Spark Joy (affiliate link) I thought I'd write a bit of an update. I do declutter quite regularly so to be honest I never felt the need to do her complete tidying as my clothes and books are quite well under control, but I have been fascinated by her philosophy and found it very helpful when it comes to streamlining my possessions.

Kondo's second book Spark Joy is advertised as being 'An Illustrated Guide to the Japanese Art of Tidying', and from the title I'd sort of been expecting a more visual book, perhaps with some photographs, so I wasn't really sure whether it would work as a Kindle book. It turns out that the illustrations are  just a few simple line drawings and so it's fine to read on a Kindle. The book does repeat a lot of information from the first book The Life-Changing Magic of Tidying (affiliate link), but it goes into a lot more detail, and for me the biggest thing that I took from Spark Joy was the emphasis on how to make the most of the possessions that you have chosen to keep.

"If you think that tidying up just means getting rid of clutter, you're wrong. Always keep in mind that the true purpose is to find and keep the things you truly love, to display these proudly in your home, and to live a joyful life." - Marie Kondo, Spark Joy

Marie Kondo describes four ways to use items that spark joy for decorating your home - placing them on something (for example a necklace on a stuffed animal), hanging them (like keychains), pinning or sticking them up (like postcards) or using them as wraps or covers (like scraps of cloth). Then everywhere you look you will see something that you love.

Over the last few weeks I've been going through my things again and following some of the advice in the book. For example I started with my photographs, which I thought were pretty well sorted. But I ended up going through them three times over the course of a week, discarding more and more each time, until I had reduced by almost a half. Those I got rid of were duplicates, blurry photos, random landscapes and unflattering ones of me!

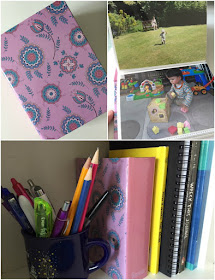
Putting favourite photos in an album

I moved a big stack of Ram's photos into his own memory box (I don't need photos from his drunken holidays among my joy sparking photographs!) and I pulled out about 90 of my very favourite photos to store in an album by my desk that I can flip through whenever I want. They are all photographs that I remember being taken, mostly of family but also of friends throughout the years, special photos with a meaning behind them. This is the album that I bought - Small Shabby Chic Pink Floral Photo Album (affiliate link). I also updated the photos in some of the frames that I had on my bookshelves and moved them to the shelves by my desk so I can see them more often.

I then invested in a new photo storage box (affiliate link) to replace the old plastic box for the rest of my photos, which are also nice to browse through.

Next I moved on to my postcard collection, which were all stored in another huge box. I've always collected postcards, mainly the free ones that you can pick up at the cinema, but some that I'd bought on holiday. At university I used to blu tack them to the walls of my various student accommodations so I thought that they were quite meaningful, but to my surprise I found that most of them didn't spark joy at all, I put so many into the recycling.

Then I treated myself to a hanging postcard display (affiliate link) which holds 40 postcards and is reversible to display 20 at a time. I easily picked out my favourite forty and the hanger is now on the back of the utility room door, tucked out of the way yet where I still see it several times a day. I will swap the postcards from time to time, and I also have a big collection of Ladybird postcards which I'd like to put out on display. Much better than crammed tightly in an ugly storage box and never looked at!

I also stuck a few postcards around my computer monitor so that I can see them while I'm working. I realised that although I aspire to a minimalist look I do also like having lots of neatly organised and pretty "clutter" around!

Postcards in a display

I sorted through my bookshelf too. I wrote about my bookshelves a few years ago, and I've downsized massively since then, I only have one big bookcase now and my smaller fiction bookcase. I still found a few books to pass on, and I rearranged the shelves a bit as well. Only keeping the books that spark joy is something that you somehow don't notice until it's done, and now I can sit and look at my bookshelves and they make me feel happy.

My bookshelves sparking joy

I also moved out some little ornaments that I had there that were crammed in and getting a bit lost. I pulled them out and put them in the melted Hama bead tray above my desk where I can see them (and they are easier to dust!)

Small collection of knick knacks in a tray

I'm really enjoying going through some of my favourite things and putting them on display so that I can enjoy them instead of having them stuffed in boxes.

Are you a Konvert? I'd love to hear your experiences!

If you enjoyed this post you might also like my blog post with some recommendations for organising and decluttering books that I've enjoyed.

Wednesday, 27 April 2016

How did you choose your blog name?

I spent a long time thinking about a name for my blog. I knew I wanted to choose a name that would be relevant for a long time, so I decided not to go with 'Mummy' in the name or anything that referred to my children. I  nearly went with 'Sleepless in Sussex' because my parenting years have been very much defined by a complete lack of sleep, but I desperately hoped that one day that blog title would no longer be relevant, and to be fair it's not quite as appropriate as it was five years ago!

I'm not exactly sure how I chose my blog name in the end, I do quite like having my name in the title and I'm pretty pleased with my choice so far. But I love hearing stories about how other bloggers chose their blog names, so I asked around to find out how they were chosen.

How did you choose your blog name?

Lots of bloggers use their names in the titles, Alice from Life as Alice writes about her life and so it was an obvious choice. Some bloggers use a nickname, like Pinkoddy which was based on her Twitter name. Locations are another popular choice for a blog name, like A Bavarian Sojourn which was previously called A Scandinavian Sojourn when written upon embarking on a stint to Denmark. Another travel blog, Mum's Gone To..., started with a series of posts on Mum's Gone to Iceland based on Kerry Katona and the frozen food shop adverts! Trish intended to change when her son left for uni but stuck with it and recently bought the domain name!

A good choice for a blog name is something that interests you, like Cupcake Mumma who was and still is obsessed with cupcakes, or else a favourite song lyric like I'm Counting UFOs from Incubus, Wish You Were Here. Perhaps a book title, like Bug, Bird & Bee which is based on the title of a book from the Eden Project and represents Aly's interests and the direction that her blog is taking.

It seems like most of the people that answered me chose their blog title to represent what they were intending to blog about. Some people chose a blog name that describes exactly what they blog about, like Becky's blogs Thrifty HomeBaby Budgeting and Family Budgeting or All the Camping Gear which was inspired by a comment from blogger Louise's husband on their way to look at tents before they started camping.

Play & Learn Every Day is an accurate description of the play based learning activities covered on the blog and In the Playroom was started while Anna was literally sitting in the playroom, as well as reflecting the content of the blog. Rainy Day Mum was named by Cerys while wondering what to do with her young children on a rainy day and Kiddy Charts was the obvious blog name that worked with what the website was offering.

Family has also been a big influence on bloggers when choosing a name. Louise named her blog
A Strong Coffee after her response to people asking how she coped with three boys under 5 and Actually Mummy started her blog writing in her daughter's voice and so she named it after a phrase that she used to say.

Mum of Three World named her blog very quickly to emphasise that she had three children, with world to sum up that it was about everything relevant to them, and it's still an accurate reflection! Mummy From The Heart was originally called 'My Life' and was intended to be more private, but once more people started reading Michelle had a rethink and chose the new name to suit her writing style and who she was. Mummy Alarm has its name because pregnancy came as a surprise, one second Carolin was just living for the day and the next she was pregnant and expecting a baby!

Finally some bloggers named their blog after asking others - Jen from Smiles & Trials had her husband make the decision and last but not least The Soup Dragon Says was named thanks to help from a group of bloggy friends!

I really enjoyed putting this post together, and reading everyone's answers was fascinating! If you are a blogger, how did you choose your blog name? Would you choose the same name again, or go for something different?

Photo in image by Lauren Mancke via Unsplash.

Monday, 25 April 2016

Some animal themed crafts from Baker Ross

As a member of the Baker Ross Bloggers Network I'm lucky enough to receive regular deliveries of their fabulous arts and crafting kits. The latest box had so many lovely things in that I've divided it into two posts, and this first post is all about some animal themed crafting.

Zoo themed stuffed toy storage box

Mia loves her stuffed animals. She has quite a collection, and she loves all of them. She has a huge pile in bed with her at night, they follow her around the house, and although she does have a few particular favourites she seems to play with them all equally. I never really had any proper storage for them, I just shoved them on a bookshelf in her bedroom when I found them lying about, so I thought that it was time to come up with a way to store them properly, yet still make it easy for her to access them.

So she helped me to make a zoo themed storage box which fits nicely on her shelf and means that her soft toys are a little more contained and easy for her to put away. You just need a large cardboard box,  and we used the one that our Baker Ross order was delivered in. I cut off the top flaps and cut away some of the box on one side so that you can easily see and access what's inside. I reinforced the box with some packing tape to make sure that it was sturdy, then Mia and I ripped up lots of different coloured Safari Tissue Paper and used slightly diluted white glue (approx. one part water to two parts glue) to stick it down over the sides and inside the box. Be warned, you need a lot of glue!

Zoo themed stuffed animal storage box

To finish we used some zoo themed letter stickers that we had in the house to make a sign for 'Mia's Animal Zoo' (her choice of words!). Then when she wasn't looking I surprised her by hiding some gorgeous Jungle Animal Plush Toys inside. She was thrilled, they really are lovely little stuffed toys.

Unicorn Sewing Kits

Both children really enjoyed making up the Unicorn Cushion Sewing Kits. The shape of the unicorn head is simple to sew around, and because it's not too big it wasn't too daunting for them. They enjoyed decorating their head with the self-adhesive stickers, although I ended up doing the manes as it was a bit fiddly for them and they got bored! They were really pleased with their finished stuffed unicorns, they are a gorgeous finished craft product!

Elephant Coin Banks

Last month we had a lot of fun painting ceramic bird planters, so I was pleased to see some Elephant Ceramic Coin Banks and some more of the lovely Brights Porcelain Paint Pots. The paint covers the ceramic beautifully, drying to a lovely shiny finish, and the colours are so vivid, it looks fantastic. The paint dries really quickly too so you can do a first coat and then add detail on top in the same painting session.

Farm Animal Pom Poms

I loved these cheerful Farm Animal Pom Pom Decoration Kits. The pom poms are very easy to make around the foam shapes, and because they are quite small it doesn't take too long for children to make them. We made a lovely sheep and duck, with the pig saved for another day.

Modelling Clay Animals

Finally we tried out the Rainbow Clay Multi Bars modelling clay. I asked the children to go along with the theme and make animals, and they eagerly got started. The clay was lovely and soft to work with, and didn't make their hands smell which is a bonus. It was a bit difficult to separate the colours initially but it didn't bother the children (and of course it always ends up mixed together in the end anyway!) Here's Mia working away busily (yes, her hair always looks like that by the end of the day!)

Child playing with modelling clay

The clay comes in lovely bright colours and I think it's a bargain for the price! They made some lovely little models and it looks as though it will store well ready for play another time.

I received these products as a member of the Baker Ross Bloggers Network.

Thursday, 21 April 2016

Review - Shadowlands at the Connaught Theatre, Worthing

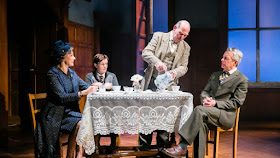
This week I went along with a couple of friends to the Connaught Theatre in Worthing to see William Nicholson's Shadowlands, visiting Worthing as part of the 2016 tour. Shadowlands tells the love story of the author C.S. Lewis and American poet Joy Gresham (nee Davidman).

Apart from being familiar with the stories in the Chronicles of Narnia series, I knew very little about the life of C.S. Lewis and nothing at all about the story in the play. Jack, as he was known to his friends, and Joy met after corresponding by letter for several years, and what began as a formal meeting over afternoon tea developed into a friendship which slowly turned into love. Then just as his experience of love was beginning, Lewis found his Christian faith and convictions about God tested when Joy was diagnosed with cancer.

Shadowlands at Worthing Theatres

The production was beautifully staged, with a simple yet detailed set that quickly transported you through the changing locations. In particular I thought the lighting was wonderful and really conveyed the changing of the seasons as well as providing a focus for the scene. There are also a couple of beautiful moments where the audience catches a glimpse of some Narnian inspired magic.

Shadowlands at Worthing Theatres

The acting was flawless, with some long monologues that were beautifully delivered and expressed really thought provoking concepts, with the premise that "real life hasn't happened yet, this is just the Shadowlands". It raises some of the big questions about why God allows us to experience pain and suffering, and it's definitely a play that will stay in the mind long after the curtain falls. 

I received complimentary tickets for the show in exchange for a review. 

Monday, 18 April 2016

Harry and the Brighton Mini Mile

After Ram ran the London Marathon last year, Harry showed an interest in running, and so this year Ram signed him up for the Brighton Mini Mile held at Preston Park in Brighton. It tied in with a weekend of running, culminating with the Brighton Marathon, and Harry was really excited to be taking part.

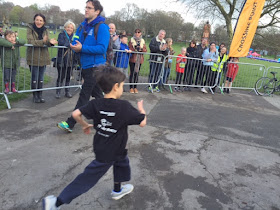
The Brighton Mini Mile race

It was only intended to be a bit of fun for him, so I was quite surprised to find out how competitive the event was. They were given t-shirts and proper running numbers, and they even had a chip for their shoe so that their run could be timed.
Harry did a bit of training in the weeks leading up and so we knew that he would be able to run the mile, but we are also realistic, he's not the most athletic child, and we knew that there would be plenty of children faster than him.
It was pretty obvious from quite early on that he was going to end up near the back, he's only got little legs and he was among the youngest running, but it didn't bother him at all. The track was circular so we were able to zip across and watch him at various points, and he had such a look of determination on his little face as he kept going.

The Brighton Mini Mile race

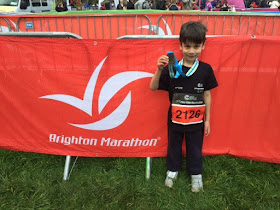
When he crossed the finish line he was delighted, and so thrilled with his medal and goody bag.

The Brighton Mini Mile race

He ran the mile in 11 minutes 34 seconds, two minutes faster than his previous best time, and we were really proud of him!

You can read Harry's own account of his race on his blog here.

Friday, 15 April 2016

Our favourite family days out in West Sussex

List of family days out in West Sussex

I've lived in West Sussex all of my life, apart from brief spells in Nottingham and Germany, and I have many fond memories of days out with my family growing up, then rediscovering them with my own children and discovering new places to visit.

Here are some of my favourite places to visit wither with or without the family in West Sussex. Click on the links to see my more detailed review.

Free places to visit in West Sussex:

Highdown Hill and Gardens, Worthing

I only discovered Highdown Hill and Gardens when we moved to Worthing a few years ago, and it's such a lovely place.  Highdown Hill itself is part of the South Downs and so it's always open with a large free car park at the top (and another at the bottom if it's full). Then Highdown Gardens are open throughout the year during the week and every day during Spring/Summer.

The gardens are beautiful, there are a couple of fish ponds, grassy slopes for running down, foresty areas to explore, stepping stones and a cave, and lots of little hidden paths. It changes throughout the seasons and it's a really wonderful place to visit. There is also a cafe and often ice creams during the summer.

Dinosaur Island at Southwater Country Park

Dinosaur Island at Southwater Country Park

Southwater Country Park has been there for a long time, but the Dinosaur Island playground is relatively new and it's a huge draw for little ones. It's aimed at children of all ages, with play equipment for both younger and older children. There's a long slide, a large sandpit where you can uncover dinosaur bones, and the centerpiece is a volcano that you can climb. The rest of the Country Park is lovely too, with a beach and man made lake that swim in, and lots of nice walks.

Swanbourne Lake, Arundel

Swanbourne Lake is situated just outside Arundel, and if it's not too busy you can park for free just outside or on the road (there's a playground along the road too!). The lake is the perfect size for walking around with small children (you can take a pushchair if you don't mind a few bumps) and there are plenty of ducks to feed, you can buy duck food at the cafe. There are also little boats to hire, although we've not been brave enough to try that yet!

Tilgate Park, Crawley

Tilgate Park is lovely, and although you have to pay for parking, entrance to the park with its large lake and playgrounds is free. You can also pay a small fee to visit the Nature Centre with lots of animals to see. I'm also booked in for the Go Ape adventure there next month which I'm a little nervous about!

Tilgate Park, Crawley

Not free, but still worth a visit!

Petworth House and Park

Petworth House and Park is a National Trust property, but you can visit the park for free (you do have to pay for parking if you aren't National Trust members). The park is lovely to explore, and the house is very nice too with lots of child friendly activities to make the visit more interesting for them.

Ferring Country Centre, near Worthing

Ferring Country Centre near Worthing

Ferring Country Centre is a lovely place to visit, it's not very expensive and there are farm animals and a nature trail to explore, as well as a garden centre and refreshments. There are often seasonal activities, for example at Easter and Halloween, and it's worth keeping an eye out for them as they are very good.

The Weald and Downland Open Air Museum, Singleton

I really love the Weald and Downland Museum, I have such happy memories of visiting with my family when I was little and when I took the children for a visit last year we had such a lovely time. There are houses to explore and all sorts of activities to have a go at like candle dipping and cooking in the Tudor kitchen. There's a fantastic indoor museum area where children can learn about tiling a roof and even building a small house using different types of joints. There is a working water mill, ducks to feed and plenty of outdoor space for picnics, it's a fantastic day out!

Weald and Downland Museum, Singleton

My West Sussex, UK for Families board on Pinterest has lots more ideas if you are looking for days out in the area! Of course there are loads more fantastic places to visit around here that we've not yet explored - where would you add?


Thursday, 14 April 2016

Review - Labyrinth board game from Ravensburger

Review - Labyrinth board game from Ravensburger

This week we've been taking a look at the family board game Labyrinth (affiliate link) from Ravensburger. Designed for 2-4 players from age seven and up, the object of the game is to find your way through the labyrinth to reach a selection of different objects and treasures, then return home before your opponents. The catch is that with each turn the pieces of the maze shift as other players try to reach their own treasures.

The game was completely new to me, but after sharing a picture on Instagram it seems that I've been missing out and other people have been enjoying it for years!

Review - Labyrinth board game from Ravensburger

To start the game, you set up the labyrinth using the game board and lots of square pieces, many with treasures on, to build a unique maze with one piece left over. The moveable pieces fit in around pieces which are glued to the board. Then you divide out the treasure cards between players, and each player looks at their first card to see what they need to search for, without showing it to the other players.

On their turn, the player uses the spare maze piece to push a row of movable pieces across and change the design of the labyrinth, hoping to create a route to their treasure. I actually found it quite difficult to visualise - many times I moved the pieces around and they didn't do what I expected them to at all! And then you can set up a route and someone else will move the pieces and change the whole thing entirely!

I played the game initially just with Harry, aged 7. He picked it up straight away, although we did start with a slightly easier version of the game - we only had five treasures each to look for and we showed each other what we were heading towards so that we could help each other while we got the hang of the game.

There is a lot of strategy involved. Some of the object pieces move and some don't, so you need to work out if it's better for you to try and reach the treasure, or to arrange for it to move closer to you. You need to think about the spare piece that you are inserting, and which way up is best. Sometimes there is a less obvious route through the labyrinth that is easily missed, and sometimes you are convinced that you've made the correct move only for it to end up completely different.

Review - Labyrinth board game from Ravensburger

We played several times, and we both got better at it each time. I found that we were very evenly matched which was great, Harry won our second game and it definitely wasn't because I was helping him!

Later on Mia joined us. She's nearly 5, which is a little young for the game, but she loved the concept. You can make the game easier for younger players by letting the child choose which object they want to reach next from all their cards, conversely you could also make it more difficult by leaving your treasure card turned up so that other players can block you when they see what you are after.

Review - Labyrinth board game from Ravensburger

The game could even be played solo by selecting an object card and working out the quickest way to reach it - this would be good practice for playing too!

We had a great time playing this game and I know that it's going to become a staple of our board game cupboard - we are going to be challenging all our visitors to a game!

I received the game in exchange for a review. Amazon links are affiliate.

Wednesday, 13 April 2016

Framing a Shakespeare quote

This year is the 400th anniversary of the death of Shakespeare, and to join in a celebration of his life and work, Viking, the stationery suppliers, asked me to create a craft or DIY project featuring one of Shakespeare's quotes. To get me started they sent me a box of crafting supplies.

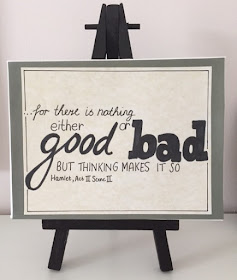
Framed Shakespeare quote craft

In the box was a sweet mini easel with canvas, and so I decided to frame a quote to display above my desk. The most difficult part about this challenge was choosing which quote to use - there are so many I loved! I decided to narrow it down to a quote from my favourite Shakespeare play, Hamlet, and one which I could use as a motivational quote for my workspace.

I wanted to choose a quote that wasn't one of the obvious ones, and so after lots of deliberation I went for:

"...for there is nothing either good or bad, but thinking makes it so" - Hamlet, Act II Scene II

In the play it is spoken by Hamlet when his friends Rosencrantz and Guildenstern return to Denmark summoned by the king, hoping that they will spy on Hamlet and find out the cause of his apparent madness. I interpret the quote to mean that the way that you feel about something is determined by how you react to it, and so if you can think about something positively then your state of mind will be much happier.

Framed Shakespeare quote craft

Although I think that my handwriting is quite neat, I've never really had much luck with trying out different typefaces or styles of writing. I knew that I wanted to use a selection of fonts to emphasise different parts of the quote, so I made a mockup in PicMonkey and experimented with text in different sizes and styles. Then I copied the text onto my parchment paper as best as I could using a pencil and ruled lines to help guide me. I went over the text using a thick Sharpie marker and a thinner black felt pen, then when the ink was completely dry I carefully rubbed out the pencil lines.

The paper was then mounted onto a darker piece of cardboard before being glued to the canvas.

Framed Shakespeare quote craft

When I mounted the quote on the easel I felt that the pale background colour blended in with the colour of the easel a bit too much. So I decided to paint the easel with black acrylic paint and I think that it looks much better. Here's my finished piece:

Framed Shakespeare quote craft

And if you are looking for Shakespeare quote inspiration, here are some others that I liked but didn't quite make the cut:

"This above all: to thine own self be true" - Hamlet
"We know what we are but not what we may be" - Hamlet
"I like this place and willingly could waste my time in it" - As You Like It
"Why, then the world's mine oyster" - The Merry Wives of Windsor
"We are such stuff as dreams are made on, rounded with a little sleep" - The Tempest
"Better three hours too soon than a minute too late" - The Merry Wives of Windsor

Viking supplied me with a box of craft supplies in exchange for this post.

Monday, 11 April 2016

Mini Beast Gardens craft

Our latest Bostik Bloggers craft box arrived in the middle of the Easter holidays, and carried the theme Minibeasts/Gardens. Usually when the box arrives I come up with some craft ideas to do with the children, but as this time they were here when it arrived I let them have a look through the materials and come up with their own craft ideas. Mia has fond memories of the fairy garden than we made a little while ago and so they decided that they'd like to go once again with the garden theme, and this time make gardens for mini beasts.

Making a mini beast garden craft for children

I found them each a box to form the basis of their gardens, and then pretty much let them get on with it themselves! I even managed to find Harry a box with a clear plastic lid so he could pretend it was a real mini beast home.

Here's how they made them.

You need:

A shallow cardboard box or lid
Green felt
Adhesive - we used Bostik Glu Dots and a Blu Tak Fine and Wide Glu Pen
Coloured pipecleaners
Artificial leaves and moss
Minibeast and flower stickers
Googly eyes

Instructions:

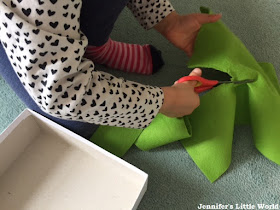
Cut the felt to fit the size of the box and place inside. If you want to you can stick it down, we used the Blu Tak Fine and Wide Glu Pen which we received in a previous Bostik Bloggers box, it's a brilliant, versatile glue.

Making a mini beast garden craft for children

Decorate your garden with flower stickers, artificial leaves and so on. Mia had great fun sticking everything down. We used Bostik Glu Dots to secure the artificial leaves which worked really well and held them firmly in place.

Making a mini beast garden craft for children

Then Mia again used the Blu Tak Fine and Wide Glu Pen to stick everything else down with, it's a great design which means that she can use it by herself and it doesn't make any mess. Harry was happy to leave his items loose so that he could move them around and play with them, but we used Blu Tack to secure some of them temporarily in place.

Making a mini beast garden craft for children

Harry wanted to make a caterpillar finger puppet for his garden. He used some felt cut out shapes and sewed around them for the body of the caterpillar, then we used the Bostik Glu Dots to stick on googly eyes and a button. The Glu Dots work really well on the felt and stuck it all down firmly and I think his caterpillar is lovely!

Making a mini beast garden craft for children

Then he finished off his garden with some pipe cleaner worms, insect stickers and artificial moss.

Making a mini beast garden craft for children

Mia decided that she wanted to make her minibeast garden portable, so she glued some ribbon onto the sides to make a handle (I stuck some tape over it as well to make sure that it was properly stuck down as she was too impatient to wait for the glue to dry!). Then they were finished!

Making a mini beast garden craft for children

This was a brilliant craft activity, not only did it occupy the children for ages while they were making their gardens, they then went on to play with them together for ages, and for days after too!

Making a mini beast garden craft for children

This box of craft materials was provided to me free of charge by Bostik as part of the Tots100/Bostik Craft Bloggers Club.

Thursday, 7 April 2016

The most amazing drives we've taken (and a couple I'd still like to do)

My top 5 scenic drives around the world

Before we had children, Ram and I were lucky enough to fit in lots of travel all over the world. Many of our holidays involved road trips, including some fantastic scenic drives, and I thought I'd share a few of my favourites. Although when I say drive, what I really should say is that I've been driven, as Ram luckily does the vast majority of the driving and I'm generally in charge of navigation (although that can sometimes be just as stressful as the driving!)

The Big Sur, California, US

Our first real road trip together was a holiday to the West Coast of the United States back in 2005. We spent several weeks driving our way between large cities and through National Parks, but the stand out scenic drive was along the Big Sur, following Highway 1 down the coast from San Luis Obispo to Monterey.

The Big Sur Drive, California

We stopped several times along the route to admire the scenery, and I particularly remember hiking down to Jade Cove, although we didn't find any jade! We also took in the 17 mile drive on the Monterey Peninsula which is very pretty.

The Great Ocean Road from Adelaide to Melbourne, Australia

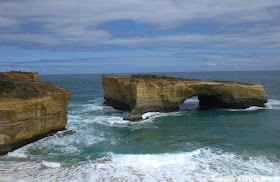
The Great Ocean Road is another coastal drive between Adelaide and Melbourne, Australia, and takes in some amazing scenery, with fantastic rock formations like the 12 Apostles. There are also some lovely little towns along the way like Apollo Bay and Port Campbell. We stopped in each for one night, and if I ever move to Australia (don't worry Mum, we have no plans to!) this is where I'd want to live.

Great Ocean Road drive, Australia

In Apollo Bay we took a glow worm tour where a local man took us to see glow worms on his land, and as we walked back to his house where we'd parked the car, the night sky was just amazing. I've never seen the Milky Way so clearly, and you could stand and stare at the stars for hours. In fact the man told us that he didn't own a television, as who needs one when you have a sky like this outside your house, and what he said has stuck with me years later.

Great Ocean Road drive, Australia

This is a very treacherous part of coastline, and there are lots of information panels on the route giving you more information about the ships that met their end there, it was absolutely fascinating. The colour of the sand is an amazing dark yellow/orange colour which I've never seen anywhere else, and the whole stretch of coast is absolutely beautiful.

Reykjavik to Jokulsarlon, Iceland

When we booked a holiday to Reykjavik, we thought that we were booking a city break, but we quickly realised that most of the interesting sights are outside the city - luckily we had booked a hire car! We spent one of our first days there driving the Golden Circle, a route which takes in the National Park Thingvellir, the Gullfoss waterfall, and the Strokkur geyser as well as lots of other beautiful scenery. This inspired us to attempt a longer drive - to Jokulsarlon, a large glacial lake filled with icebergs.

Drive in Iceland from Reykjavic

We visited Iceland very early on in the season and there weren't many other tourists around, so we were a little daunted by the long drive and spent quite a bit of time planning, and contemplating whether we could manage it. We set off very early one morning and are so glad that we did. It was a long drive, but the road was flat and empty, and with only one road going around the island it's impossible to get lost!

The scenery in Iceland is volcanic and deserted, and it feels as though you are driving across the moon or another planet. On the way you pass a glacier that you can walk right up to and on (although we didn't go far as it's not the best idea when you can hear the ice creaking and cracking next to you!) and it was fascinating to see.

Drive in Iceland from Reykjavic

The Icefields Parkway, Canada

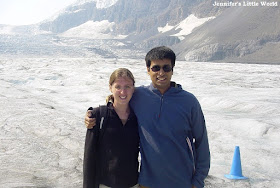
We encountered more glaciers along the Icefields Parkway in Canada. This route is a lot more touristy, and you can only approach the glaciers under strict supervision. We took a tour on a special bus which drove us to a carefully fenced off area that you could walk around on (and yet I still managed to fall in up to my knees in icy water!).

The Icefields Parkway, Canada

The Icefields Parkway drive itself runs through the Canadian Rocky Mountains Park from Banff to Jasper and takes in some beautiful sights along the way, like the spectacular Lake Louise as well as other bright blue lakes, tucked away between the mountains and forests.

The Icefields Parkway, Canada

Uluru to King's Canyon, Australia

Our drive from Uluru to King's Canyon through the Australian outback was another drive that we found the thought of a little daunting. It involves driving for many hours through the bush, with just one stop en-route at Curtin Springs cattle station which literally is in the middle of nowhere. If you break down you could be waiting for help for a very long time, and the heat is deadly.

Driving to King's Canyon, Australia

Fortunately, as I realised when we drove along it, although there aren't many other drivers on the road, there are enough, and I'm pretty sure that someone would always stop to make sure that you were all right, and to send for help if you weren't. It was a very very hot drive, as even the air conditioning couldn't stop the sun streaming in, but we packed plenty of water and took along lots of CDs for some tunes and it was a brilliant drive. We didn't see a lot of wildlife but we did spot a tornado like storm of orange dust which was pretty cool.

One day...

These drives were much easier to undertake child free, and on our more recent family holidays the driving has become more about just getting to the destination rather than enjoying the journey. But there are still a few drives that I hope to experience one day, and hopefully share rather than endure the experience with the children!

I'd love to visit Iceland again one day, and this time spend a week or so driving the Iceland's Ring Road around the whole of the country. I imagine that a great deal of the journey would be quite isolated, but there are places to stop, and lots of things to see on the way. It probably wouldn't take much work in the way of navigation as there is only the one road to follow, so I could sit back and enjoy the scenery.

Another drive that I'd like to take, although definitely not as the driver, is the Amalfi Coast in Italy. It looks like a stunning drive, although perhaps also terrifying with lots of steep drops!

Have you taken any of these drives? Or do you have completely different ones on your wish list? I'd love to hear about them!

Tuesday, 5 April 2016

Ten things I love about blogging

The other night I was feeling a bit down about my blog. I absolutely love writing my blog, but sometimes the blogging world can feel a bit competitive, full of constant promotion and desperately trying to get your voice heard above many many others. I was trying to brainstorm blog post ideas and I wasn't getting anywhere, so I ran myself a hot bath, settled down with a notepad and pen, and tried to get my creative juices flowing by making lists, a technique that I find works really well when trying to get my ideas together.

I challenged myself to come up with a list of ten things that I love about blogging, and I found the exercise really satisfying and it really did make me feel better, so I thought I'd share my list here.

Ten things that I love about blogging

Ten Things I love about Blogging


Expressing my creativity and sharing my ideas - I started my blog because I wanted to share the things that I'd been doing and making, and I think that I'm even more creative because of the blog. I've worked with many brands where I've been challenged to come up with a craft using certain craft materials and I've taken part in lots of crafty challenges. I've found new craft ideas through other blogs that I've then gone on to try out myself and it's really inspired me.

Challenging myself - I've used my blog to undertake many different personal challenges, which I simply would not have done without it. For example the Patons Crochet Along which kick started a crochet addiction and really pushed me to try a craft that I'd struggled with in the past. I'm loving working on my Sky Blanket, and a couple of years ago I took part in the Great Bloggers Bake Off and attempted a different bake every week for 12 weeks, it was the regular blogging that kept me motivated!

Reading other blogs and discovering that I'm not alone - Before I started my blog I never realised that other people were blogging about their own experiences. Particularly as a new, sleep deprived Mum, it was really comforting to find people blogging about the same challenges that I was facing, and usually writing with much more honesty than the people that I spoke to in real life.

Going well outside my comfort zone - I'm definitely an introvert, and many days I'm quite happy if I don't have to leave the house. So sometimes I really need to push myself, and I'm always so glad that I did. Back in 2013 I decided on a whim that I really wanted to join the group of bloggers climbing Snowdon with Team Honk for Comic Relief and I did it - even though I'd never met any of the other people that I'd be climbing with before and the thought terrified me. I was also terrified at the thought of speaking at the BritMums Live conference last year but even though I was so nervous it was a fantastic experience.

Keeping my work related skills up to date - I've not worked in an office environment for several years now, but I know that I'll be returning to the world of 'real work' one day. In the meantime I'm still using many of the skills that I'll need - negotiation over fees for sponsored posts, working to deadlines, attention to detail, prioritising, multitasking and so on.

Indulging my love of organisation - I love making lists, and blogging provides me with so many opportunities. Ideas for posts, ideas for crafts to blog about, long lists of posts that I've written. There is also an editorial calendar to manage, seasonal crafts and activities to schedule, Pinterest boards to organise and social media followers to keep track of.

The chance to attend special events - I've been invited to many events through my blog, and even though not being London based means that I sometimes miss out, I still get very excited at the thought of going to a press launch for a product, the press night for a show, or a day out hosted by a brand like the YouTube Kids event at London Zoo and I love being able to share these opportunities with my family.

The chance to earn a bit of money - I don't earn a huge amount from my blog, but I do earn enough to consider it a small part-time job, and I am officially self-employed with my blog as the source of income. It's great because I can fit blogging and social media around the family, and it's something that I really enjoy doing and a world that I never would have otherwise discovered. There is also the potential to earn more and make it into more of a job as the children get older and I can devote more time to it.

"Freebies" - I know, I know, I shouldn't refer to blog review products as freebies. It takes a lot of time to photograph and write up review items, not to mention of course all the unpaid work that I put into my blog that puts me in a position to be offered these things. But the truth is that through my blog I've received many products and experiences that we simply wouldn't have had otherwise, we've saved a lot of money on day trips,craft supplies and toys, and because I really do love writing my blog, even the reviews, it doesn't feel like work.

Making new connections with people that I would otherwise never have encountered - Through blogging I've met so many people, both virtually and in 'real life'. I may only get to physically meet them once or twice a year, but I've made some lovely friends and we stay in touch via social media, and I never would have met them without my blog.

If you are a blogger, what would you add to the list?

Sunday, 3 April 2016

My Sky Blanket in March #skyblanket2016

My Sky Blanket is now complete! Here is a link to the completed Sky Blanket

Here is how my blanket progressed throughout the year - JanuaryFebruaryMarchAprilMayJuneJulyAugust, September, October, November and December.

If you have found this page because you would like to make your own Sky Blanket, you might like these posts:


Sky Blanket progress in March

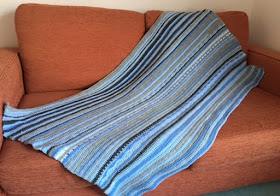
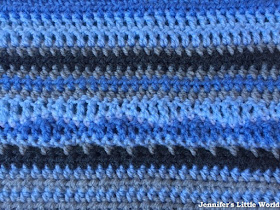
I can't believe that it's the end of March and my crochet Sky Blanket is a quarter complete! It's really starting to look like a blanket now which is very satisfying, and it's lovely to be able to sit under it while I'm working on it. I'm not sure it will be so comfortable during the summer though!

This was my January update, this was my February update, and here's how the blanket is looking so far:

Sky Blanket progress in February

The colours are still pretty mixed, which I like, but there does seem to be a lot more blue appearing lately, there was a lovely long run of blue around the middle of the month and you can see that the latest rows (at the bottom of the sofa) are looking much less grey.

At the beginning of the month, the 2nd of March was a really windy stormy day, so I did a row of half trebles with spaces to be the wind, then a single row of double crochet the next day when it had calmed down again. I've been pinning sampler crochet blankets on Pinterest and I love how they look so I'm hoping to incorporate a few more rows using different stitches. On the 4th March it was one of those days with a bright blue sky and big fluffy white clouds.

Sky Blanket progress in February

So I did a wavy row in the medium blue and then a row of double crochet in white. I finished off the wavy row the next day, so there is now a nice white wavy row.

Sky Blanket progress in February

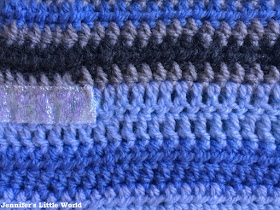
On the 11th March it was super frosty and very foggy too. I snapped a picture of the car windscreen from inside before I headed off to the gym first thing:

Sky Blanket progress in February

Then I reflected this in my blanket with a light blue yarn and some sparkly frosty ribbon.

Sky Blanket progress in February

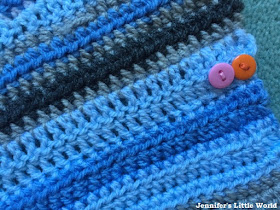
On the 12th of March we were treated to a lovely pink and orange sunset. I don't seem to have seen many sunrises or sunsets so far this year. I think that the problem is that all the main windows in our house face North and South, so I only tend to catch them if I'm out and about.

Sky Blanket progress in February

I felt it was so pretty that it was deserving of two buttons.

Sky Blanket progress in February

At the end of March my husband's sister got married in a long Easter weekend of celebrations. For the first day of the wedding I crocheted in some small beads from a beaded string bracelet that Mia was given at one of the events, and for the day of the big Indian wedding I included a big gold button.

Sky Blanket progress in February

I'm loving my blanket so far!

There was a group of us taking part in the Sky Blanket project throughout 2016, and you can find us across social media, in particular Instagram, using the hashtag #skyblanket2016. The project was started by Bug, Bird & Bee, The Boy and Me and You Little Sew and Sew.

If you aren't sure if a Sky Blanket is the project for you, you might like this blog post with some more ideas for a year long craft project.

With thanks to Make it Coats for supplying me with the yarn for this project.