Pages

Wednesday, 30 December 2015

Minecraft Hama bead keyrings

How to make Hama Minecraft keyrings


It's only been a few months since we introduced Minecraft, but already Harry is pretty well addicted. I did have reservations about getting the game for him, and it is a little concerning how he would play it all day if he could, but I'm also very impressed with how well he gets on with it, he builds all sorts of complicated structures with things that move and so on, and the game really appeals to his mechanical little mind.

It's his birthday in January, and I somehow seem to be finding myself hosting a Minecraft party at our house for a few of his friends. Not an easy party where they sit and play Minecraft, but a themed party with various crafts and activities to keep them all entertained for a couple of hours. It's a bit daunting but luckily I have some good friends helping me out, and I'm sure I'll be sharing some of our ideas in a blog post shortly!

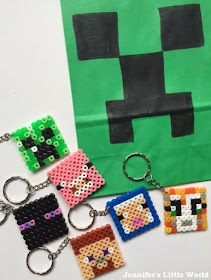
In the meantime over Christmas I've been working on the party bags. I found that small official Minecraft toys were quite expensive, and Minecraft themed partyware isn't really available, so I've been making a few things myself and with Harry's help. The first thing that we made together are these Minecraft Hama bead keyrings.

Minecraft party bag fillers

For the designs I used these Minecraft designs for Hama beads from Minieco. They are so simple to make on a square pegboard, and if you are looking for different designs it's easy enough to take the pattern straight from the Minecraft game itself, as it's perfectly suited to Hama beads!

I ironed the beads firmly on both sides so that they would be sturdy, but I made sure not to over iron so that the holes were still open. Then I bought some blank keyring chains (affiliate link) which I could attach to the corners of my designs. The end ring fitted nicely through the hole in the Hama bead when opened with some pliers.

Pile of Minecraft Hama bead keyrings

I hope that his friends are pleased to receive them! The party bags themselves in the picture are simply green paper bags (affiliate link) which I decorated in black pen with a Creeper face. I'll be sharing some of the other things that I made for the party bags in a few weeks!
Wednesday, 23 December 2015

Our Gingerbread Houses - Christmas 2015

I started our Gingerbread House tradition back in 2012. I was inspired by ones that I'd seen on blogs and Pinterest, and so I added it to my Day Zero Project list. I spent ages fretting about my first Gingerbread House, but in the end it wasn't nearly as difficult as I expected it to be! I always use the same recipe from Tesco which includes an easy template and also a video to follow - you can find the Gingerbread House recipe here. The first house I made pretty much by myself, with Harry adding a few decorations under careful supervision.

Over the years I have adapted the recipe slightly, I decrease the amount of the wet ingredients by about 20% and by reducing the size at which I print the template to 75% it makes just enough dough for two slightly smaller gingerbread houses.

In 2013 we had two houses, and while I pretty much decorated Mia's house, Harry did it by himself. Then last year they were both very much involved in the decoration and loved making them.

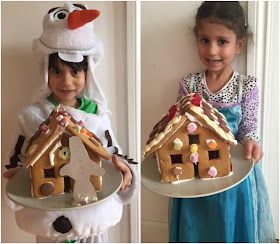
So continuing tradition, here are the 2015 Jain Family Gingerbread Houses!

Making gingerbread houses with children

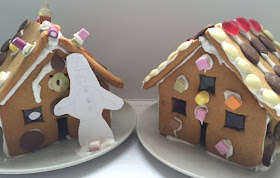
I made the gingerbread and assembled the houses but I had no role in the decoration apart from piping the icing where directed. Mia went with a pretty house, with jelly heart sweets on the roof and neat lines of chocolate buttons. Harry came up with an imaginative house which has sweets formed into the shape of a moose with antlers and a butterfly, and he embellished with a paper cut out snowman.

Making gingerbread houses with children

Now to see how long we can keep them around for before they are broken up and eaten!

Here are our previous Gingerbread Houses:


And here was our 2016 Gingerbread House which was also captured on video as part of Vlogmas 2016

Friday, 18 December 2015

The end of Mia's first term

I can't believe that Mia has finished her first term of school already. I sat in the carol service at school this morning, having been there for the last two years with her sitting on my knee, and this year she looked so grown up sat down there on the floor with all her friends. 

Child on first day of school

This was her very first day. I'm afraid that she doesn't always look quite as neatly turned as this (and she definitely doesn't by the end of the day!). She is enjoying her hot school dinners which is brilliant because Harry only lasted with them two weeks, and she is trying all sorts of different foods. The trouble is that while Harry could wear the same jumper all week she really needs a clean one every day, and we don't own enough jumpers to keep up to that standard, so along with her wild hair she generally looks pretty scruffy!

She's settled into school absolutely fine, we've had no clinging, no tears and no complaining. I've noticed that she tells me a lot more than Harry does about the relationships between children in her class, who plays with who, who says mean things to who, and she's also obsessed with which children get to take home one of the special teddies at the end of each day.

Mia has been very much a Daddy's girl since she was a baby. As a toddler she'd often scream if I tried to hold her when Ram was about. Once when we were going through US immigration I was convinced that the officer would think I was trying to kidnap her because she screamed the place down when I held her so that Ram could do his fingerprints. When out and about as a family she's always naturally gone to Ram and Harry has gone to me.

But since starting school Mia has been much more clingy to me. I get so many more cuddles, and when we are out she often asks to walk next to me and hold my hand. It's lovely, and it makes me wonder if she took me for granted before - perhaps now that I'm not around all the time she realises that she does want me after all!

I'm so proud of her!

Wednesday, 16 December 2015

Buying our first flat

A first step on the housing ladder is a very exciting moment. For me, that was back in 2003 when I bought my first property, a lovely two bedroom second floor flat in Worthing. We were lucky to have some financial help from my parents as well as some savings that we'd built up which gave us a good start. Ours was the one in the middle with the green plant in the window, which is still sitting on my kitchen windowsill today!

Our first flat in Worthing

We spent a lot of time searching for the perfect flat. Fortunately Worthing has plenty to choose from, which are generally a good size and well maintained. The first property that we saw was actually the flat on the top floor, which we fell in love with, but as we hadn't yet sorted out any of our finances we were in no position to put in an offer. It's funny how these things work out though, and we were actually better off where we ended up as our flat had an extra toilet and needed less work.

We moved from a rented furnished flat so we had to buy pretty much everything. The majority of our furniture came from Ikea, and we had to drag my parents along to help us bring back everything that we bought! But it did mean that our actual move was done in a couple of car loads, along with a bit of extra help to carry the massive old style television up two flights of stairs.

The location was perfect - just off a lovely tree lined road filled with big houses, a short walk to the seafront and then to town, close to the station, and near enough to walk comfortably to work. We used to go for long walks along the sea in the evenings.

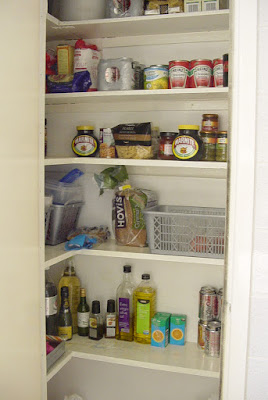
Inside it was lovely too, we had a huge living room and all the windows were massive, including a glimpse across the South Downs from the main bedroom. There was so much storage too, huge wardrobes in the bedroom the length of the room and a pantry in the kitchen which was brilliant.

Our first flat in Worthing

We didn't need to do too much work to it at all, although we painted every room, replaced the flooring in the kitchen and had the windows done. Looking back through the few photos that I have (which were taken as part of a home inventory when I had much more time for such things than I do now) I'm amazed by just how little stuff we had. It's no wonder that I could clean the whole place thoroughly in under an hour!

Our first flat in Worthing

After our wedding, with some more savings built up and plans to start a family, we knew that the flat would no longer be practical for us but it was a real wrench to sell it. We still drive past from time to time and reminisce. Perhaps we'll end up living there again in our retirement!

This is a sponsored post in association with Santander.

Tuesday, 15 December 2015

Infographic - Christmas Crafters are worth £376 million to the economy

Research from Direct Line for Business has shown that over three million people in Britain will be selling their crafts this Christmas, both online and at Christmas craft markets across the country. It's something that I often feel I should be doing, especially now that with both children at school I have a bit of extra time - although the research also revealed that these crafters are working on average 19 hours a week from October to December and I'm not sure how I could fit all that in! 

The Infographic below shows some of the ways that these 'Christmas Crafters' are making money, along with some top tips for starting or running your own crafting business. One thing that I'd not thought about before is purchasing Craft Insurance - it's really important if, for example, a customer is hurt when using one of your products, or if you suffer damage to your stock. You can find out more information here - Direct Line for Business Craft Insurance

Christmas crafters infographic
I have also shared some more tips on starting a business as a parent here. 

This is a sponsored post in association with Direct Line for Business.

Salt dough tree decorations for Christmas

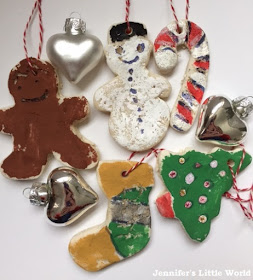
This month, appropriately enough, the theme for my Bostik Bloggers craft box was Christmas. I've been meaning to make some salt dough tree decorations for a while now, so it seemed the perfect opportunity to give them a go. They are simple to make even for very little ones, and make lovely ornaments for your own tree, or to give to friends and relatives to treasure over the years.

Salt dough Christmas tree ornament decorations

You need:

Flour, salt and water to make the salt dough
Festive cookie cutters and a straw
Paint in a variety of colours
Glitter glue and other sparkly embellisments
Twine, ribbon or sparkly pipe cleaners to hang

Instructions:

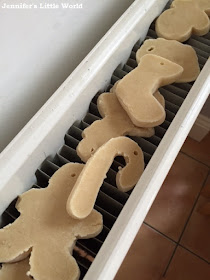
First you need to make your salt dough. Mix together two parts flour, one part salt and one part water, adding the water gradually until you have a firm dough. I used a cup as a measure and it made enough for about 18 decorations. Roll out the dough to a thickness of around half a centimetre, and cut into shapes. Use a straw to make a hole in the top of each shape. Harry also added some details to his decorations with a cocktail stick.

To dry I baked it in the oven at 100C for about half an hour, until the shapes were firm to touch, then I finished them off by leaving them on top of a radiator for a few days, if you need them to be finished sooner then you can leave them in the oven for longer but keep an eye on them so that they don't burn.

Salt dough Christmas tree ornament decorations

When dry the ornaments can be painted and decorated. Children's ready mix poster paint works well for painting salt dough, but we did use some acrylic paint, especially for the white, as it covers better and gives a stronger colour.

Salt dough Christmas tree ornament decorations

We waited until the next day to make sure that the paint was completely dry, then we decorated the salt dough ornaments with some Bostik glitter pens. The glitter pens can be used to make dots or by squeezing our a larger amount you can then spread the glue with a paintbrush and it dries to a lovely, sparkly, shiny finish.

Salt dough Christmas tree ornament decorations

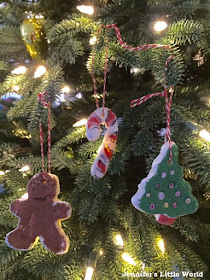
Finally each one was threaded with a length of red and white stripy twine, making sure to use a generous amount, and they were ready to be hung on the tree.

Salt dough Christmas tree ornament decorations

The box of craft materials was provided to me free of charge by Bostik as part of the Tots100/Bostik Craft Bloggers Club.

Monday, 14 December 2015

My granny square crochet blanket in progress

Update - Here's the finished crochet granny square blanket!

I've been wanting to crochet a granny square blanket for ages. Like many of my crafting projects, I'm sure that Pinterest had a lot to do with the inspiration, and you can see my Crochet Blanket board at the bottom of this post. I had a bit of a shaky start when it came to getting to grips with crochet, but with the completion of my gorgeous crochet Afghan I'm feeling pretty confident, and I'm very much looking forward to starting the Sky Blanket project in January.

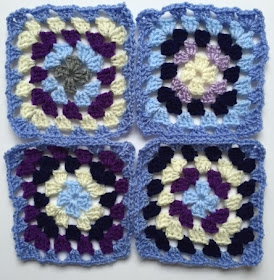
As part of my learning to crochet process I started making granny squares. They were pretty terrible at first, but I persevered and eventually they started to look alright. Some of my early squares have mistakes in, where I've started working a new colour on the wrong side of the square or I'm missing one of the groups of trebles in the corner, but I'm still going to use them in the blanket, nobody's perfect!

Box of crochet granny squares

Each square is made of five rounds with the outer round always the same colour (and I really that hope I don't run out!). This is a blue yarn that I bought in Hobbycraft ages ago when I first had the idea of making a blanket. Most of the other yarn was given to me by my Mum in blue, cream and purple, and I've bought a few more purple balls since. The finished blanket will measure 13 squares by 11 squares for a total of 143 squares. I might do a border as well, I'll see how big it is and how much yarn I have left over!

I don't have a plan at all when it comes to the distribution of the colours having gone for a cheerfully random selection, so I'm hoping that it all works out well in the end. I'm vaguely trying to alternate light and dark colours as I go around but that's about it. I'm going to have to find myself a huge space somewhere in the house and lay out all the squares in a way that pleases me, it's going to be like an enormous logic puzzle trying to make sure that all the colours are balanced. Then I'll have to sit there for hours and hours sewing them all together!

Four crochet granny squares

It's quite a slow process, I reckon that it has been taking me almost an hour to make one square (!) but it's a good project that I can take out and about with me. Progress will slow down I'm sure once I get started on my sky blanket, but I can take the squares with me when we go away and I don't want to be lugging a huge blanket about. I've made 50 squares so far, so just a few more to go!

Here are some blankets that have inspired me, many are beyond my current skill level but maybe one day if I keep practising!

Saturday, 12 December 2015

Cinderella Pantomime at the Pavilion Theatre, Worthing

This week we were invited to attend a performance of the 2015 pantomime Cinderella at the Pavilion Theatre, Worthing. The production featured a host of stars, including Dancing on Ice's Matt Evers, Strictly Come Dancing's Camilla Dallerup and Mark Read from the boy band A1.

Going to the pantomime as a family was a yearly tradition when I was little, but it's been years since I last went to one. For the last couple of years Harry has been to the pantomime with his school which is brilliant, but I've always felt that we were missing out on a family tradition a little bit, and so now that Mia is a bit older and able to sit still for long enough I was delighted that we were given the opportunity to attend as a family.

Well we all enjoyed the show very much. The singing was fantastic, the dancing and costumes spectacular (especially the Ugly Sisters of course!), and the whole production felt completely polished, even during a couple of mishaps. It was very funny, with traditional comic routines that I remember from pantomimes when I was little, along with up to date jokes.

Harry found the entire thing completely hilarious and was laughing throughout. I'm sure that a lot of the jokes must have gone over his head, but it didn't matter to him and he was still repeating them the next day and giggling to himself. He was also completely caught up in the audience participation, it's unusual for him to be joining in but I don't think he could stop himself. Mia was spellbound by the singing and the dancing, and was particularly entranced when Cinderella magically turned into a princess.

Children watching Cinderella at Worthing Theatres

One especially good thing about this show was that there was no evil villain, the only baddies were the Ugly Stepsisters who were giving a comic rather than scary performance. This is great because Harry in particular is very sensitive to things that are a bit frightening and there was nothing here for him to worry about.

It was a good long show, and as it was an evening performance it did finish quite late, so if you have little ones I'd suggest going for a morning or matinee performance. The children are watching it again with school next week and I know that they are going to love seeing it again, I'd really recommend it!

We received complimentary tickets to the press night in exchange for this review.

Friday, 11 December 2015

Sharing the magic of giving this Christmas with Sellotape

Sharing the magic of giving at Christmas with Sellotape

This Christmas, Sellotape is donating Christmas gifts to vulnerable children and young carers at the Honeypot Children's Charity, and have updated the packaging of their Original Golden Roll to include information about their support of the charity.

Honeypot has been working since 1996 to enhance the lives of vulnerable children and young carers aged 5-12 years old, and they provide respite breaks and on-going outreach support for the children. I was asked by Sellotape to take part in a very special challenge - to wrap some carefully chosen gifts that Sellotape will be giving to children at the charity using Sellotape products.

I must admit that I don't usually pay a lot of attention to how I wrap my presents, but with these gifts going to such important recipients I enjoyed spending a bit of time to try and make them look extra special, and I really hope that I've done a good job!

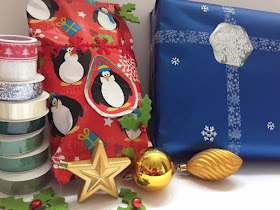
I received two gifts to wrap - a toy electric guitar and a Play Doh set - along with a selection of Sellotape products and other crafty bits and pieces to help me.

Sharing the magic of giving at Christmas with Sellotape

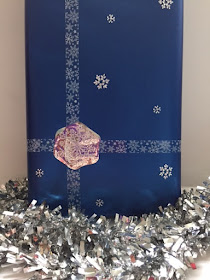
I decided to start with the toy guitar. I loved the gorgeous blue metallic wrapping paper that I was sent, and with some sparkly snowflake stickers included in my hamper I decided to go with a Frozen inspired snowflake theme.

First I wrapped up the parcel, luckily it was a nice simple shape! Then I wrapped it around with some Sellotape festive tape. This is clear Sellotape which has lovely little snowflakes printed all across it, and it looks beautiful on the dark paper. I stuck one of the snowflake gem stickers onto some plain silver wrapping paper and cut it out, then I glued it onto the front of the parcel at the point where the tape crosses.

Then I decorated the rest of the parcel with some more of the smaller snowflake gem stickers.

Sharing the magic of giving at Christmas with Sellotape

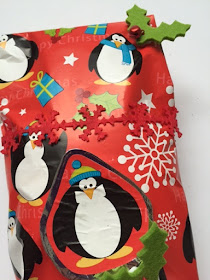
The Play Doh is a present for a younger child, and so I decided to try and make it a bit more fun. It's an awkward shape, so I wasn't quite sure how to approach it, and I went with my usual method of pretending that it is square and making sure that the edges are firmly secured with tape! I chose some bright, fun wrapping paper with penguins on. The design also features a holly leaf and snowflakes, which matched a jingling holly berry decoration and red snowflake trim which I received in my hamper.

Sharing the magic of giving at Christmas with Sellotape

To finish the parcel I cut out one of the penguin motifs from some spare wrapping paper, mounted him onto silver paper and then onto a piece of thin card. I used some foam pads to stick him onto the front of the parcel so that he stood out a little way, and then added some holly leaf stickers.

I hope that the finished parcel looks fun and inviting when it's under the tree!

Sharing the magic of giving at Christmas with Sellotape

This is a compensated post, and I received a hamper of wrapping materials.

Thursday, 10 December 2015

Classic children's Christmas crafts

A couple of years ago I wrote a post about classic children's Christmas crafts, sharing some of the fun crafts that I remembered from my childhood. It made me think about how many of my happiest Christmas memories involve the different crafts that we did every year, and I was interested to know whether other people felt the same. So I asked around on Facebook to see what other people remembered about their classic childhood Christmas crafts.


This is the snowman that we made a couple of years ago by sticking cotton wool around a toilet roll tube, and I was pleased to find out that I wasn't the only one that made these when they were little!


Like the toilet roll tube above, lots of our Christmas decorations were made by recycling. I still sit down after Christmas with a big pile of Christmas cards and use pinking shears to cut them all up into gift tags, and I found out that lots of other people do the same!


Another fun thing that I remember making from old wrapping paper is paper chains to decorate the house a few weeks before Christmas. We had them strung up all around the house, I don't think I've seen any as Christmas decorations for years, they've obviously just gone out of fashion as lots of other people remembered making them as children! Sometimes we would use the pre-gummed papers, which as Aly reminded me probably came from Woolworths, and Hannah remembers colouring in strips of paper with pens.

With my Mum's help (and thinking back, she probably used to do most of the work) we used to decorate the many glass panes in our front door with stained glass window decorations. Helen remembers doing that too, as well as using coloured paper to make lanterns. From memory our front door always looked amazing at Christmas. I do remember the year that my Mum presumably tried to simplify things by allowing us to stick cotton wool balls all over the door to represent snow, and all the clean up job that took place afterwards! Now Helen recreates the craft in biscuit form with her stained glass biscuits!

A popular craft that lots of people remembered was folding and cutting up white paper and card to make snowflake decorations. Last year I remember Harry being obsessed with making paper snowflakes, leaving a trail of tiny pieces of cut up paper all over the place. I'm trying to keep quite about it this year!

Not everyone remembers doing much crafting at Christmas, and Aly and Joy make a special effort to do things with their own children. You can see lots of Joy's Christmas crafts on her blog. Like Mary, I also remember making sweets at Christmas, especially peppermint creams. I need to dig out a recipe and make some this year!

I loved reading about everyone's Christmas crafting memories, thank you to everyone that jogged my memory and shared their own memories with me!

Aly from Bug Bird & Bee
Hannah from Cupcake Mumma
Helen from Actually Mummy
Jen P from Smiles & Trials
Jen S from Love Chic Living
Joy from Pink Oddy
Mary from Keynko
Michelle from Mummy from the Heart
Pippa from Red Rose Mummy
Sarah from Mum of Three World
Swazi from Chocolate is not the Only Fruit

and my friends Debbie, Des and Liz.

You might also like this guest post that my Mum wrote for me a couple of years back sharing her memories of a 1950's Christmas - she made paper chains too!

Do you have any stories of your favourite childhood Christmas crafts? I'd love to hear them!

Wednesday, 9 December 2015

Hama Universe - The free Hama bead app!

As regular readers of my blog will know, in this house we love Hama beads. So much so that I even have a whole Hama bead page! So I'm always interested to hear about new Hama related developments, and the other day I discovered the new Hama bead app Hama Universe.

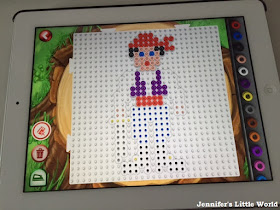
The app is designed for children aged from 5-7 years old and can be downloaded for free from the Apple Store and Google Play. I've found that it works better on a tablet as it's a bit fiddly on a smart phone. The trouble with Hama beads is that they aren't particularly portable, so this app is a brilliant way of 'playing' with Hama beads on the go!

On the home screen you can either choose from a huge selection of pegboards, or you can select a theme from Pirates, Circus or Princesses. The pegboards on the main screen are blank for you to come up with your own designs. Those in the themed islands have some colours on the boards to suggest where you could place the beads, although you are free to use whichever colour bead you choose. It's easy to remove a bead that you've placed incorrectly.

Free Hama bead app for children

When you've completed your design you can 'iron' it, and then it will be saved in the app and appear on display in your themed land. Designs that you create using the free pegboards will appear in your Hama bead world, and you can save a picture of them to share with others.

I'm really liking this app and so are the children. There are loads of different boards to play with and it will keep them busy for ages. It's brilliant for fine motor skills, and can also be used as a way of designing creations while out and about that can be made when they get home. If you love Hama beads I'd recommend giving it a go!

Hama Universe app
No compensation received for writing this post, I just wanted to share it!

Monday, 7 December 2015

Breakfast with Father Christmas at Wyevale Garden Centre, Findon

At the weekend we were invited by Wyevale Garden Centres to enjoy Breakfast with Father Christmas. I chose to visit Wyevale Findon (Worthing), as we've been there several times and the children love the soft play there. On our way through the garden centre to the restaurant we stopped several times to admire the Christmas decorations, there was a really festive feel.

We were greeted and shown to our table, complete with Christmas crackers, and the children were given the choice of going in the play area or decorating a cookie - they chose the play area without hesitation!

Breakfast with Father Christmas at Wyevale Garden Centre, Findon

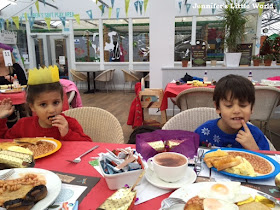
It wasn't long before we were served our breakfast, Ram and I had the Great British Breakfast and the children had their own cooked breakfast. There was plenty there, and they let us have a hot chocolate instead of the tea or coffee which was delicious. While we were eating, Father Christmas arrived through the garden centre ringing his bell, and he made a round of the tables, stopping at each one to greet the children and have a quick chat with them while they were eating.

Breakfast with Father Christmas at Wyevale Garden Centre, Findon

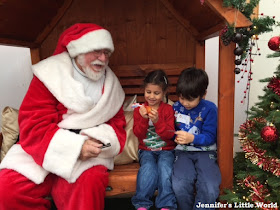
Then he went and settled himself in his grotto and the tables were called up to visit him individually. It was a very smooth process, and even though we were near the end we didn't feel like we were left waiting, as the children were occupied with their food and a festive colouring and activity sheet.

Breakfast with Father Christmas at Wyevale Garden Centre, Findon

When it was our turn to chat to Santa, the children were delighted to be given a bag of chocolate coins, and then they had a proper chat with him. He showed them the magic key that he uses to get into houses that don't have a chimney, and he made sure they would be sending him their Christmas lists nice and early so that his elves have time to make their toys.

Breakfast with Father Christmas at Wyevale Garden Centre, Findon

Then they were asked to choose a gift from a selection around him. I was really impressed with the choices available, they were all good quality gifts and suitable for a range of ages and interests. Mia chose a big squashy doll and Harry went for a kit to excavate your own gems, they were both thrilled with their presents. 

We really enjoyed the experience, it was a lovely way for the children to meet Father Christmas and I think that along with the food and the present it works out very good value.

Breakfast with Father Christmas costs £9.99 per child for a cooked breakfast, then £7.99 for for an adult Great British Breakfast or £3.99 for an adult Mini Breakfast. Tea with Father Christmas is also available. We received a complimentary visit in exchange for this review.

Friday, 4 December 2015

Christmas crafting with Springboard Supplies

This Christmas we've been trying out some Christmas crafting kits from Springboard Supplies, a company that specialises in the supply of creative educational resources to schools and other organisations. The craft kits are all sold in packs of 30, perfect for groups of children, and we were sent a selection from the Christmas collection to try out.

We started with some Robin Cards with Feathers. Each crafting pack contains everything that you need to make the crafts along with full instructions. These robin cards are really simple to make, they just need decorating with some festive feathers and you have some sweet little cards to give to loved ones!

Crafting for Christmas with Springboard Supplies

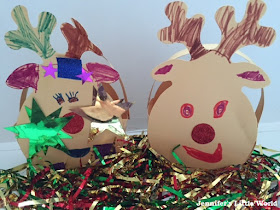
Next we made some Reindeer Baskets which will be a great way to present small gifts. They can be decorated with pens, stickers, sequins or any other festive embellishments, then folded up and glued together to form the basket. We made these when we had friends over to visit and it was great to see how each child personalised their basket and then had something to take home at the end of the afternoon.

Crafting for Christmas with Springboard Supplies

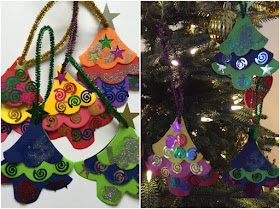
I really love our Triple Tree Decorations. Each one is made from three differently sized pre-cut tree shapes which are decorated and then threaded together. They come with a roll of plastic ribbon, but I used some glittery pipe cleaners to up the sparkle factor, and the children were easily able to thread them together. They'd be brilliant for a group of children where each child could make one to hang on a communal Christmas tree, they can each be personalised but also look great all hung together.

Crafting for Christmas with Springboard Supplies

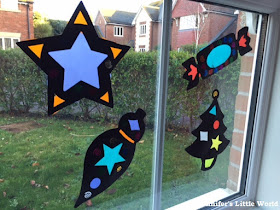
One of my favourite childhood Christmas crafting memories is the stained glass window decorations that we would make every year to go on our front door. I remember spending ages on them (although looking back I suspect that it was my Mum that ended up doing most of the work!). These Stained Glass Festive Shapes with pre-cut shapes are an easy way to make some lovely festive window decorations. The coloured paper is really thick, cuts easily without tearing, and comes in a range of different colours, some with glitter and different textures. Even Mia was able to have a good go at these herself, and then we decorated them with lots of swirly sequins.

Crafting for Christmas with Springboard Supplies

Finally we decorated some Bauble Cards and Shapes to stick up on the stairs. This is another craft which would be great for a large group or class to make, and then group together for a lovely collaborative display. The pre-cut baubles are nice and big, and the kit comes with a selection of different patterned and shaped pieces, which you can use to make geometric patterns or cut up yourself for your own designs.

Crafting for Christmas with Springboard Supplies

I was sent a selection of craft kits in exchange for this review. You can find all these products at Springboard Supplies.

Wednesday, 2 December 2015

The Patons Wool DK Afghan Blanket

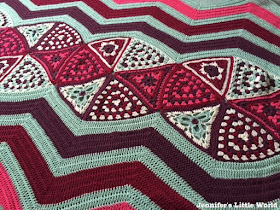
The Patons Wool DK Afghan Blanket completed

Back in the summer, Make it Coats invited me to join in with the first ever Patons Crochet Along. Over the course of six weeks, I would crochet a gorgeous Afghan, with a different part of the pattern being released each week. I shared my trepidation in my introduction post - along with the fact that I'd also need to learn and master crochet in order to complete the blanket!

But I'm so proud of myself, with help from my Mum and support from the Make it Coats team I managed to complete my blanket only a little while after the deadline, and here it is!

The Patons Wool DK Afghan Blanket completed

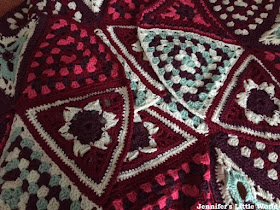
The blanket is made using Patons Wool DK in five gorgeous colours. The first three weeks involved making beautiful flower triangles. The first one took a few attempts working alongside with my Mum, but we worked it out, and I was able to manage the rest of the Afghan by myself.

The Patons Wool DK Afghan Blanket completed

I found the filler triangles quite easy because they are just like granny squares (but triangular ones), and although it was quite hard work to get them done in time they didn't take too long. My flower triangles did end up a variety of different sizes, so once I'd finished all the filler triangles I added in a few extra rounds here and there to make sure that they were all the same size before I blocked them.

The Patons Wool DK Afghan Blanket completed

Sewing up the blanket was also quite straightforward, and it was great to see it all come together (and to see how big it was actually going to be!)

The Patons Wool DK Afghan Blanket completed

The final week was crocheting the wavy stripes down the sides. I knew it was going to be a challenge to complete it all in time so I didn't even attempt it, but I did work very hard on it for a couple of weeks to get it done! Luckily once I'd got started and done the first row I knew what I was doing and so it was fairly straightforward, and I was pleasantly surprised to find that my triangles actually fitted together as they were supposed to!

I spend many pleasant evenings sat on the sofa working on the edges and enjoying the warmth of the blanket. It was the first time I'd worked on a large project like this and I was surprised by how heavy and snug it was! The wool is very thick and warm. I did love that this part of the project was one that I could work on a little bit at a time, I could keep it to hand and do a few stitches while the children were in the bath or doing their reading.

My final Afghan isn't perfect, there are several mistakes in there and a couple of the triangles have somehow made their way in backwards, but I'm so proud of it and pleased with myself for managing it. I really needed the motivation to get it done within a specific timescale too, it helped me to make sure that I completed it in good time!

Unfortunately the pattern for this blanket is no longer available. There are three different flower triangles, fifteen filler triangles in different colour combinations, and then the Afghan is sewn together and wavy borders are added.

The Patons Wool DK Afghan Blanket completed

I was supplied with the yarn that I needed to complete the project in exchange for sharing my progress on my blog and across social media.

Tuesday, 1 December 2015

Review - Marvel Kids Interactive Website from Disney

Ram and I enjoy watching the Marvel Superhero films, but we've not yet let Harry watch them as I think he's still a bit young for them. But he's still familiar with the characters because he sees the toys and merchandise and hears his friends talking about them, so he's keen to learn more. The Marvel Kids interactive website from Disney is a great way to introduce him to the world of super heroes in a child friendly and age appropriate way.

The website is divided into four sections - Games, Video, Characters and Activities. Harry's favourite section was the Games. Before you can play a game or watch a video you have to watch a short advert which is a bit annoying, although it's something that the children accept as they are used to watching videos with adverts on YouTube. The games are all quite simple to play but take a little while to complete. If you need to stop playing then your progress on the game is saved even when you've shut down the PC which is quite clever.

Harry tried out a few of the games which are all based around classic game formats like platform games, shooting to hit targets and so on. There are lots to choose from and he found some easier than others, so they are aimed at a range of ages and abilities. His favourite was Avengers Assemble Combined Strike.

Avengers Assemble Combined Strike game from Marvel

You need to fly Iron Man through the streets, shooting at the baddies and collecting special power up symbols and crates. It's a simple game, easy to control using the mouse or keyboard, and as you progress through the game you unlock more levels.

The Characters section contains information about the main Marvel characters, written in a simple and easy to understand way that gives a good introduction to the character. We also had a lot of fun with the printable Activities. The activities are designed to appeal to a range of different abilities, and include mazes, word searches, anagrams and Sudoku. For use at home I'd print in black and white to save ink, but I also think they'd be great printed out in full colour to use as party bag fillers for a Superhero party. The Videos are fun too, although some of them are quite short so it's a bit annoying having to watch an advert each time.

It was definitely the games that will keep us coming back to the website, there is such a good choice of different styles of game along with different superhero characters to play, there is lots here to keep little ones occupied for ages!

We received a Disney voucher in exchange for this review.