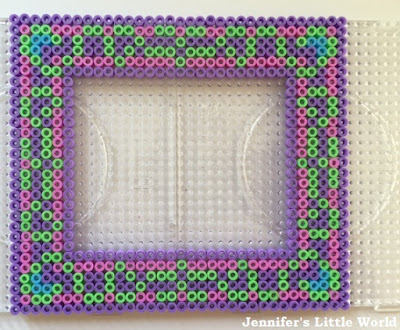
To make a frame large enough to display a standard photo I found that it was best to use two large square pegboards, which are designed to slot together so that you can make a design across both boards. You could use a single square board but you'd only be able to display smaller photographs. For more complicated designs I map them out on graph paper beforehand. Be warned, these frames use up a lot of Hama beads!
Assemble the frame on the boards as usual and iron. After ironing, it's important to place the frame underneath something heavy for a few minutes while it cools, to prevent it from warping. I always iron the design more on the side that will be at the back to keep it sturdy, as I like the look of the beads when they aren't ironed too much.
I made a back for the frames using thin cardboard which I taped to the back of the frame at the top and bottom, leaving the sides open to insert the photograph. I used white cardboard, in case I want to frame a photograph that isn't large enough to fill the frame. I've been propping them up on the mantlepiece, but they are light enough to stick easily to a wall, or you could make a flap from a second piece of cardboard so that they can stand up.
Hama beads are available in a huge range of colours so you can pick out those that match your decor, they don't need to be garish, there are some lovely subtle shades available.
Pastel Hama bead frame
This frame is displaying my current favourite picture that I found while sorting out, my sister and I bathing dollies in the garden. I showed the photo to Mia and she wouldn't stop going on about it until I let her take her dolly in the bath with her that night!
This is the template for the design.
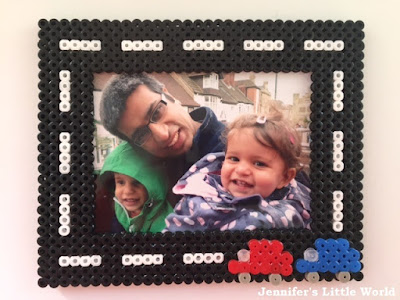
Cars Hama bead frame
You can see this in my Transport post. This photograph was taken on the top of a bus, so it's the perfect subject matter for a road themed frame! Harry has his eye on this one.
The basic Cars Hama bead frame is just made to look like a simple road, then it incorporates some little cars that are glued onto the bottom of the frame to make them stand out. It's hard to show in a photo, but it looks pretty cool! I just used white PVA glue to stick the small designs to the frame.
This is the template for the design - super simple!
Stripy Heart Hama bead frame
This is a really simple frame, made more interesting with a striped heart in the corner. For the heart I used a basic cross stitch heart design. Some of the beads in this frame are my stripy Perler beads which I bought on holiday in the US. Perler beads are almost identical to Hama beads, the only difference I've found is that they seem harder somehow, but they are fine to mix with branded Hama beads. I'm not sure where you can easily buy them from in the UK, I'll definitely be keeping my eyes open because I do love the stripy beads. I completed the frame with one of my old baby photos!
I hope that you liked my Hama bead frame ideas! I've also made Hama bead frames previously. You might like my Hama bead frames inspired by Roman mosaic designs or my Hama bead heart frames.
For all my Hama bead designs visit my Hama bead page.


I love your photo frames! They are awesome! What a great ideas to use them to display photo! Thank you for joining in with us! #pintorials
ReplyDelete