Here's how we made them:
Materials:
Card blanks
Coloured card
Heart decorations and jewels to stick on
Bostik glitter pens
Bostik micro dots
Instructions:
First you need to make your folded springs for the inside of the cards.
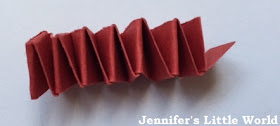
Your finished spring will look like this, and you will glue one end to the inside of the card and the other end to the back of a decorated cardboard heart or similar. You want it to be about 2-3cm in length. I tried to describe how to make it with a series of step by step photos:
But in the end I realised it would be easier to just make a quick video to show how its done! My strips of cardboard measure about 1cm by 30cm.
Then the children each cut out and decorated a large heart from red cardboard to stick inside the card, and decorated the fronts of their cards with a variety of heart stickers and decorations, kept in place with the handy Bostik micro dots. They both finished off their cards with the Bostik glue pens which went on really smoothly and dried to a nice sparkly finish.
We also used the materials from this box to make a lovely jewellery box for Mia.
The box of craft materials was provided to me free of charge by Bostik as part of the Tots100/Bostik Craft Bloggers Club.


No comments:
Post a Comment
I love reading your comments!