I use a fantastic recipe from Tesco - How to Build a Gingerbread House. On the website you can find a video which is really helpful to watch first, and some templates that you can use for the pieces. To make two smaller houses I print the template at 75% of the size and the recipe makes enough gingerbread for the two houses along with extra for about eight gingerbread men or other decorations like little trees for the house.
The recipe is pretty straightforward. I never have any treacle so I just substitute golden syrup which seems to work fine. I also find that I don't need to add quite all of the melted butter and sugar to the dry ingredients, so I add it gradually and mix as I go. I make the gingerbread house pieces the day before and then store them overnight in a cake tin, separated by pieces of baking paper. This way they are nice and firm for when you come to assemble the house.
A trick that I learned from the video is to roll out the gingerbread directly onto the baking paper and cut the pieces out, then move the whole thing onto a baking tray. This means that the pieces don't become misshapen. You need plenty of baking paper!
I do find that the larger pieces that make up the roof need a little longer to cook than the window pieces. You need to remove the pieces from the oven as soon as they have started to brown slightly and then leave them to cool. They will still be quite soft when they first come out the oven, but they do harden up.
The windows are made using crushed boiled sweets, I find that I need about six large sweets for all the windows in the two houses. For a larger house you need one boiled sweet which you can place whole in the centre of each window before putting the pieces in the oven.
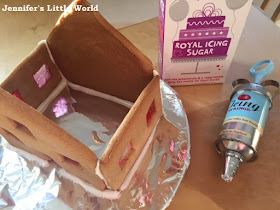
The next day it's time to assemble the house. The smaller houses each fit nicely onto a dinner plate, covered with tin foil. I use Royal Icing which you can buy in powder form and just add water. I don't follow the instructions exactly as I find it makes the icing too runny. I find about 300g of icing sugar and 40ml of water makes a nice thick icing, but just add the water gradually and keep mixing, it's best if you can use an electric mixer. This makes loads of icing, enough to assemble the houses and with plenty left over for decorating.
I use an icing syringe to pipe the icing onto the pieces, making sure to stick it to the plate at the bottom. Assemble the walls first and leave to set before adding the roof (it takes about 10-15 minutes to set firmly enough). I start with the back piece, icing a line along the plate and propping it up using a glass. Then I add the sides, again icing along the bottom to hold it in place. Then finally add on the front piece. I fill in any gaps with plenty of icing and if necessary I ice along the bottom sides again so it's nice and sturdy. Adding the roof is a little more tricky and you may need to hold it in place for a few minutes so that it doesn't slide off!
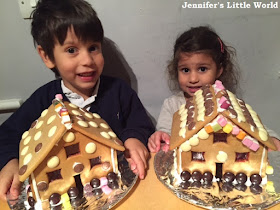
I make the gingerbread houses myself up to this point, as you do need a little bit of concentration! Then I let the children loose to decorate them. I find that chocolate buttons are good for decorating as they are light and stick down easily. Dolly mixtures add a bit of colour, and as I'm personally not a big fan of jelly sweets I always choose something that's nice and chocolatey too!
I helped the children decorate by piping them lines of icing that they could stick the sweets onto. They were so pleased with their finished houses!
The tradition continued! Here are our 2015 Gingerbread Houses.


No comments:
Post a Comment
I love reading your comments!