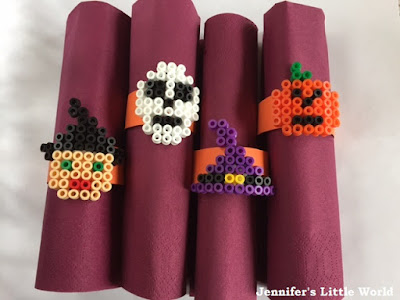
I love crafting for Halloween and I've definitely been enjoying the Halloween Hama bead crafting this year. I've had to buy several extra packets of black Hama beads! These simple little Halloween designs are shaped as they cool so that they can be attached to a ring of cardboard. They can then be used as free standing table decorations, or perhaps filled with small sweets at a Halloween party. They can also be glued to a circle of card to make themed napkin rings that can be taken home as party favours.
You can find a copy of the designs for these Hama bead napkin rings at the bottom of the post.
I made two of each of my Halloween designs - a skull, witch's hat, pumpkin and witch. One set are mounted at the base of cardboard rings to make free standing Halloween table decorations. The second set are mounted into the centre of a cardboard ring to make a Halloween napkin ring.
All the designs are created using the square Hama bead peg board and a variety of suitable Hama bead colours. The ring is made from orange cardboard. When you have ironed the designs, before they have completely cooled, wrap them around a cardboard tube and hold them in place while they cool down.
Related post - Ironing tips for Hama beads
When the designs have fully cooled they will retain their curved shape.
The circle of orange card is stapled at the back, with the Hama bead motif glued on the front. For the decorations it is glued at the base of the stand, for the napkin rings it is glued across the centre.
Here are the patterns for the mini Halloween designs:
If you enjoy making Hama bead designs, you might like my other Halloween Hama projects! I have also made Hama bead witches and a Hama bead Haunted House as well as Hama bead Halloween coasters.
You can also find lots more Hama bead Halloween ideas in my round up post - Hama bead crafts for Halloween
I also have lots more Halloween crafts and activities for young children on my Halloween Pinterest board:
Follow Jennifer Jain's board Halloween crafts and activities on Pinterest.
You can also find lots more Hama bead Halloween ideas in my round up post - Hama bead crafts for Halloween
I also have lots more Halloween crafts and activities for young children on my Halloween Pinterest board:
Follow Jennifer Jain's board Halloween crafts and activities on Pinterest.


No comments:
Post a Comment
I love reading your comments!