Pages

Wednesday, 29 October 2014

Don't be tempted by cheap imitation Hama beads

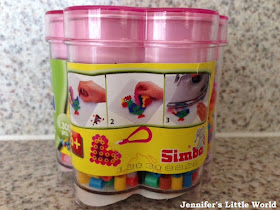
I have a confession to make. The first "Hama beads" that I ever purchased weren't real Hama beads. They were these ones:

Problems with cheap Hama beads

To be fair, in my naivety I didn't realise the difference. They were shelved with the Hama bead packs in the toy shop, they looked identical to me, and most importantly, they were temptingly cheap. When we got home I soon realised my mistake. The beads were slippery, the pegboard pegs too short and the beads were easy to knock over. It was frustrating for me, and even more so for Harry. When ironed, the finished design went all brittle and easily snapped.

Fortunately I didn't let the experience put me off, and we rectified the mistake with a big box of genuine Hama beads and some authentic pegboards, and we never looked back.

Until a couple of weeks ago that is, when I was in my local craft shop stocking up on real Hama beads and I was pointed towards some new stock - very cheap kits of beads.

Don't buy cheap Hama beads

It was only £2.20 for the pack so I picked one up for Mia. It had a transparent board with a coloured template to go underneath that I thought might be good for her to have a go at. Unfortunately it was a disappointment. The template didn't  match the board, both in colours used and in the positioning of the beads. The beads were slippery and far too fiddly for Mia, (who has been coping fine with real Hama beads for months) and worst of all there weren't enough beads to even complete the design properly.

I will make one exception when it comes to imitation Hama beads. I've bought a few packets of the Picture Beads brand from Hobbycraft, and they work very well. Although at £2 a pack they are actually more expensive than the genuine standard coloured beads in my local shop, they do work out cheaper for the more specialised types of beads, for example the glittery and glow in the dark beads.

So let this post be a warning to avoid cheap Hama beads, and if you've been put of Hama beads with a bad experience of cheap imitations, please give the real ones a go, as they are so much better!

If you are looking for a way to use up some cheaper Hama beads that you've collected, I've blogged about some crafts that use melted Hama beads.

Tuesday, 28 October 2014

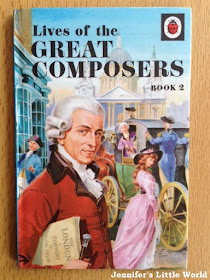
Ladybird Tuesday - Lives of the Great Composers Book 2

A while back I looked at the Ladybird book Lives of the Great Composers - Book 1, and my OCD tendencies were satisfied when I discovered Book 2 in the big box of Ram's childhood Ladybird books. Both books are in Series 662 - History of the Arts. Book 1 covers Bach, Beethoven and Mozart, and Book 2 covers Handel, Haydn and Schubert. Both books were published in 1969. Another book in the series is The Story of Music, which I have also written about.

Ladybird book Lives of the Great Composers Book 2

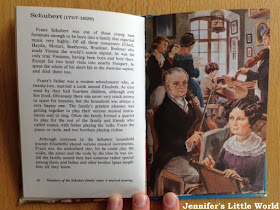
Because the book only covers three composers, it's a pretty comprehensive text and there is a lot of detail. The biographies are written like stories, beginning when they were young children, which makes them a bit more approachable. They are not just a dry history, but are filled with little anecdotes, many of which are beautifully illustrated and sometimes quite humorously. For example, a paragraph about Haydn's short marriage to his rather volatile wife is illustrated by a picture of him cowering against a door clutching a violin while she throws crockery at him, definitely making the story more memorable although I'm not sure that they'd use an illustration like that today!

Ladybird book Lives of the Great Composers Book 2

I really like the style of the book, although wordy it's actually very entertaining and definitely brings the stories of these men to life. 

Ladybird book Lives of the Great Composers Book 2

The book finishes with a quick summary of the well-known pieces by the composers in the book. I'm definitely going to be keeping these books around as a reference for school projects in the future!

If you love Ladybird books, do pop over and visit Ladybird Tuesday, where Being Mrs C is assembling a really comprehensive catalogue of Ladybird books and reviews.

Below you can find links to all my Ladybird Tuesday book posts.

Snow White and Rose Red
Hansel and Gretel
Ali Baba and the Forty Thieves
The Three Little Pigs
The Old Woman and her Pig
Little Red Riding Hood
The Ugly Duckling
The Railway Children
A Little Princess
A First book of Aesop's Fables

A Ladybird Book about Knitting
More Things to Make - For Special Occasions
Easy to Make Puppets
Learning to Sew
Stamp Collecting
Tricks and Magic

Prehistoric Animals and Fossils
Dinosaurs
Stone Age Man in Britain
Great Civilisations - Crete
Charles Dickens
Nelson
Lives of the Great Composers Book 1
Lives of the Great Composers Book 2
The Story of Music

Plants and How They Grow
The Ladybird Book of the Night Sky
Sea and Air Mammals
The Farm

The Story of Nuclear Power
The Motor Car
How it Works - The Computer
How it Works - The Rocket
The Story of Ships
The Postman and the Postal Service
People at Work - The Nurse

Understanding Numbers
Talkabout Clothes
Going to School
Teaching Reading

Stories of Special Days and Customs
Christmas Customs

Girls and Boys - A Ladybird Book of Childhood

Thursday, 23 October 2014

Hama beads aren't just for little ones!

I'm sure I must be right in thinking that most people would find it difficult to watch their children playing with Hama beads and not want to join in - as you can probably tell, I have just as much fun playing with them as my children! There is usually a box lying out somewhere in our house, and many times I have found myself ironing things for Mums to take home as well as their visiting children! I couldn't wait until Harry reached the age when I could justify buying some for us all to try out.

We've not had many actual Hama bead sets, instead I buy the boards and beads separately, coming up with my own designs and looking online for inspiration. In particular I really like the larger boards, they are so cleverly laid out so that you can use them in different ways and I love seeing how I can create different designs.

I like the look of finished Hama bead creations (perhaps because it's a similar look to cross stitch) and I do have quite a few projects displayed around the house. So I thought I'd share some of my Hama bead projects which are more suitable for adult crafters.

I was very proud of my Hama bead hair clip holder which is really useful for storage in Mia's bedroom. It was very easy to make, and you could customise it by using all sorts of designs for the top and bottom.

Hama bead hair clip holder

Hama beads can be used to make lovely, unique and cheerful picture frames. I've made Hama bead heart frames and Hama bead Roman mosaic inspired frames, and I've also made freestanding picture frames to frame little pictures that the children have drawn. You can make them in any different colour combination to suit the decor of your room.

Hama bead Roman mosaic frame

My Hama bead hanging heart decoration was designed and made for Valentine's Day, but it is still hanging up in our hallway! I really like it, it makes me smile when I see it! I keep meaning to make the children something similar as decorations for their bedrooms. I really like the idea of one with cars and trucks for a boy's bedroom, or as Harry has a space themed bedroom perhaps planets and rockets. It would also be a nice way to display creations that the child has made themselves.

Hama bead hanging heart decoration

Finally I really love my cheerful Hama bead covered jam jars, I was so pleased with how these turned out. They really brighten up my desk and my head has been filled with possibilities since I discovered how easy it was to make curved Hama bead designs!

Hama bead jam jar covers

All these projects were made using the midi sized Hama beads, which are the size that are most commonly available. I've also been having a lot of fun with the mini Hama beads, which are aimed at ages 10+. They really are tiny, about a quarter of the size of the midi beads, and it's easiest to use tweezers to position them carefully on the boards.
If you are new to mini Hama beads you can see me demonstrating how to use them in this video below.


There are some of my first mini Hama bead projects here and there are more on my Hama beads page. I recently undertook a massive colour sorting operation and I have a few more crafts planned using them which I'll be sharing soon!

Mini Hama bead craft projects

I have a Pinterest board called Hama bead ideas for me which is filled with some lovely projects. It has reassured me that I'm definitely not the only grown up that plays with Hama beads, some of the designs are so intricate and creative and I can't wait to try them!

Follow Jennifer Jain's board Hama bead ideas for me on Pinterest.

Tuesday, 21 October 2014

Ladybird Tuesday - Snow White and Rose Red

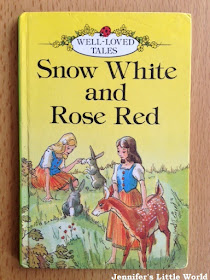
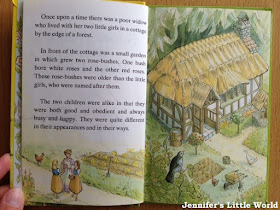
The Ladybird book Snow White and Rose Red is part of the Well-Loved Tales, Series 606D, and I own several other books in this series. This particular copy is one of the more recent books, with a shinier cover and green spine. The look and format of the books changed in 1979, when this book was published. At Mrs Fox's you can see a review of the original version of the tale Snow White and Rose Red. The text in my copy seems to be the same, but the illustrations are very different and the text is also printed on both sides of the full page spread, not in the usual Ladybird style where text is found on the left and illustrations on the right.

Ladybird Well Loved Tales - Snow White and Rose Red

I wasn't familiar with the story of Snow White and Rose Red. It's a bit confusing, because the character of Snow White in this book is different to the more well known Snow White and the Seven Dwarves. This story is about two sisters who are very close to each other, and yet also different in both character and appearance.

Ladybird Well Loved Tales - Snow White and Rose Red

There is still a dwarf in the story, although this is a rude and ungrateful dwarf that doesn't appreciate it when the girls save his life on several occasions. They also help out a large bear that spends the winter with them, and when he kills the dwarf an enchantment is broken which reveals him to be a prince. He then marries Snow White, leaving Rose Red to marry his brother, and they all live happily ever after with their mother in a castle filled with treasure.

Ladybird Well Loved Tales - Snow White and Rose Red

It's a pretty typical fairytale, written in a simple way for children to understand and with plenty of illustrations. I did feel a bit sorry for Rose Red though, who has to marry the unknown prince, but it's still a lovely addition to my collection!

If you love Ladybird books, do pop over and visit Ladybird Tuesday, where Being Mrs C is assembling a really comprehensive catalogue of Ladybird books and reviews.

Below you can find links to all my Ladybird Tuesday book posts.

Snow White and Rose Red
Hansel and Gretel
Ali Baba and the Forty Thieves
The Three Little Pigs
The Old Woman and her Pig
Little Red Riding Hood
The Ugly Duckling
The Railway Children
A Little Princess
A First book of Aesop's Fables

A Ladybird Book about Knitting
More Things to Make - For Special Occasions
Easy to Make Puppets
Learning to Sew
Stamp Collecting
Tricks and Magic

Prehistoric Animals and Fossils
Dinosaurs
Stone Age Man in Britain
Great Civilisations - Crete
Charles Dickens
Nelson
Lives of the Great Composers Book 1
Lives of the Great Composers Book 2
The Story of Music

Plants and How They Grow
The Ladybird Book of the Night Sky
Sea and Air Mammals
The Farm

The Story of Nuclear Power
The Motor Car
How it Works - The Computer
How it Works - The Rocket
The Story of Ships
The Postman and the Postal Service
People at Work - The Nurse

Understanding Numbers
Talkabout Clothes
Going to School
Teaching Reading

Stories of Special Days and Customs
Christmas Customs

Girls and Boys - A Ladybird Book of Childhood

Monday, 20 October 2014

Review - Hot Wheels Total Turbo Takeover track set

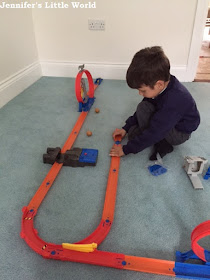
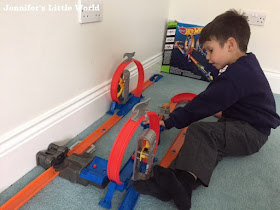
The Hot Wheels Turbo Takeover track set is part of the Hot Wheels Track Builder System which includes a variety of sets and individual pieces of track. The pieces can all be combined together, allowing children to design, create and customise their very own track challenges. The Turbo Takeover set includes two loops, a pull back button to start the car off and a battery powered booster to speed the car around the second loop. It also has a plastic piece that flips up into the air when a car hits it and a slope with 'rocks' that fall down one at a time when the car passes underneath.

Hot Wheels Total Takeover track set review

The set was pretty easy to put together, and Harry (5) can easily manage to build and customise it. The set includes instructions for a couple of different layouts, and it can also be combined with other sets from the same range. We don't have any of the other sets but I've seen some of them at friend's houses and I can imagine that you could build some pretty spectacular layouts with all the pieces that are available!

Hot Wheels Total Takeover track set review

The Turbo Takeover system is pretty good as a standalone set though. The battery powered booster takes 2 D batteries (not included) and it really does fire the cars along. The pull back initial launcher has three different settings and the booster has two speeds, so you can try out different combinations to see what works best. The pieces of track are smooth and flexible and feel sturdy.

We did find that the set didn't work with many of Harry's cars, and even Hot Wheels branded ones wouldn't always stay on the track. As the set only comes with one car, it would be nice if there were a couple more included. He didn't seem to be bothered though, especially as you only need one car at a time to use it. I liked that the set was easy to dismantle and doesn't take up too much space to store.

Hot Wheels Total Takeover track set review

The fun with this set for Harry was more in the designing and building of the track rather than the actual running of cars around it. He also liked playing with it just pushing his cars around it, not using the booster pieces.

He enjoys watching Hot Wheels videos on YouTube, and he had fun making his own video of the set. In this short video Harry demonstrates the set and shows a car being fired around the basic track layout:


We received this set to review. 

Sunday, 19 October 2014

Book review - Personalised children's books from Wondrous Ink

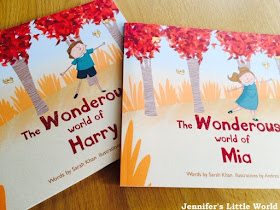
This week, Harry and Mia each received a lovely parcel in the post, addressed to them individually. Inside was a book each from Wonderous Ink, a very special book which not only mentions them by name but also uses the letters from their names to remind them how wonderful and unique they are.

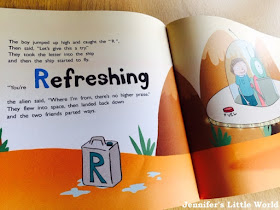
The books are designed for children aged 2 - 8, but a book also makes a nice gift to buy for a newborn. The story follows a boy or a girl who is curious to know what makes them different from all the other children in the world. They go out for a walk to ponder the question, and find that they are lost in an enchanted forest. But on their way they meet a variety of different characters, each with a problem that the child is able to solve by using a letter from his or her name. In return the character gives them an attribute beginning with that letter of the name, giving them the courage to find the way home.

Review - Personalised children's books from Wondrous Ink

The book is really cleverly designed and printed on high quality, thick paper. Although there is a page designed for each letter, for example both Harry and Mia have the same page for 'a' (although still tailored differently for a boy and a girl), where there are two letters the same in a name the pages are different - Harry has both an r for remarkable and one for refreshing.

Review - Personalised children's books from Wondrous Ink

The story is written in simple verse making it easy and fun to read aloud, and the illustrations really are lovely. Harry was thrilled to see his name repeated all through the book and Mia was delighted too - she's now just about able to recognise her name written down. It's a lovely book to share with your child and remind them just how wonderous and individual they are.

Each book also has a personal keycode which the child can use to create an online Wonderous World. You can read a continuation of the story in the book, and there is a quiz where children can answer questions based on the book.

On the Wonderous Ink website you can preview the entire book using your child's name, and then if you like it you can order it there and then for £19.99, including postage and packing.

Harry and Mia received a book each in exchange for this review.

Saturday, 18 October 2014

Halloween Hama bead napkin rings and decorations

You can find all my Hama bead Halloween crafts here - Hama bead crafts for Halloween

I love crafting for Halloween and I've definitely been enjoying the Halloween Hama bead crafting this year. I've had to buy several extra packets of black Hama beads! These simple little Halloween designs are shaped as they cool so that they can be attached to a ring of cardboard. They can then be used as free standing table decorations, or perhaps filled with small sweets at a Halloween party. They can also be glued to a circle of card to make themed napkin rings that can be taken home as party favours.

You can find a copy of the designs for these Hama bead napkin rings at the bottom of the post.

Hama bead Halloween napkin rings

I made two of each of my Halloween designs - a skull, witch's hat, pumpkin and witch. One set are mounted at the base of cardboard rings to make free standing Halloween table decorations. The second set are mounted into the centre of a cardboard ring to make a Halloween napkin ring.

Hama bead napkin rings for Halloween


All the designs are created using the square Hama bead peg board and a variety of suitable Hama bead colours. The ring is made from orange cardboard. When you have ironed the designs, before they have completely cooled, wrap them around a cardboard tube and hold them in place while they cool down.

Related post - Ironing tips for Hama beads

Hama bead skull napkin rings

When the designs have fully cooled they will retain their curved shape.

Hama bead napkin rings for Halloween


The circle of orange card is stapled at the back, with the Hama bead motif glued on the front. For the decorations it is glued at the base of the stand, for the napkin rings it is glued across the centre.

Here are the patterns for the mini Halloween designs:

Mini Halloween cross stitch or Hama bead pixel art designs

If you enjoy making Hama bead designs, you might like my other Halloween Hama projects! I have also made Hama bead witches and a Hama bead Haunted House as well as Hama bead Halloween coasters.

You can also find lots more Hama bead Halloween ideas in my round up post - Hama bead crafts for Halloween

I also have lots more Halloween crafts and activities for young children on my Halloween Pinterest board:

Follow Jennifer Jain's board Halloween crafts and activities on Pinterest.

Friday, 17 October 2014

Christmas ribbon and Hama bead bauble tree ornaments

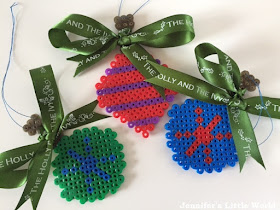
Today I'm sharing some Christmas ornaments using one of my favourite craft materials - Hama beads! These ornaments for the Christmas tree are really easy to make, and even little ones can join in and make their own simple decorations

Hama bead and ribbon Christmas ornaments


This Christmas I have been chosen as a Fantastic Ribbons blogger, and today I'm using some of their lovely Christmas ribbon. The ribbon that I have chosen is the 15mm Satin Ribbon "The Holly and the Ivy", priced at £2.50 for a generous 4m roll. If you want to see what I did with the other ribbon have a look here - Simple Christmas crafts using ribbon.

Christmas ribbon designs

I love the rich green colour of the ribbon. It may be that when we come to decorate our tree the colour becomes a little lost in the green of the tree, so I might use the ornaments to decorate the fireplace instead, but these would look lovely on a white or pale coloured tree. Here are my finished Hama bead ornaments!

Hama bead and ribbon Christmas ornaments


The ornaments are really simple to make using just the square Hama bead pegboard. Here are the basic designs that I used, but you could vary them in all sorts of ways using different colours and patterns. The key element to include in your design is the top part which you use to hang the ornament and to wrap the ribbon around. I used gold Hama beads for this part but yellow would work just as well.

Hama bead and ribbon Christmas ornaments


When you have ironed the designs (I ironed on both sides to make them really sturdy) you just need to tie a length of ribbon around the top to form the bow. Then take some thin thread or cotton and use a needle to thread it through the Hama beads on the top layer and tie to form a loop. Even if the hole has closed as a result of the ironing, the beads should still be soft enough to easily push a needle through.

Hama bead and ribbon Christmas ornaments


These ornaments are so simple to make that children can get involved too, and they make a lovely small gift to pop in with a Christmas card!

You can find all my Hama bead crafts here on my Hama bead page!

As a Fantastic Ribbons blogger I received these two rolls of Christmas ribbon to review.

Wednesday, 15 October 2014

Hama bead witches for Halloween using the princess pegboard

You can find all my Hama bead Halloween crafts here - Hama bead crafts for Halloween

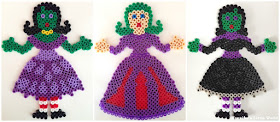
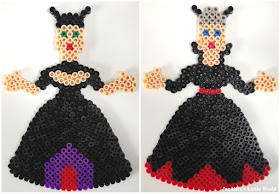
I bought this Hama bead princess pegboard with the intention of using it to make some pretty princess for Mia. But with Halloween approaching, I was inspired to use the board to make some spooky Hama bead Halloween witches instead. These boards to use a lot of beads - I had to stock up on my black beads to make these Halloween designs!

Hama bead princess pegboard


I buy most of my Hama bead pegboards individually from the craft shop in my village. They have a great selection, and they are reasonably priced. Most of the boards that they sell are also available in the larger Hama bead sets, but I like to buy the boards and large boxes of beads individually, and if I need inspiration there is plenty online. 

Hama bead witches for Halloween

I experimented with different lengths of dress, sleeves and skin colours. This is another great board that is really versatile, you can come up with lots of different designs. I can quite happily while away an evening or two trying out different things!

My second set of witches are a bit scarier:

Hama bead witch designs

We used these Hama bead witches to create a Hama bead witch Halloween display which can be illuminated with small battery powered candles and was really easy for the little ones to make. You could also line them up across the mantlepiece, or maybe display in the window for trick or treaters to admire! I've also thought about hanging them as a mobile or stringing them to make bunting.

If you are making Autumn and Halloween decorations from Hama beads you might also like my Hama bead Halloween Haunted House or these Autumn themed Hama bead battery tea light holders. We've also made Halloween napkin holders from Hama beads and Halloween Hama bead coasters.

You can find lots more Hama bead Halloween ideas in my round up post - Hama bead crafts for Halloween

Have a fun, crafty Halloween!

Hama bead witch designs for Halloween

Tuesday, 14 October 2014

Ladybird Tuesday - Sea and Air Mammals

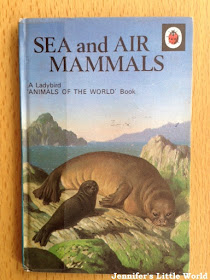
The Ladybird book Sea and Air Mammals is from Series 691 - Animals of the World and was published in 1972. Each of the other books in the series looks at the mammals living in all the different continents (except for Antarctica for some reason). Full colour illustrations are provided by John Leigh-Pemberton, a map at the beginning shows the distribution of these mammals and at the back of the book there is a chart showing the Orders of Mammals referred to, arranged in families.

Ladybird book Sea and Air Mammals

From that introduction you can probably surmise that this is not one of the Ladybird books which is aimed at very young children. Instead it's a substantial reference work, which goes into an enormous amount of detail. It's very wordy, and although the text is fairly easy to read and contains plenty of interesting facts about these mammals, it's not a book that you would sit and read through. Instead I imagine it is intended for the school or home reference library, waiting for a particular piece of relevant homework.

Ladybird book Sea and Air Mammals

Like all Ladybird books, it's the illustrations that really stand out. Some of the mammals are represented in their natural surroundings, others are drawn on the page in families so that you can compare them. One of the bats is drawn as a labelled diagram. I can easily imagine copying the pictures out to illustrate a school project.

Ladybird book Sea and Air Mammals

It will definitely be a useful reference tool to have around, and much nicer to thumb through than scrolling past information on Wikipedia!

If you love Ladybird books, do pop over and visit Ladybird Tuesday, where Being Mrs C is assembling a really comprehensive catalogue of Ladybird books and reviews.

Below you can find links to all my Ladybird Tuesday book posts.

Snow White and Rose Red
Hansel and Gretel
Ali Baba and the Forty Thieves
The Three Little Pigs
The Old Woman and her Pig
Little Red Riding Hood
The Ugly Duckling
The Railway Children
A Little Princess
A First book of Aesop's Fables

A Ladybird Book about Knitting
More Things to Make - For Special Occasions
Easy to Make Puppets
Learning to Sew
Stamp Collecting
Tricks and Magic

Prehistoric Animals and Fossils
Dinosaurs
Stone Age Man in Britain
Great Civilisations - Crete
Charles Dickens
Nelson
Lives of the Great Composers Book 1
Lives of the Great Composers Book 2
The Story of Music

Plants and How They Grow
The Ladybird Book of the Night Sky
Sea and Air Mammals
The Farm

The Story of Nuclear Power
The Motor Car
How it Works - The Computer
How it Works - The Rocket
The Story of Ships
The Postman and the Postal Service
People at Work - The Nurse

Understanding Numbers
Talkabout Clothes
Going to School
Teaching Reading

Stories of Special Days and Customs
Christmas Customs

Girls and Boys - A Ladybird Book of Childhood

Monday, 13 October 2014

My weekend to myself

This weekend I received my reward for over a week of solo parenting while my husband partied in the US. He took the children with him up to his parents, leaving me alone at home for a glorious two nights. Here are some of the many things that I enjoyed while they were away:

Sleep! On Friday night I had the best night's sleep that I have had in years. Literally in years. I have had nights away without children before, but not in my own bed and not without having drunk alcohol. On Saturday morning a thunderstorm woke me up at 5am but I went back to sleep and slept until 9.30am. Heaven. Sleeping so late did make the day seem much shorter though!

The silence. Absolute silence in the house. I could also make as much noise as I wanted, without worrying about waking sleeping babies. I watched television with the door open and I hoovered in the evening.

My timetable was my own. Since we started weaning, the day has been marked out by mealtimes, and not necessarily at the times I want them. Breakfast is at 7am, lunch is at 12pm, dinner is at 6pm. I ate my lunch at 1pm and dinner at 7pm, just because I could.

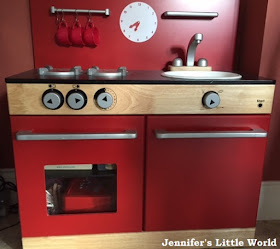
I tidied things up, and they stayed tidy. Below is our wonderful toy kitchen, and it has never looked like this before. For the time being at least, everything is stored inside, sorted into different boxes, and not scattered throughout the house, hidden in child sized shopping bags or piled up on top waiting to be put away (okay, it looks like there is still one cup around somewhere that needs to be tracked down).

Wooden toy kitchen from John Lewis

It was a similar story with the cleaning. And there was so much less of it, I ate breakfast and put my plate and knife in the dishwasher. There was no other washing up, no surfaces needed wiping, the floor didn't need sweeping.

I left out my crafting projects. I left my knitting out like this, overnight. With a needle out in the middle and everything. It was all in exactly the same place when I got up the next morning!

Knitted blanket square in progress

My mini Hama bead project remained undisturbed, even when left out precariously on the table.

Mini Hama bead project in progress

I could start something and finish it without being interrupted. I could also tidy and throw things away unnoticed and without complaint.

I watched grown up television during the day. It's not so much the adult content that stops me when there are small children around, just the fact that they won't tolerate it.

After I had eaten my dinner, I washed up and then that was it. No spending another hour and a half doing the bath and bed time routine. All that extra time in my day!

I had a very productive weekend. I did some holiday planning and wrote and scheduled all my blog posts for when we are away. I wrote guest posts, and I worked on some crafty projects. I took long baths and read. I even went to the gym, and I didn't get lonely at all. Of course I did miss everyone, and I worried about them while they were away, but I know that the break did me a lot of good.

What would you do on a weekend by yourself?

Friday, 10 October 2014

Creating a holiday scrapbook with young children

I love to travel, and I've always made scrapbooks to document my adventures. I first started making holiday scrapbooks on my childhood holidays to France, where I would fill old exercise books with pictures, postcards and notes. As an adult, I would keep a detailed diary while we were away, then on my return write it all up, glueing in pictures cut from tourist leaflets and ticket stubs.

On our recent holidays with small children it has been forgotten. I have usually been so busy looking after and entertaining the little ones that I don't think about making time to sit down and write up a diary (although this blog has proven to be a fantastic way of keeping a record about some of the places that we have visited as a family.)

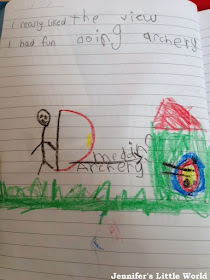
On our recent holiday to Snowdonia, I decided that it would be the perfect opportunity for Harry to start his own holiday scrapbook. We bought him a cheap exercise book which had a plastic wallet attached to the cover, and I provided him with a pencil, crayons, glue and scissors. Then when we were out and about we collected tourist leaflets about the places that we had visited, postcards, and other paper ephemera souvenirs like tickets. I've never been organised enough to add actual photographs to my scrapbooks, but you could easily do this too with a bit of planning. Then every day at some point we sat down together and spent a few minutes writing about that day.

Child working on a holiday scrapbook

I cut out pictures for him from the leaflets, and he arranged them on to the page and glued them down. Then we added a date, a note about the location, and he drew some pictures himself. He wasn't keen on doing too much writing, but I gave him a few prompts and he wrote captions and labels for his pictures.

Page from a child's holiday scrapbook

You could ask your child some questions and write down their answers, or just chat to them about what you've done that day and write down what they say. Older children can be given a sentence to finish or a topic to write about. We also labelled maps with places that we visited and labelled diagrams of things that we've seen, for example the parts of a castle. 

Pages from a child's holiday scrapbook

Slightly older children can keep a more detailed diary, and research more about places that you've visited to add in some extra information.

It would also be a nice idea for children to start an online travel blog that could be shared with friends and family, and then it would be easy to include your digital photographs. This would be easy to update as you were away, as it only takes a few minutes to upload a photo and a few lines of text.

While you are out and about keep an eye out for ephemera that you can use in the scrapbook - we've used restaurant and attraction business cards, receipts, tickets, leaflets and so on. You can also buy postcards, stickers or bookmarks. Craft shops that sell scrapbooking supplies have ranges of themed stickers, for example stickers related to a country that you are visiting.

It's a good idea to photograph or scan the pages when you have finished so that you have a permanent record in case something happens to the original book. Something that I really need to get started on with my collection of holiday scrapbooks!

More recently we created a scrapbook together of our Summer Holiday 2016 - you can find out how we did it here - Making a Holiday Scrapbook

If you have younger children, you might like this post from my other blog Toddler Things - Preserving holiday memories with toddlers.

Thursday, 9 October 2014

Review - Kids Pass Discount Family Pass

If you're a regular reader of my blog, you'll know how much we enjoy taking day trips and outings as a family. The cost of all those attraction tickets can really add up though, and so we are always looking for ways that we can save money on entry. I was recently introduced to the Kids Pass website, which promises plenty of great offers that can save you up to 50% on family days out.

It's completely free to sign up to Kids Pass, and registration is quick and simple. Once logged in you can access the Member Offers area of the website. Here you can filter by location to find places closest to you, and also drill down by type of attraction - for example Indoor or Outdoor, Theme Parks or Aquariums. When you have found the offer that you want to use you can print out a voucher that will give you the discount on arrival.

I found a good selection of local places to visit. There are four in Sussex, including a saving of £2 at the Blue Reef Aquarium in Hastings for up to six people, and 20% off at Knockhatch Adventure Park in East Sussex which is on our list of places to visit.

Some of the deals are exclusive to Kids Pass members and some are offers which are generally available but have been handily collected together in one place. As well as days out, you can also find vouchers to save 15% at Rainforest Cafe and 20% at Planet Hollywood which are great deals. I've been having a good browse, and I can see that it's definitely going to be worth checking the site before we plan any trips away.

On the Days Out section on the website, again you can filter by location to find attractions in your local area or areas that you are planning on visiting. In particular the Parks section is very good as many of these are free to visit and you might discover ideas for places to visit that would be difficult to find if you aren't local.

By next year there will be 1000 attractions on board across the country, and the website is continually being updated. It's definitely worth signing up, you are bound to find a voucher for somewhere that you are planning to visit as a family!

This is a sponsored review.

Wednesday, 8 October 2014

Different Rangoli to make with children for Diwali

Rangoli are beautiful, artistic designs that originate in India. They are created on the floor, either indoors or outdoors, and are usually formed with natural materials such as dyed sand, rice or flour. They can be very simple or incredibly complex and usually feature geometric designs and patterns. They are made to welcome the Hindu deities, they act as decoration and are thought to bring good luck. Rangoli are often created for Diwali, the Festival of Lights.

Designing and creating Rangoli is a great activity for children of all ages, because you can tailor them to the age and ability of the child. There are many different ways that you can make Rangoli with children, and this post contains some of the ways that we've created Rangoli together.

If you're a regular reader of my blog, you'll know how much we all love Hama beads in this house. The Hama bead circular pegboards and the huge range of coloured Hama beads available makes them perfect for making Rangoli designs that can be used as coasters, place mats or decorations for a Diwali celebration.

I began with a series of designs for small Hama bead Rangoli. These designs use the small circle template and are very simple, easy for young children to copy or use as a base for their own ideas.

Small Hama bead Rangoli

Then I moved onto creating large Hama bead Rangoli designs. These designs use a lot of beads as the large Hama bead circle template is quite big, but the final designs really are vibrant and eye catching. I love that the pegboard is so versatile, there are so many different ways that you can place the beads on the pegs!

Large Hama bead rangoli for Diwali

Dyed rice is a very popular choice of material when making Rangoli. Rice is very cheap and it's easy to dye using food colouring. For these dyed rice Rangoli I drew the basic design onto painted cardboard and filled the outlines with glue before the children spooned the dyed rice into the different shapes.

Dyed rice rangoli

Salt is another great natural material that is easily dyed with food colouring. Our recent dyed salt Rangoli designs were really easy for the children to make using clear contact paper and they also make lovely window decorations.

Dyed salt rangoli

Different Rangoli to make with children for Diwali

I have rounded up all my other Diwali crafts and activities into one post which you can find here - Simple Diwali crafts for young children.