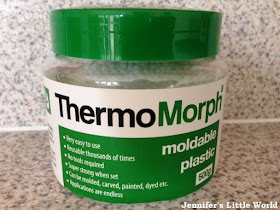
Thermomorph is made from polymorph granules - small pellets of plastic which melt together when added to boiling water to form a mouldable substance. You have a few minutes to mould the plastic before it sets and becomes too stiff to handle. You can make your own shapes, push it into moulds, or shape it by pressing against other textured surfaces. Although I was asked to review it as a crafter, I can see that it would have many other uses around the home, particularly for DIY projects if you are trying to fix or replace small plastic parts.
I had a few ideas for ways that I could use the ThermoMorph in my crafting, and once I got started I kept thinking of more crafts! I'll start with a quick introduction to ThermoMorph.
How to use ThermoMorph
It's really easy to get the ThermoMorph ready to use. I used a little pyrex jug and poured a small amount of boiling water into the bottom. Then I spooned in a few teaspoons of granules at a time. The granules start to melt almost immediately, and you know that they are ready after a minute or two when they have become transparent and clump together. Then you can remove them with a spoon and squash it all together, and although hot the ThermoMorph is ready to handle almost immediately.
It cools very quickly to a temperature that I was happy to even allow the children to touch (obviously I kept them well away from the hot water). You can tear it easily into smaller clumps. You have a couple of minutes to manipulate it before it starts to become cloudy and solidify too much to use. It has set pretty much solid after about ten minutes.
I found that the water only stayed hot enough for me to melt one batch at a time, so ideally you need to work somewhere with access to a kettle and sink so that you can replenish the hot water. If you run out of time and the plastic has become too solid you can re-melt it by popping it back in hot water (but you will lose any shape that you've already moulded).
1 - Moulded shapes with ThermoMorph
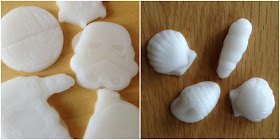
The most obvious place for me to start was making shapes using moulds. I found that the best types of mould were silicon moulds, but I did manage to use plastic chocolate moulds too. For the plastic moulds it's important to wait until the ThermoMorph has cooled quite a bit, press it into the mould and remove it straight away. Hot plastic into a plastic mould does not end well. I made some pretty seashells using a plastic Wilton chocolate mould (which I bought in the US but similar ones are available in this country).
The Star Wars shapes are made using silicon chocolate moulds which I borrowed from a friend. The plastic shapes would make good game pieces or counters, and I can imagine making something like a themed chess or draughts set. They would also be lovely keyrings or magnets, as little gifts or keepsakes. They could easily be painted too.
I'm intending to paint these like the moulded snowflakes which you can see below.
2 - Child's fingerprint keepsake magnets
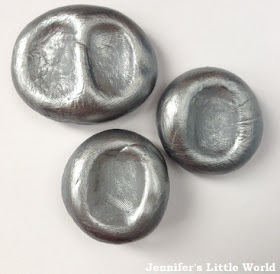
After using the ThermoMorph for a while I was confident enough to let the children get involved. It's only really hot when you first remove it from the water, and it very quickly cools to a temperature that is very safe to touch. I made some round balls and then let the children press their fingers into them to create an imprint.
When the plastic had fully set I used a cotton bud to rub some black stamping ink and then some silver stamping ink over the fingerprint detail. It picked up the fingerprint really clearly.
Then I painted the back and around the edges using silver acrylic paint. It needed a few coats to produce a nice finish and I was really pleased with how well the silver paint worked (I just used Hobbycraft own brand acrylic paint). The stamping ink produced a nice effect on the ThermoMorph too.
Finally I glued a small magnet to the back of each. When making the original mould you could also make a hole in the plastic so that you could use it as a pendant or a keyring (see the ThermoMorph beads below for how to make a hole in the ThermoMorph as it's setting). I also wrote the child's name and the date on the back in permanent marker - as it turned out that both fingerprints were almost the same size!
3 - Stamp bases
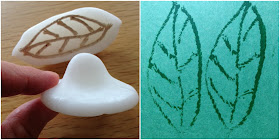
Originally I wanted to try and carve the ThermoMorph itself into a stamp, but I don't have any experience with carving and my lino cutters didn't work, so instead I used the stamp handle that I had made as a holder for a stamp outline. I moulded a lump with a handle in the top, shaped exactly to match my fingers, then pressed it against a flat silicon sheet (I used the base of a square silicon cake tin) while it set to create a nice flat base. Then when it was set I glued string to the stamp to make a leaf shape. It was easily washed off once I'd finished so that I can make new designs.
4 - Thermomorph beads for threading
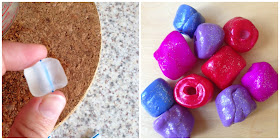
I've tried and failed to make salt dough beads, so I thought I'd have more success with the ThermoMorph. I cut a drinking straw into small segments about 15mm long, then wrapped the melted ThermoMorph around it, making sure to keep the ends of the straw clear. The children helped with these too, rolling and shaping them to create some very unique beads. Originally I was going to keep the straw inside the bead, but when the ThermoMorph was nearly set I found that I was able to easily remove the pieces of straw using a pair of tweezers.
This time I tried painting the ThermoMorph with nail varnish, and it was very successful. The beads still needed two coats, but because the nail varnish dries so quickly it didn't take long to do, and I'm lucky enough to have quite an extensive brightly coloured nail varnish collection. Then I finished them off with a generous coat of silver glitter paint.
Although I made these beads quickly with the children for them to play with, I can see that with a bit more time and thought you could come up with some beads that would be stylish enough to wear as actual grown-up jewellery. You could make some lovely chunky pendants or earrings.
5 - Painted snowflake decorations
The children made these pretty snowflakes using a silicon chocolate snowflake mould. I made the ThermoMorph into small balls and placed them in the centre of the mould, then the children pressed them down to fit the shape. The mould is quite deep, so they didn't fill it to the top, they just covered the very bottom which is enough to imprint the pattern.
The next day we painted the snowflakes. Like the fingerprint keepsakes, we used a couple of coats of silver acrylic paint, then finished off with some silver glitter paint. They will make lovely Christmas decorations or would also work well as embellishments for Christmas cards as they are fairly thin. They could be used as Christmas tree decorations, either by making a hole before the plastic has set or just by gluing ribbon to the back.
And as well as all this crafting, I also used ThermoMoprh to build a replacement part for our broken laundry basket!
I really enjoyed playing with the ThermoMorph. And it's great for experimenting with, because if you make a mistake or you aren't happy with your creation, you can just pop it back into the boiling water and start again! A little goes a really long way, even though some of our creations seem quite large I still have plenty left. A 500g tub currently costs £19.49 on Amazon, not a bad price at all considering how far it will go.
I was sent a tub of ThermoMorph in exchange for this review.





Ooo I am liking this stuff, I've seen it on a couple of blogs now and am loving the suggestions - and fixing the laundry basket too ey? Clever!
ReplyDeleteThe snowflakes would be fab come Christmas to decorate the tree with!
Thank you! I'm saving the snowflakes for Christmas (and I'll probably be making more by then too!). People have come up with some lovely ThermoMorph projects, it really is very versatile.
DeleteWow those look very cool, especially the beads. My girls would love it. x
ReplyDeleteThank you! I think that we're going to be making more beads. I loved how well they picked up the colour in the nail varnish, they are really bright and cheerful.
DeleteI have never heard of that stuff, but it looks fantastic. All kinds of possibilities! :)
ReplyDeleteIt really is great, and I'm sure that I'm going to find more uses for it over time.
DeleteThis looks so much fun. I've never seen anything like this, but how cool
ReplyDeleteThis looks amazing - my husband would love the stormtrooper as he's Star Wars obsessed lol x
ReplyDeleteOh wow this is interesting! I never knew something like this actually exists! Cool! Need to buy it!
ReplyDeleteSecond post I have seen on this, looks like really interesting stuff. Will have to keep in mind for future crafting!
ReplyDelete