Pages

Monday, 31 March 2014

Making chocolate Easter Eggs

I've long been fascinated by the idea of making my own Easter Eggs. When I was little we had some Easter Egg moulds, but I just couldn't imagine how you used them to make the chocolate eggs. So when I was offered an Easter Egg making kit it seemed like the perfect opportunity to give it a go.

The kit that I was sent is the Make Your Own Chocolate Egg kit from Choconchoc which contains everything that you need. I must admit that I was a little daunted by the process, but we gave it a good go!

It was Harry that suggested that we use some white chocolate as well, and as we had some white chocolate buttons in the house we melted some of those down first and put a few splodges into each mould. Then we moved onto the milk chocolate and melted down a good batch to fill the moulds. You need to put the chocolate into the mould and then swirl it around to coat it. Then place into the fridge to set. You need to put in several layers of chocolate, we ended up with three thick layers in the end. You also need to make sure to place the mould face down in the fridge so that the chocolate runs right to the edges of the mould.

Making our own chocolate Easter Eggs

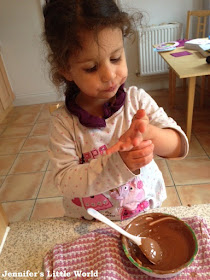
Because you need to wait for each layer to harden before you add the next there is a little bit of hanging around, fortunately you still have a bowl of melted chocolate to keep you busy! The photograph of Mia above was taken at the beginning of the session, by the end there wasn't much Peppa visible on her top!

Making our own chocolate Easter Eggs

The chocolate eggs popped out of the moulds quite easily after they'd been in the fridge for a little while. The edges were a bit rough though as I hadn't smoothed them off properly, so I evened them up a bit with a knife. Then I pressed them against baking paper on a hot baking tray to smooth them off even more, and then pressed the two halves together. It was a lot simpler than I was expecting! We used more melted chocolate to add the face decorations.

Making our own chocolate Easter Eggs

You may notice that one of the Easter Eggs has an improvised mouth. This is because my husband got to the jelly sweets before we did! We also had enough chocolate to make another couple of eggs. It was a lot easier the second time round, perhaps this is a thriftier way to celebrate Easter in the future!

I was sent an Easter Egg kit by Stay In to make my own chocolate Easter Eggs, although with no obligation to blog about it, I just wanted to share the fun that we had!

Sunday, 30 March 2014

Sponsored post - How to ensure babies get a good night's sleep

Any parent will agree that sleeping patterns will be completely disrupted when a newborn baby comes along. While it’s true that babies sleep a lot during the day (averaging around 17hours!), the chances of these hours being in large blocks of time, not to mention during the night, are slim to none. Unfortunately, it’s one of those things that new parents will just have to get used to, and even those that love their sleep will cope. It’s certainly not easy, but soon enough, your baby will settle into a routine that suits both of you, giving the household a pleasant night’s sleep time after time. Until then, there are a few little pieces of advice that may come in handy, to try and ensure the best night’s sleep possible for baby and, indirectly, you.

Make sure they’re comfortable 

Ensure that you have a good selection of sleepsuits and baby grows, so that they will be comfortable no matter what the weather is like outside. It’s a little cooler at the moment, so a sleepsuit may be more advisable, but as the weather heats up and the summer months arrive a babygrow would be much more cooler for them.

Cotton clothing will be the most comfortable option, too, as it’s more breathable and kinder to babies’ skin. Take a look at the George at ASDA’s baby grows and sleepsuits which provide excellent value for money.

Keep an optimum temperature 

You can find room thermometers in the shops that can help you to determine the temperature in your baby’s room, but other than that, you can use your thermostat to ensure that their room isn’t too hot. It’s better for the room to be cooler, rather than too hot, to prevent baby from overheating. After all, if it’s a little cool in their room you can keep them warm with blankets and sleepsuits, whereas, if it’s too hot, there’s little you can do to ensure they remain comfortable.

The optimum temperature for a baby’s room is 18C, but anywhere within a range of 16C and 20C is ideal.

Develop a bedtime routine 

Introducing a bedtime routine is essential so that they can learn to relax and sleep. Something as simple as dinner, bath, and bed is enough in the beginning. Even newborn babies can benefit from consistency.

Swaddle 

It doesn’t work for all babies, but some love the security of swaddling and will settle far easier if they’re swaddled than if they’re not.

White noise 

In the beginning, baby may sleep better if there’s white noise that they can hear. They’re used to being in the womb, where it’s never silent, so a little noise may help. Something as simple as radio static can help them to adjust to life outside mum’s tummy.

Create the perfect environment 

Dark, quiet and no distractions – at night-time, their room is to sleep in, and the calmer and more soothing it is, the better.

Comfort and relaxation are two of the most important aspects that you can master to ensure that your little ones have the best sleep possible. Naturally, a newborn will take time to sleep through the night and that’s something you’ll just have to deal with, but it will get better – we promise!

This is a sponsored post.

Thursday, 27 March 2014

Hama bead and paper plate Easter decorations

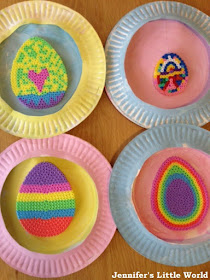
This Easter craft was inspired by the Hama bead aquarium that we made last year, which I was reminded about recently when I wrote about ways to display your finished Hama bead projects. They are simple Easter decorations, combining two of my favourite crafting materials - paper plates and Hama beads.

Easter craft with Hama beads and paper plates

This craft was a fantastic joint effort between the children. Mia helped me to paint the paper plates while Harry was at school, and then Harry made the Hama bead Easter eggs. Some of them he finished a little while back when we bought the pegboard, and he also made a couple of new ones just for this craft.

Paper plate and Hama bead Easter decorations craft for children


The Easter Eggs are made on the Easter Egg Hama bead pegboard. It's a great pegboard, because it is shaped in a way that means you can make eggs of all different sizes. It's also very versatile, with lots of ways that you can place the beads to make different patterns while still keeping the overall shape obvious. I'm planning on making lots in a smaller size that we can use for an Easter Egg hunt around the house and keep from year to year. I've also made some tiny Hama bead Easter Eggs which we used as cake toppers!)

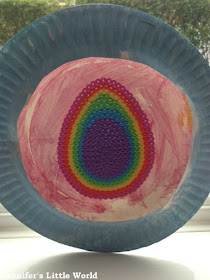
We painted up plenty of paper plates. You need two for each frame, one is used as the background and the rim of a second is used for the front of the frame. With older children you could think more carefully about the background that will be visible in the frame, perhaps a lovely scenic background with hills and sky, or a pattern which matches the Easter Egg which will be displayed. You could also decorate the outside frame with stickers or other collage materials.

When the paint is dry, cut out the centre from half the paper plates to make the outside of the frame. Staple them together with the tip of the rims together, so that a 3D frame is formed. Tie cotton thread securely through the top of the Hama bead egg, then use a needle to push the other end of the thread through to the back of the paper plate frame, underneath the rim so that the egg is hanging down slightly. Leave a long tail on the cotton and use a long strip of sellotape to secure. If you want to hang your decoration, add a loop of yarn or ribbon. Otherwise they can be propped up on a shelf or mantlepiece.

Paper plate and Hama bead Easter decorations craft for children


Hama bead creations are great for hanging because you can so easily tie thread through the holes. Even if the hole is slightly closed after ironing, it's very easy to poke through again with a needle. You do need to make sure that the cotton is tied tightly to the top of the egg and that the cotton is taped firmly to the paper plate, as the finished Hama Easter Egg can be quite heavy.

Paper plate and Hama bead Easter decorations craft for children


Paper plate and Hama bead Easter decorations craft for children

You can find all my Hama bead crafts on my Hama beads page - there's lots to inspire you all year round!

Tuesday, 25 March 2014

Simple first sewing - making lavender bags

Harry loves sewing. He's come a long way from his first toddler sewing attempts. It was at Christmas when he made a felt Christmas decoration at school that I realised how competent he actually was when it came to wielding a needle and thread. Recently he's been obsessed with making lavender bags. I have a big bag of lavender that I collected from lavender bushes in our old house, and even though we moved from there over two years ago I still have plenty left which has kept the lovely scent.

First sewing project for children - felt lavender bags

I give Harry felt to sew with because it's sturdy enough for him to hold and yet still easy to push a needle through. I experimented with a blunt needle, but it didn't go through the felt very well so now I trust him with a normal needle and he's not injured himself yet. He can also be trusted with a pin to hold the two halves of felt together. For the sewing we use a thick cotton thread or a couple of strands of embroidery thread.

I let him choose a shape and a colour, then I cut out the two halves from the felt and he sews them together. Before sewing up the last inch or so he puts in a small amount of stuffing and a generous amount of lavender, then I help him to make sure that it is all sewn up firmly. I think he does pretty well with the sewing, sometimes he gets in a tangle and needs a bit of help, but mostly he manages pretty well, with some rather neat stitches.

I'm well aware that sewing isn't an activity that boys tend to do, but I'm hoping to continue it with him for at least a little longer. We were at his school the other night for parent's evening and there were some lovely examples of embroidery on the walls from the older children which gave me some ideas. I also have very fond memories of practising different stitches on that large scale Aida cross stitch fabric and I still have some of my attempts, so I might pull that out and see if I can get him to copy it!

First sewing project for children - felt lavender bags

Monday, 24 March 2014

The Three Things cross stitch sampler by Moira Blackburn

Moira Blackburn Three Things cross stitch sampler completed

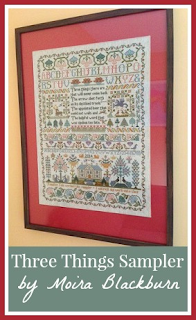
I have a new addition to the wall of the room that I call our 'quiet room' - my Mum has done a fantastic job and framed my completed cross stitch sampler for me! It's the Three Things sampler by Moira Blackburn (affiliate link) and I blogged about it here when I finished it - a massive cross stitch accomplishment - along with a teaser photograph, and now I can reveal the sampler in all its fully framed glory! It's a reproduction of a vintage sampler and it has lots of different designs including a gorgeous border and lovely different plants and animals. I think that my favourite part of the sampler is the house in the middle, one day I'd like to design a sampler featuring my current house!

I really like the inscription too:

Three things there are that will never come back
The arrow shot forth on its destined track 
The appointed hour that could not wait, and 
The helpful word that was spoken too late.

Moira Blackburn Three Things cross stitch sampler completed

It's a bit difficult to take a photograph of it when the glass is so lovely and shiny and has a tendency to reflect back the rather untidy other half of the room, but I think you can see how the red frame really complements the hints of red in the sampler. I'm so proud of it. It's a large piece, the frame measures 73 cm from top to bottom and there is plenty of detail in the cross stitch.

Friday, 21 March 2014

Displaying those finished Hama bead projects

If you're a regular reader then you'll know how much we like our Hama beads in this family. You can find many of our Hama bead projects here! But it can be difficult to know what to do with all the melted plastic creations that are produced, so I thought I'd share a few ways that we've used to display our finished Hama bead crafts, both mine and the children's!

How to display your finished Hama bead projects


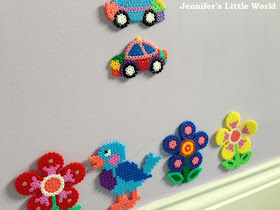
A little while ago I made lots of Hama bead houses. I really like the house pegboard, because it's very versatile and you can vary the design of the house a lot. The finished houses are now lined up along the skirting board in Mia's room to make a little town, enhanced by a rainbow and a car.

How to display your finished Hama bead projects

Harry helped me to arrange them, and decided to continue the theme in his own room with some of his favourite flowers and other creations. I think they look really pretty, bright and colourful, and they can be moved around and rearranged as the mood takes him. I'm thinking about a seasonal display for next Christmas too, so we might make some Christmas trees and other decorations. Perhaps even a Nativity scene. So many possibilities!

How to display your finished Hama bead projects

Another wall decoration is my Hama bead heart hanging display which I made for Valentine's Day, although it's still hanging up on the wall! I think it's really sweet and a bit different. You could display all sorts of shapes, flowers would look pretty or perhaps a row of different vehicles or animals for a child's room. They are a great way of filling a long narrow space in a room.

Hama bead hanging heart decoration

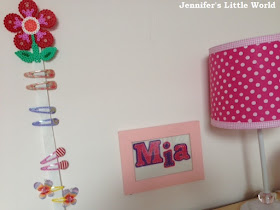
A similar project is my Hama bead hair clip holder. Also using ribbon and with a Hama bead creation sewn to the top and bottom, it's a lovely and pretty way to organise hair clips.

Hama bead hair clip holder

We have a round Hama bead pegboard, which is great for making coasters. Mia has been playing with Hama beads since she was only just 2, and can competently fill a shape with the beads. It's fantastic for her fine motor skills (obviously toddlers this young should be very carefully watched when using Hama beads as they are very small) and has helped her with her colour recognition. She has produced many randomly coloured circles, and although I don't iron them all it's nice to have a few to use as coasters. I also made some Halloween Hama bead coasters to use at that time of the year!

Hama bead Halloween coaster designs

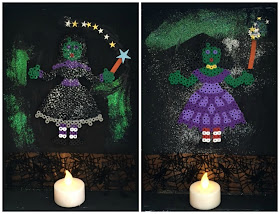
Also for Halloween, a couple of years ago we made some Halloween Hama bead witches. The following year I recycled them into some Halloween frame decorations made with shoebox lids painted black and a battery powered tea light at the bottom to make some Halloween witch displays.

Hama bead Halloween witch display with battery tea light candles

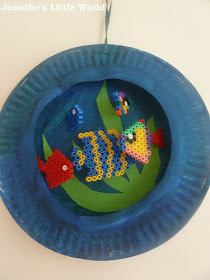
Harry remains very proud of his Hama bead aquarium which we made on Under the Sea Day. It's really simple and I think that it looks good. I'm thinking about extending the idea with a similar sort of frame made from paper plates with other objects hanging inside. The paper plate frame is just the right depth for a hanging Hama bead picture and can be decorated in all sorts of ways, great for some seasonal crafting.

Hama bead aquarium paper plate craft

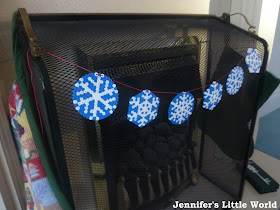
We've also used finished Hama bead shapes to make bunting, like this Hama bead snowflake bunting, another Christmas craft which could be adapted for different celebrations. I like the idea of making bunting using different letters to spell out a name or a greeting like Happy Birthday. 

Hama bead snowflake Christmas bunting

Finally now that I've started having a play with mini Hama beads myself I'm still coming up with ways to display my miniature creations. My favourite so far is these mini Hama bead plant markers, so colourful and pretty!

Mini Hama bead plant markers craft

How do you display all your Hama bead creations? I'd love to hear your ideas!

Tuesday, 18 March 2014

Simple paper plate Spring or Easter basket

The weather has been wonderful for the last few days! At the weekend we took the children down to the beach, and on a whim I gave them each a bucket to take with them. It was a big hit, they loved having a bucket each to collect little treasures in and bring them home. So I decided to have a go at making some Spring baskets that they can take out in the garden or out and about with them to keep the things that they collect. These paper plate baskets would also be great to use on an Easter Egg hunt, or to use to present a small gift.

Simple Easter basket craft with paper plates

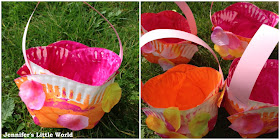
Take your paper plate and make four slits on opposite sides, cutting about an inch into the centre of the plate. Fold lightly to make a square in the centre. Then paint on both sides using bright, Spring colours - we went for orange and pink.

How to make spring themed paper plate baskets for Easter

When it's dry, fold up the sides and staple them together to form a basket. Use a thin strip of pastel card to make a handle, and staple into place. Then if you like you can decorate the basket - we glued on some fabric petals, you could also use scraps of coloured paper, stickers or glitter. As you can see I got a bit carried away, and we ended up with four baskets!

How to make spring themed paper plate baskets for Easter

Then take the basket out into nature and go hunting. Mia absolutely loved picking flowers, she completely cleared our garden of daisies and dandelions, running back every few minutes full of excitement to show me, and to get me to smell them. Even when she'd finished outdoors she still wanted to play with the baskets, hanging them on the back of her pushchair as she pushed her teddies around. Such a simple thing, and yet so much play value!

How to make spring themed paper plate baskets for Easter

How to make spring themed paper plate baskets for Easter

Saturday, 15 March 2014

My embroidery hoop house picture

Embroidery hoop art

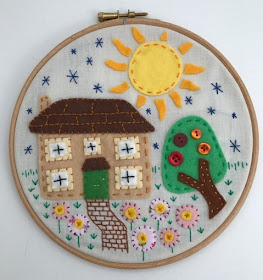
Embroidery hoop art is another craft that I have discovered since I joined Pinterest. I've even created my own board full of inspiration, which you can see at the bottom of this post. I particularly like the embroidery hoop pictures that have plenty of different stitches, and that incorporate a house and flowers, so I created my own version.

Embroidery hoop art house picture

If you are a long time reader of my blog you may recognise the felt house that is in the hoop, it's the one that I made out of felt to use as a logo. It's not an exact representation of our house, but it has some similarities, and it's also similar to the house that I've always doodled. The sun has a meaning too, it reminds me of the one that I painted in Harry's room when we decorated his nursery, now probably painted over by the new owners of the house! I also took some inspiration from some felt and fabric pictures that I sewed for Harry's room while I was pregnant - you can see them here among my five favourite completed crafty projects.


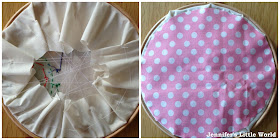
I realised when I'd finished it that I had no idea how to finish off the back, so I thought I'd share a picture. I didn't do the best job and it's something that I need to work on to make it all look a bit tidier. The spotted fabric that I used to back it is a cheap pillowcase from Asda.

Backing to embroidery hoop art

It took me ages to decide where to place the screw. I quite liked having it a little bit off centre, but then I realised that it was the easiest way to hang the hoop, so I ended up with it at the top. I'm not sure where to put it yet, I'd quite like to put it somewhere that it's not easily seen but where I can still go and visit it. Perhaps in our bathroom.

I used a fairly big embroidery hoop for the design, the design area is about 18cm across. I did find myself rather intimidated by the large background area, so for my next embroidery hoop craft project I chose some smaller frames to work with. You can see them here - Embroidery hoop art with button flowers.

Friday, 14 March 2014

Book review - Quiet by Susan Cain

I'm a member of the Britmums Book Club, and the latest book that we've been reading is Quiet: The power of introverts in a world that can't stop talking by Susan Cain (affiliate link)

Book review - Quiet: The power of introverts in a world that can't stop talking

I was very keen to read this book. I've always identified myself as an introvert, with a certain amount of social anxiety and a personality type that is often overshadowed by more extroverted peers. As the blurb to the book reads, I often feel as though 'the loudest have taken over - even if they have nothing to say'. That is one of the central ideas in this book - that our society favours those who are extroverts, with schools and offices designed around the ways of working and workspaces that suit them. This makes them uncomfortable spaces for introverts, meaning that they are not easily able to express their opinions and thus their input is not taken into account, to their detriment.

I don't like to brand myself as a complete introvert, as it is very much a sliding scale. But I feel that I definitely do display more introverted than extroverted tendencies, and you can assess yourself in a short quiz at the start of the book.

You need to concentrate while you're reading this book, and there is so much to take in that I think it will definitely take a second reading to assimilate all the information. You can see from the photo above that I was busy sticking bookmarks into all the chapters that caught my eye! For example, I enjoyed reading about the concept of "restorative niches". This is a term coined by Professor Brian Little, a former Harvard University psychology lecturer and speaker in the field of personality and motivational psychology. A restorative niche is the term for the place that you go when you want to return to your true self. As an introvert I need to make sure that I create these spaces for myself in my daily life, both physically and emotionally, which can be difficult when I spend my days dealing with the needs of two small children and then wanting to spend time with my husband in the evenings. I've realised that I do make a conscious effort to build my alone time into my day, often by going up to bed early in the evening for a bath or to read for a while. It's more difficult with the children around during the day, although I'm lucky enough to enjoy two mornings a week while they are both at nursery and school, and I definitely do feel frazzled by the end of the day if I've not had time to myself to sit and think, or "be alone inside my head for a bit" as I call it.

I was also interested to read a case study of an introvert-extrovert couple, as that is often how I see my relationship. In the case study, the husband wants to host regular dinner parties and social events, whereas his wife hates these occasions and just wants to stay at home and enjoy some quiet time. The book discusses why the two of them feel the way that they do, and how they are able to reach a compromise that suits them both. I know he won't, but I would love my husband to read this book too so that he might understand our differences a little more.

There are also some really useful tips for dealing with introverted children, many of which I've found that I utilise automatically when dealing with Harry in particular, who is quite a sensitive child. It's difficult to tell with Mia as she's that bit younger, but I do often feel that personality-wise Harry takes after me and Mia takes after Ram. I'll be re-reading this section as they grow older.

I'll leave you with my absolutely favourite quote from the book, which is a short paragraph that spoke to me, and also I'm guessing many people that are reading this post, and I think that you'll see why:

"Studies have shown that, indeed, introverts are more likely than extroverts to express intimate facts about themselves online that their family and friends would be surprised to read...The same person who would never raise his hand in a lecture hall of two hundred people might blog to two thousand, or two million, without thinking twice. The same person who finds it difficult to introduce himself to strangers might establish a presence online and then extend these relationships into the real world".

You can read what other members of the book club thought of the book over at the Britmums Quiet Linky.

I received a copy of the book to review as part of the Book Club, Amazon link is affiliate.

Wednesday, 12 March 2014

Going to the library

When I was little, we used to go to the library as a family once a week. We went in the evening after dinner, and we could each take home four books. I'm not exaggerating when I say that it was often the highlight of my week. Even now I can remember the excitement of sitting in the car with my four new books, and I had usually made a start on the first before we even arrived home. I remember as a teenager a teacher telling me that I wasn't reading enough because I hadn't written much in my reading log. The truth was that I was reading so much that I was too embarrassed to write it all down.

I must admit that I'm a bit slack at taking my own children to the library. I have no excuse, it's on the way home from school and we can detour past it every day if we want to. We do have a lot of books in the house, and I'm lucky enough to receive a good number of review picture books in the post too, so I've become a little lazy. But as Harry's reading improves I'm finding that we don't have any books that he can read himself. He's stuck between the pre-school picture books and longer chapter books, both of which I read to him. He reads his school books so quickly, and they don't change them every day, so I thought we'd pop along and see if we could find any books that he might be able to read himself.

I was really pleased to find a whole shelf of books that are at the right level for him. And he was really excited too. We quickly worked out that all the books at his level were marked with a certain type of sticker, so I left him to choose himself some books from the ones in that range. He wanted to start reading them as soon as he got home, and three of his four had been finished by bedtime. I was so pleased to share his enthusiasm.

It's reminded me what a fantastic resource the library is, and that we are very lucky to have one in our village.We visited straight from school, there are two primary schools on the road, and we were the only people in there. It has made me really determined to build a regular visit into our routine, because it would be a real shame if we were to lose it.

Tuesday, 11 March 2014

Spring Crafting with Baker Ross

A couple of weeks ago, I wrote about some of the fantastic goodies that we received from Baker Ross so that we could enjoy some Mother's Day crafting - Crafting for Mother's Day with Baker Ross. This week we've been putting the other bits and pieces that we received to good use and enjoying some Spring crafting, very appropriate as the weather has really brightened up recently with some lovely sunshine.

We started with a simple Daffodil Wreath. You just need to glue the foam pieces together to make a really pretty and cheerful foam daffodil wreath. There weren't any instructions but it was easy enough to work out and with a bit of help from me Harry was able to put it together. I had some tacky glue which helped because you do need to make sure that the centres of the daffodils are stuck firmly together and don't pop open. It looks so good and is such nice quality that I'll be packing it away to display in future years!

Next, we are starting to think about planting some seeds ready for Spring, so these Design Your Own Flowerpots arrived with perfect timing. Each pot comes with two pre-printed and one blank insert that you can colour in and customise as you like, then just slot the pot together with the insert inside. They are very sturdy and could be used year after year, perhaps making a new insert each time. We added some stickers to ours to spell out the children's names so they knew who had planted which seeds. They are for indoor use only so we've planted them up with some basil which we are always using in cooking. With a houseplant in they would also make a lovely gift.

We were also sent a large bag of brightly coloured Coloured Wooden Craft Sticks. I decided to have a go at something which I've seen in various places online, a lollipop stick bird feeder. I took inspiration from the one that I found here - Popsicle Stick Bird Feeder - but it was very easy to make. You need a double layer of sticks for the base, I found that eleven sticks made a base the correct size, and then just build up the walls with a dab of strong glue on the corners. In total we used 50 sticks, so we have plenty left over for more crafting! Then we filled it with bird seed and hung it up from our summer house. It is in a fairly sheltered spot, I'm not sure how well it would hold up if it was in a more exposed position, but it definitely brightens up that corner of the garden.

Baker Ross crafts for Spring

Harry also used some of the sticks along with a pack of fabric petals to create some Spring decorations for the house. We also made some Spring headbands. I made the headbands using a circle of pastel coloured card, and then the children glued the fabric petals around the outside to decorate. Making hats and crowns is always a hit activity in this house for some reason!

Baker Ross crafts for Spring

I received these products as a member of the Baker Ross Bloggers Network.

Saturday, 8 March 2014

Charlie Bucket costume for World Book Day

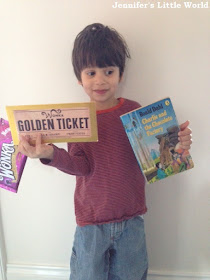
Thursday 6th March 2014 was World Book Day. I've been aware of it for a few years now, mainly from panicked online chatter about costumes. Now that Harry is in school, this was the first year that I needed to help him prepare a costume. I might appear crafty, but I've not had a lot of experience with costume making, so I wanted something easy and definitely from a book that he knew and enjoyed. I recently read Charlie and the Chocolate Factory to him and he absolutely loved it, so Charlie Bucket seemed like an obvious choice.

The most important prop was a Golden Ticket. There are lots of printable Golden Tickets available online, I chose one that was quite simple (sorry it's no longer available). We printed it in colour and then I glued it onto some gold cardboard. The book itself also contains the full text that was printed on the Golden Ticket, so you could type it all up yourself into a document and then print onto yellow or gold paper.

Then we bought Harry a Wonka chocolate bar. They are easily available in the supermarkets and I have to say that they are delicious! I bought my favourite which is the Millionaire's Shortbread bar. I didn't trust Harry to take a bar of chocolate into school and return with it intact for me to eat, so I removed the chocolate for safekeeping and replaced it with some thick cardboard.

How to make a Charlie Bucket costume

Then I just dressed him in some old clothes - a pair of jeans that were a little too short in the legs, and a top which is getting a bit scruffy. He's quite skinny anyway and also generally quite scruffy, so he looks the part!

How to make a Charlie Bucket costume

For a different twist on the theme you could even dress your child up as a golden ticket like Domestic Goddesque! You can also find some more Roald Dahl costume ideas here - World Book Day Roald Dahl easy fancy dress ideas.

Thursday, 6 March 2014

Mini Egg Cookies for Easter

My usual Easter baking is extremely traditional, and generally involves a couple of Cadbury Mini Eggs presented in simple 'nests' made from chocolate covered cornflakes. But this year I thought I'd have a go at something different, and so I tried some Mini Egg cookies. I know that it's not actually Easter for ages yet, but it's good to have a practice in advance. Also I've managed to resist Mini Eggs in the supermarket since just after Christmas, so I've done pretty well to get this far!

Mini Egg cookies simple recipe without egg

I used a very simple cookie recipe which requires few ingredients and was found originally on the Living it Little blog, sadly no longer available. It works very well when any type of confectionery is added - I've also used Smarties, Maltesers, Minstrels and chopped up chocolate. The Mini Eggs do make the cookies rather bulky, and so perhaps cookie style cakes would be a better description, but they are still delicious!

Recipe for Easter Mini Egg cookies


Ingredients:

4oz softened butter
4oz light muscovado sugar
6oz self-raising flour
1 tbsp golden syrup
Two 100g packets of Mini Eggs (give or take the few that don't make it into the bowl)

Method:

Cream together the sugar and the butter, then add the flour and syrup and mix to a dough before adding the Mini Eggs. I make my dough in an electric mixer, and I found that the mixer bashed the Mini Eggs about a bit which worked well in the cookies. Otherwise you could leave them whole, which will increase the depth of the cookie, or perhaps break them up a bit using a rolling pin before putting them in.

Roll the dough into small balls slightly larger than a walnut, flatten very slightly, and place on a greased baking tray. Bake in the oven for about 7 minutes at 180C.  The most important thing to remember with these cookies is that you need to remove them from the oven as soon as they start to brown on top, even though they will still be rather soft and spherical in shape. Leave them on the baking tray to cool and they will flatten out. I find that this recipe makes about 15 good sized cookies, although natural wastage does usually occur during the shaping of the cookies, especially if there are small children about.

Next I'm thinking about attempting a Cadbury's Creme Egg batch of cookies. I wonder if they'd work, or whether they'd turn out too sticky?

Enjoy!

Recipe for Easter Mini Egg cookies

Monday, 3 March 2014

Mini Hama bead decorative plant markers

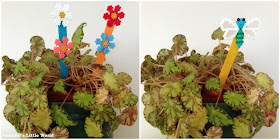
Oh, I am loving mini Hama beads at the moment. I recently posted about a few of the mini Hama things that I've made lately - mini Hama bead projects - and now I'm trying to come up with ways in which I can use and display the little finished pieces that are currently just being stored in a box. I've started by making some mini Hama bead decorative plant markers. They are really easy to do, just glue the completed design on to the end of a plain, coloured or painted lollipop stick to display in your favourite houseplant. I'm not sure how well they would stand up to outdoor use, although I guess as they are plastic and therefore waterproof they would probably easily last a season or two in the garden before being damaged by sunlight or frost!

Mini Hama bead plant markers


I really like the look of the completed designs, it's a bit difficult to show the scale in photographs but I hope that the lollipop stick gives some idea. Each bead is about the size of a standard cross stitch, so they lend themselves really well to cross stitch patterns. The flower and dragonfly designs are not my own, they can be found in the Hama Mini Bead Flowers Pack which I received for my Birthday.

You could also come up with designs to match the plant that is being used to display them. I do like the idea of making little fruits and vegetables to signify what is actually growing in a plot, for example miniature carrots and tomatoes. They would be good for when you first start sowing seeds indoors, and something pretty to look at while you wait for the seedlings to start growing.

Mini Hama bead plant markers

I haven't found many mini Hama bead crafts on the web, so if you have some to share I would love to see them!