Friday, 28 February 2014

Crafting for Mother's Day with Baker Ross

I'm really excited to be a part of the Baker Ross Bloggers Network. Baker Ross sell all sorts of arts and craft materials, both basic craft supplies and more structured pre-packaged kits which help children to make some gorgeous gifts and keepsakes. You can purchase in bulk, if you are looking to buy products suitable for playgroups or community groups for example, or parents can buy smaller quantities for home use. As a parent, I can see so many materials that we would use. In particular, if we are even planning a party based around any theme, there are lots of great products which would really make it unique and provide some wonderful crafting and party bag supplies.

We received a huge box of craft materials to try out. So many that I can't fit them all into one post! So I'm going to start by taking a look at some of the products we received which are particularly themed towards Mother's Day, celebrated in the UK this year on Sunday, March 30th.

As an absolute minimum for Mother's Day I would hope to receive a card, and Baker Ross offer a number of different pre-printed cards for young children to colour. I really like these MUM Pop-Up Cards, because they are a little bit different and have plenty of space for children to colour. We decorated them with some pretty flower stickers and gem stickers. We were also sent some Mother's Day Face Cards which we've not got to yet but also look like being a lot of fun for the children to decorate. They'd be a great craft for a group of children at a playgroup or similar, as young children can work on them without needing too much supervision.

It's also lovely to receive a homemade gift on Mother's Day, and it's nice if it's something that you might actually use! The Heart Charm Bracelet Kits are really pretty, and Harry easily managed to put one together for me which he was really proud of. I left Harry to make his by himself while I occupied Mia, but you could also take the opportunity to help your child think about planning a design in advance, and look at the colours and creating a pattern.

For something a little bit more freestyle, children can decorate some Wooden Heart Magnets. I painted them red first myself using acrylic paints to make sure that they were evenly covered, then gave the children various stickers, pens and buttons to decorate them. They would make a lovely gift for Valentine's Day too, or a Birthday present for a special person. I've also kept some of them aside, as I can see a few more crafting possibilities for me to try myself!

Finally, these Treasure Chest Foam Kits are girly enough that they would also make a pretty and practical gift for Mum, although I'm afraid that I won't get a look in at ours as they are already stuffed full with 'treasure' that the little ones have collected together! They were pretty easy to assemble, and came with plenty of bits and pieces to decorate them with. I've been thinking that they would be fantastic for a pirate themed party - you could make them as a craft activity during the party, and then also use them as party bags for the children to take home, perhaps finding some chocolate coins or other suitable treasure to fill them with.

Treasure chest craft with Baker Ross

We also received lots more arts and crafts goodies which have been keeping us busy over the last few days, so do keep an eye out for my next Baker Ross post which will be all about Spring crafts. It's been nice to have actually seen some sunshine over the last few days!

I received these products as a member of the Baker Ross Bloggers Network.

Thursday, 27 February 2014

Sleepless in Sussex

I remember agonising over my choice of blog name. I came up with some names that I loved, and rejected them because the blogspot URL was already taken. I wanted to steer away from anything that mentioned Mum or Mummy, or that referenced my family size, because I wanted something more permanent. For the same reason I didn't go with my favourite blog name - Sleepless in Sussex.

When I started this blog, toddler Harry screamed for several hours every night and then started his day before 5am. Mia was six weeks old with typical newborn sleeping patterns. For quite a few of those early months, entire nights were spent alternating between the two of them. But I knew, or at least I hoped, that it wouldn't last forever. Because one day I would be sleeping fairly consistently again, and that blog name would become redundant.

Harry did start sleeping through regularly when he was about three. He also began to sleep slightly later in the mornings, at least after 6am. Now aged five he does sleep through, and usually until around 6.30am. He is up in the night probably about once a week for various reasons, but compared to what we've been through with him in the past it's a breeze.

Mia however is still a bad sleeper. She wakes up at some point every single evening screaming, then again soon after we've gone to bed. If we're lucky then that's it, but at least three or four times a week she will wake several more times throughout the night. It's pretty exhausting. I'm sure it's all our fault, we do have the bad habit of settling her with a drink of water, so now she wakes and asks for a drink.

I'm just clinging on to the hope that when she reaches the magical age of three she'll settle down and we'll start to enjoy at least a few uninterrupted nights. To be honest I'm so used to the sleep deprivation now that I find it much easier to cope with than when I just had Harry, it's just a part of life now!

Gro Clock and toddler sleeping accessories

Tuesday, 25 February 2014

Making candles

Another activity that formed part of my Day Zero Project list was to make a candle. When I was little, my Dad used to take us into the school where he taught, and we used to make candles in his science lab. We made them by dipping a long wick into melted wax over and over again. It took ages, and the candles that I produced were generally triangular in shape because all the wax slid down to the bottom, but I was super proud of them, and we loved taking them out into the garden lit once it was dark.

Making my own candles

To make my candles I bought a candlemaking kit from Hobbycraft. There were several different ones to choose from, and I chose the basic candlemaking craft kit. It comes with a big bag of wax chips, some moulds, three different colours and some perfume, as well as the other bits and pieces that you need. The only extra equipment that you need is a saucepan for melting the wax and a spoon to stir, definitely best to buy a very cheap saucepan or sacrifice an old one, as you won't be able to use it for food again! If you don't want to melt the wax directly into the saucepan, you can rinse out an old tin can and rest that inside the saucepan.

It was a bit difficult to estimage how much wax was needed to melt, but at least if you do too much you can always re-use it. It reduces down in size quite a lot from the solid wax chips so you need more than you think. After a couple of attempts I found that the best way to melt was was to put it inside an old tin can which rests inside the saucepan which is filled with water and boiled. It took a lot longer to melt down than I thought it would - about 20-25 minutes for a couple of large handfuls of wax chips. It doesn't need to be stirred constantly all that time, but you do need to be there to supervise it.

A small amount of the colouring goes a very long way, as does the fragrance. I made yellow and red wax, and also attempted some stripy candles which turned out really well.

I'm pretty pleased with my finished candles, they are a little patchy and the instructions do suggest coating them with melted wax to make them a bit more shiny, so I may try that when I've melted up my next batch. They smell lovely too!

Making my own candles

I've only made these four basic candles to begin with, but I'm definitely inspired and as it turned out to be very easy I'm going to be making more. The instructions come with some ideas for extending your candle making, and one idea that I like the sound of is to make a candle in a bold colour, then chop it up and put in the mould before surrounding with melted wax in a different colour for a bit of a contrast.

I would also like to make some more stripy candles, and I'll be melting down all my old candles to make new ones. The moulds included in the set are very good and can be used over and over, and looking online it's very cheap to buy the wick separately. You could also make your own moulds quite easily from old plastic containers. I'm so glad I pushed myself to try something new!

Saturday, 22 February 2014

Babysitting and cross stitching

I babysat for a friend the other night. I quite like babysitting. The boys I sit for never wake up during the evening, so I don't need to worry about being disturbed. Mia wakes up every evening at some point between 9 and 10pm screaming, and even though she usually settles quickly it does mean that we can't really have anyone to babysit for us at the moment, as I'm not sure how she'd react if we weren't there. So it was nice to have a chance to sit quietly of an evening and know that I wasn't going to be disturbed.

I took the opportunity for a chance to work on my latest cross stitch. It's a small kit which I bought a while ago in the sale in Hobbycraft, it's actually a design for a large coaster and it comes complete with the plastic case and cork backing. When I opened it I found that it didn't actually include any embroidery silks which surprised me as kits usually do, perhaps that was why it was so cheap. Fortunately I have a good range of colours which I've picked up at various times so I should have all that I need. It's quite a pretty little picture and I like that it will be functional when it's finished.

Cross stitch birdhouse kit

This is the very last cross stitch kit that I have, so once it's finished I'll have to make the decision whether to buy a new kit or not. The trouble is that I find cross stitch kits so expensive as an initial purchase, even if they do take me years to finish!

Thursday, 20 February 2014

Beach themed day

This week is half-term, and it feels a bit like Harry's first real holiday from school. For his first half-term we spent most of the week away in Berlin, then over Christmas Ram was off work a lot, so I didn't really have to do much extra entertaining than normal. This week though it's mostly just me and the children, and as I really enjoyed the themed days that I planned over the summer I thought it was time for another. I let Harry choose the theme, and he went for Beach Day.

How to hold a beach themed day for children

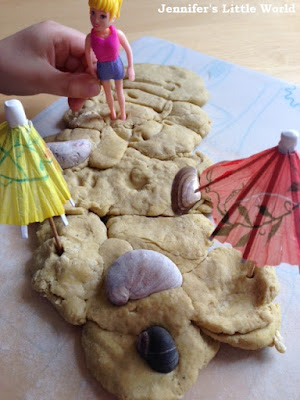
I decorated the living room with my sarong that I always take to the beach and a few beachy inflatables. I wasn't sure that I was up to having sand traipsed throughout the house, so instead I thought I'd have a go at sand playdough. I always use the fabulous Four Minute Playdough Recipe from The Imagination Tree as a base for my play dough as it's so easy to make. This time I played around with it a bit, I substituted some of the salt for actual sand, then added quite a bit more sand and flour as it went very sticky. It didn't work as well as some of my play dough, but it did the job!

How to hold a beach themed day for children


To go along with the play dough I provided some shells, glass pebbles, little dolls wearing suitable beach attire and cocktail umbrellas. Both children loved the beach umbrellas and they each made up a beach scene. Harry then went on to make up some stories with the dollies.

I used these same figures for my Beach Sensory Tub a little while ago, which is another idea that would fit in perfectly with this theme - click the link to find out more!

How to hold a beach themed day for children

I like to include a baking activity as part of our themed day, so next we made some sand biscuits. We make biscuits a lot as I have a very simple recipe for basic shortbread that works very well. You just need 50g caster sugar, 175g plain flour and 125g butter. You can either rub it together by hand or mix it in the mixer, and if necessary add a splash of milk to form a dough. Roll out, cut out your biscuits and bake in the oven at 180C for about 15 minutes, remove when they start to brown. I dyed some sugar yellow to look like sand - all you need to do is add a few drops of yellow food colouring to a bowl of sugar and mix well. I prepared it the night before so that it had time to dry out, but that wasn't really necessary. We iced the biscuits will yellow icing and then sprinkled the coloured sugar on top to look like sand.

How to hold a beach themed day for children


We used some more real sand to make a beach picture with sand. First we painted a sheet of thin card with different shades of blue and white paint to make the sea. Then when it was dry we used PVA glue to stick the sand on to make the beach. I printed out some pictures of children playing on the beach, and the children coloured those in, cut them out, and stuck them on their pictures.

How to hold a beach themed day for children


I couldn't have a themed day without featuring some themed Hama beads. There are lots of patterns available online, and if you have transparent pegboards, you can often print out the patterns and then place them underneath which makes it really easy for young children to create the designs. Otherwise these designs are very simple, so quite easy for children to copy.

How to hold a beach themed day for children


I always turn to the brilliant Twinkl resources when I'm looking for themed activities, and I wasn't disappointed. I printed out a few worksheets for Harry which are all suitable for children in reception - a seaside scene labelling worksheet (free download), a seaside word search (Twinkl subscriber resource), seaside spot the difference (Twinkl subscriber resource) and sea themed addition and subtraction colouring puzzle (Twinkl subscriber resource). He loves doing little puzzles like these, and it's a good (and fun) way to keep his learning going while he's off school, I was really impressed with how his maths skills are coming along.

I also found some blank postcard templates (free download) to make some postcards which were brilliant. I printed one out for each child, and they decorated one half with some pictures cut from magazines and 'wrote' on the other side. Then I stuck the pieces back to back and laminated them. It was a good exercise for Harry in creative writing, I encouraged him to choose some pictures that he could pretend represented something he was doing on holiday, and he came up with a little postcard to send to Daddy. Mia loved copying him, she's very good at pretend writing. Harry's writing says "Dear Daddy. Fed a goat and I went on a bike love from Harry" based on the pictures that he chose for the front of his postcard!

How to hold a beach themed day for children


Finally I found some instructions for simple paper boats which you can find here - origami paper boats printable. I made them a couple and we floated them in the bath. I'm going to try and memorise the instructions because it's a handy thing to be able to produce for some quick entertainment!

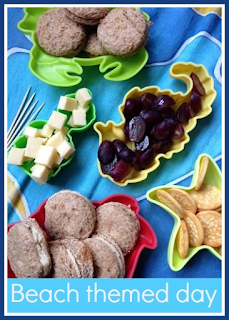
We also had a beach lunch sitting on the sarong in the living room and pretending to be at the beach. I put out the food in (well washed) sand moulds for a bit of a change.

How to hold a beach themed day for children


I do like our theme days. It's a really good idea to have a long list of activities to at least try and fill the day, I had forgotten how long those afternoons can be when you are at home with small children.

If you feel inspired, here you can find the posts about our other themed days:

Space Day
Antarctic Day
Under the Sea Day
Dinosaur Day
Transport Day
Australia Day
Roman Day
Disney Frozen Day

And some tips on how to hold a themed day at home for children.

Tuesday, 18 February 2014

Some more mini Hama bead projects

I've really been enjoying my mini Hama beads lately. I blogged before about my mini Hama bead Christmas decorations, and for Christmas I was lucky enough to receive a big pack of the tiny beads and an inspiration book. The inspiration book is very helpful, because I've found that unlike the midi beads there aren't a lot of ideas out there online for the mini beads. They are obviously not so popular, or perhaps not so widely known about.

Mini Hama bead projects

The mini Hama beads are about a third of the size of the standard midi beads. They really are tiny, the only real way to place them onto the pegboard is by using tweezers, and they can be a bit fiddly and susceptible to jolting out of position. It's definitely a craft for older children and adults - the suggested age range is 10+.

A pack of mixed beads contains a very good selection of colours. You do have to be a bit careful, because many of the colours have very similar shades, so it's best to work in daylight if you can, or at least check over your design in daylight before you iron it! When ironing, you need to be very careful that the iron is not too hot and that you don't press for too long, as the little beads melt very quickly.

Related post - Ironing tips for Hama beads

I really like how the mini beads look when they are ironed. They remind me of cross stitch, because the beads are about the same size as a single stitch. This means that you could easily use a cross stitch pattern for mini Hama beads. You can make designs that are a lot more complex than with the standard beads because they are so small, so you can create designs with more shading and with plenty of extra detail.

Here are some of my favourite projects using mini Hama beads:

Mini Hama bead Russian Doll tiled picture

Mini Hama bead decorative plant markers

Mini Hama bead Easter Egg cake toppers

Mini Hama bead heart pin badges

Mini Hama bead Russian Dolls tiled picture

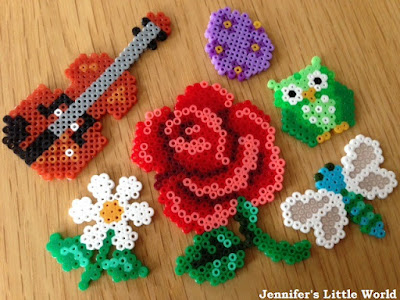
Please note that the mini Hama bead projects in the main picture aren't my own designs. The flowers and dragonfly come from a Mini Hama bead flowers kit, the violin and Easter egg are from the inspiration book ('Inspiration 13') and the owl design can be found here

Sunday, 16 February 2014

Review - PaediaSure Shake

PaediaSure Shake is a supplement drink, aimed at children who are fussy eaters. Specially designed for children, it contains a balance of 26 vitamins and minerals, with protein, vitamin D and calcium as well as iron, all things that children need in their diet in order to grow and develop.

If your child is a fussy eater it can be a worry that they are missing out on some of these essential nutrients. PaediaSure Shake is intended to form a regular part of a child's daily diet during their fussy eating phase while you work to establish healthy eating habits. It is aimed at children from aged 1 - 10 years.

I was sent a tub of the PaediaSure powder to try. The powder is mixed with water at room temperature to make a milkshake style drink. We tried the vanilla flavour - strawberry and chocolate are also available. You use five scoops of powder to make up a serving. The number of recommended servings per day varies by age, a five year old like my son should have no more than three servings.

PaediaSure shake for children

I would call Harry a fussy eater. He never showed much interest in food, right from the very first days of weaning. I feel that he eats very little, and he rarely complains that he is hungry. If I give him something that he doesn't like to eat, he just won't eat it. Although he does eat from all the food groups, he eats a limited range of food, and he's not adventurous at all. This is a problem when we eat out or if other people are preparing food for him, because he will not try anything that is unfamiliar. I accept that a lot of this is my fault, I have become lazy when it comes to making him food. I cook him things that I know he will eat, because he sometimes looks so very skinny and I want to be sure that he has enough to eat.

I do worry that Harry is missing out on some of these essential nutrients that he needs. But unfortunately, because he is so fussy about trying anything new, the shake was not a success for us. Harry was very good, and did try it, but he just had a sip and refused to drink any more. I passed it on to Mia (2) who was the same, one sip and then refused any more. I tried some myself and I can see that I would expect it to appeal to a child, as it has a pleasant, milky taste, and is very sweet. But because Harry is only used to drinking water and milk, it was just too much of an unfamiliar taste and texture for him.

One concern I do have is that if you gave a child too many shakes then it might fill them up so much that they don't want to eat any other food, particularly if they are on the small side with a small appetite. I think I would just stick to the one drink per day, and serve it away from mealtimes so that they are still hungry enough to eat proper food.

If you are worried about your fussy eating child then it wouldn't hurt to give these shakes a go, especially if you think that they would enjoy the flavour, as it would certainly give you peace of mind that all their nutritional needs are being taken care of. A 400g tub of Paediasure currently sells for £9.99 in Boots.

I am a member of the Netmums Blogging Network, a unique community of parent bloggers from around the UK who have been handpicked by the Netmums team to review products and brands on their behalf. I have been paid expenses and supplied with a product sample for this review but retain all editorial control. All my Netmums Reviews will display the Netmums logo within the post.

This is a Netmum's sponsored review.

Saturday, 15 February 2014

Watching Mia's role play

I love watching young children, particularly toddlers, as they role play. I'm particularly interested watching Mia play, as I naturally compare her to Harry, and the differences have really surprised me.

Mia has grown up surrounded by toy cars and trains. She has always played with them a lot, but lately I've noticed how motherly she has become in her role play. Harry has a great attachment to Giraffe, that he takes to bed each night, but Mia seems to attach herself so much more to dolls and soft toys. She has her Teddy, and her Seahorse musical toy that she takes about with her. Since we brought home Percy Bear from nursery last week she has attached herself to a new Percy Bear, offered as a replacement as she was so upset when he had to go back. She also has a little doll which she plays with more and more.

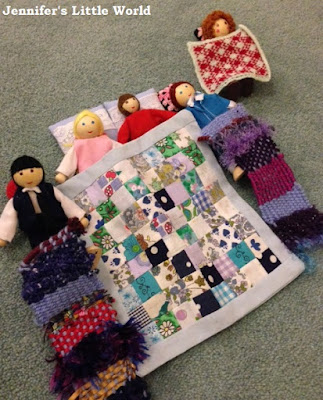
She packs them all up in her dolly pushchair and pushes them about, copying the places that we visit with her in the pushchair - nursery, school, the playground. She hangs a little handbag from the handles, where she keeps the bottle of milk which she stops to give to them at periodic intervals. She also loves giving them medicine from a spoon, and her absolute favourite activity is tucking them all up in bed. I find my cushions and little blankets scattered about all over the house, with teddies underneath them. One day I went to tidy the living room after dinner and found all her little dolls house dolls neatly tucked up on the floor, I couldn't bear to disturb them.

Dolls house dolls set out for sleeping by toddler

At the moment she is also completely obsessed with birthdays. Probably because Harry celebrated his birthday over three weekends - with presents and a cake each time - she is constantly presenting me with a 'birthday cake' (usually a toy plastic plate with a felt strawberry on it, or something equally random) and singing me Happy Birthday, before instructing me to blow out the candles.

I'm sure that Harry wasn't so motherly in his role play, and I don't think that it's anything to do with me, because I don't feel that I treat Mia any differently. Harry had plenty of soft toys that he could have mothered in the same way, and he much preferred pushing his cars and trains about. But I do love watching her play!

Friday, 14 February 2014

Valentine's Day cross stitch heart

Happy Valentine's Day!

I mentioned in my last cross stitch post that I bought a few little kits in the sales after Christmas at Hobbycraft. They were supposed to be Christmas kits, but I managed to find some that were fairly general, one of which was this little cross stitch heart which I finished just in time for Valentine's Day.


It was quite refreshing to stitch something which I completed almost in one session. It wasn't as easy as I expected though being so small - there's some tricky back stitching in there!

I bought two other small kits, one is a gingerbread man and one is a cat. I suppose when I bought them I had in mind that the heart could represent me and Ram, the gingerbread man Harry (because he was learning The Gingerbread Man story at school at the time) and the cat Mia (because she likes pretending to be a cat). It would be nice if I could come up with some way of incorporating them all into a finished piece, either to be framed and hung up or maybe as a cushion or something. I'm not very good at deciding what to do with finished cross stitch pieces, I do like to have them on display but I also like quite a simplistic look to my decorating without too much clutter about.

It's something for me to think about, I'd love to hear suggestions if you have any!

Wednesday, 12 February 2014

A massive cross stitch accomplishment

This week I was so proud of myself - I actually finished my cross stitch sampler! This has been an extremely long term project. I estimate that I've been working on it for about seven years, although of course not continuously! It's always been there in the drawer in the coffee table for me to work on a little bit at a time. It's the Three Things sampler by Moira Blackburn (affiliate link) and it's definitely been a labour of love.

I left my name and the date until last, and finally I stitched those last little crosses.

Three Things cross stitch sampler by Moira Blackburn

This is a bit of a teaser photograph, because it is still folded up in the bag at the moment, I'll post a proper photograph of it when it is properly framed. It's the Three Things Sampler by Moira Blackburn, a design influenced by historical samplers and part of a lovely range of samplers. I remember the kit seemed quite expensive when it was purchased, but if you think about the amount of time it has kept me occupied for it represents excellent value!

Update - you can see a photograph of the finished framed sampler here.

Now I can't decide whether to start another long term project, or whether to concentrate on a few different crafts for now. I have a few tiny cross stitch kits which I bought in the sale after Christmas, so I'll still have some cross stitch to work on if I want to. I really like some of the cross stitch designs which are based upon ancient maps, and I'm also toying with the idea of creating my own design. My Mum gave me a book of cross stitch designs which can be used to stitch a family tree, and I like the idea of coming up with something like that, perhaps including a cross stitch depiction of our house. I'm busy collecting ideas over on my Cross Stitch Pinterest board!

Monday, 10 February 2014

The Adventures of Percy the Nursery Bear

I'm afraid that my heart did sink a little when I collected Mia from nursery last week and I discovered the existence of Percy Bear, who came to stay with us for a week along with his book of Adventures. I have heard about these bears from other Mums, along with the warning that they are a bit of an exercise in competitive parenting. This was borne out by the two books that accompanied him, packed with photographs and detailed descriptions of all the fun that he has had while staying with Mia's classmates.

Mia was delighted though, so I went along with it. Luckily we had an outing planned for the weekend anyway - a trip to the cinema - so Percy joined us and came along for pizza and ice cream afterwards. We don't normally let the children take their teddies out with us as I'm terrified of them getting lost, so Mia was very excited to be able to bring Percy along with us. I loved watching her chat away to him and tell him what we were doing.

The adventures of Percy the nursery bear

I took plenty of pictures and managed to get some printed out for his diary. I didn't go into quite as much detail as some of the other parents had managed, but I think we did okay. We even baked biscuits especially so that Percy had something to write about.

The adventures of Percy the nursery bear

Sunday, 9 February 2014

Hama bead heart frames

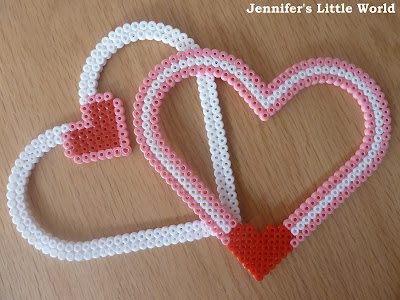
Hama beads are such fun to do, but it can be difficult to find ways to use or display the things that you make. These Hama bead heart frames are great for Valentine's Day because you can personalise them with a photograph of yourself or a loved one, or even just with a picture of something else that you love, perhaps a pet or even a place.

Hama bead heart frames for Valentine's Day


If you attach some magnetic strip to the back they can be stuck on the fridge, or you could make a hanging loop with ribbon. You could even embellish them for extra interest, maybe by adding buttons or sequins.

Hama bead heart frames for Valentine's Day


These Hama bead frames are all made using the large Hama bead heart pegboard, but you could also use the smaller heart pegboard to make smaller frames, or just use the centre portion of the large heart pegboard. I used red, white and pink for a Valentine's Day feel, but they would also look good in a mixture of colours or in a selection of colours that matches the decor of the recipient.

Hama bead heart frames for Valentine's Day


Hama bead heart frames for Valentine's Day

I ironed the beads firmly on one side to make sure that they were nice and sturdy, especially important when the width of the frame is only two beads. Then I ironed the front side slightly less, so that you can still see the definition of the beads and the shapes of the hearts.

This is a great Valentine's Day craft for young children because you can leave them to create their own designs. You don't need to stick to a rigid plan, just let younger pre-schoolers place the beads wherever they like, or just create a simple pattern of stripes or alternating beads. They are perfect to pop in an envelope along with your Valentine's Day card as a little extra gift.

I've used Hama beads to make lots of other Valentine's Day themed crafts, and you can find them all here - Hama bead crafts for Valentine's Day.

They include:

Hama bead heart hanging decoration
Hama bead heart spinning decoration
Hama bead heart photo frames
Mini Hama bead heart pins
Mini Hama bead hearts

Valentine's Day themed crafts using Hama beads

Saturday, 8 February 2014

Review - Tinkerbell and the Pirate Fairy 3D

At the weekend we were invited to attend a preview screening of Tinker Bell and the Pirate Fairy. Tinker Bell and the Pirate Fairy is the latest in a series of Tinker Bell films. I've not watched any of them all the way through, but I know that Harry has enjoyed watching them, and I've picked up bits and pieces here and there from when they've been on. The latest installment tells the story of Zarina the inquisitive dust-keeper fairy, who leaves Pixie Hollow in disgrace after her experiments with pixie dust go wrong. She returns a year later to steal the important blue pixie dust, having teamed up in the meantime with the pirates of Skull Rock, who want to make their own fairy dust so that they can plunder the world's treasures in a flying pirate ship.

It's a light-hearted and fun story, with plenty of entertaining adventures. The story takes place before the action depicted in Peter Pan, and this film contains a few hints towards the familiar Peter Pan story, featuring the voice of Tom Hiddleston as the young Captain Hook.

Not only was this Mia's first trip to the cinema, it was her first 3D film. At 2 1/2 she is probably still a bit too young for the cinema, although we managed to keep her fairly still in her seat with a packet of chocolate buttons! Animated films always seem to work well in 3D and this was no exception, the 3D effects definitely add to the experience.

If you are looking for a film to watch with the children over half-term then I'd definitely recommend Tinker Bell and the Pirate Fairy, and it's not just one for little girls either, as Harry (5) really enjoyed it too!

Tinkerbell and the Pirate Fairy review

We received complimentary tickets to the preview screening.

Friday, 7 February 2014

Review - Playmobil sets from Cuthberts Toys

Cuthberts Toys is an independent toy store which first opened in St Albans in 2009, and has since opened two more stores in Letchworth and Hatfield. The retail experience is designed with the child in mind, selling a fantastic range of toys from across the top brands as well as offering online shopping. Cuthberts Toys are well known for their friendliness and excellent customer service, and they very kindly sent my children a fantastic Playmobil set each.

Playmobil 4008 Super Set Fairy Fountain

Playmobil 4008 Super Set Fairy Fountain

This set comes from a range which is new to me, the Playmobil Fairies range. There are quite a few pieces in this range and the Fairy Fountain is one of the larger sets. It's a little fairy garden, with two figures and a fountain that actually squirts water. It's a very sweet little set, and Mia really loves it. There's something about adding water to play sets which makes them a great deal more exciting, and the pump in this set works really well and is easy enough for Mia to operate herself.

Playmobil 4008 Super Set Fairy Fountain

There are some very tiny pieces in this set so I've done what I usually do and kept them to one side until Mia is a bit older, as there is plenty of play value in the set to keep her entertained for the time being. Mia's favourite game to play with the set is to put everything in the water and then take it out and dry it, it can keep her busy for ages. Harry was also desperate to play with the set. He had more of a scientific interest in how the pump worked, but even though everything about the set says 'girly' he still really enjoys playing with it! It doesn't hold a huge amount of water, so even if there is a spillage it won't make too much mess.

Playmobil 4008 Super Set Fairy Fountain


Playmobil 4014 Super Set Knights

Playmobil 4014 Super Set Knights

The Super Set Knights set is part of the Playmobil Knights range. Harry is lucky enough to own the Lion's Knight Empire Castle, and this little fort is the perfect addition to his set up because it features some of the rival knights, something that he spotted straight away. The fort has a secret hiding place with a huge stash of gold treasure, and two cannons to protect it which have some impressive firing power! It's a nice compact set too, and actually packs away in the original box which is great because I haven't yet found a practical way to store all our Playmobil. Although this set is a part of the Knights range, it would also make a really good standalone set, because with three figures and plenty of weapons included there is plenty of scope for different games. It also fits in well with the sets from some of the other ranges, for example Harry loves pitting his knights and pirates against each other.

Playmobil 4014 Super Set Knights

Cuthberts Toys sent us these Playmobil sets, but with no obligation to write about them, I just want to share how wonderful they are!

Wednesday, 5 February 2014

Simple felt Valentine's Day gift bags

I enjoy sewing, and so it's only natural that I'd like to encourage the hobby in my children too! There are lots of first simple sewing projects that you can try with children, and so I thought we'd make some little felt gift bags for holding Valentine's Day treats which can be reused from year to year.

Felt is a brilliant fabric to start sewing with children as it doesn't need hemming and you can use a larger, blunter needle which is easier for young children to work with. It's also thick and sturdy for them to hold comfortably.

Valentine's Day felt gift bag craft for children

Another advantage of using felt for crafting is that you can easily add embellishments and other decorations to it using fabric glue.

Valentine's Day felt gift bag craft for children

Instructions:


An A4 sized sheet of felt will make two gift bags. First fold your felt sheet in half lengthwise to create two long rectangles. Fold the rectangle in half from the bottom, and sew down each side to make the bag. We just used a simple running stitch in a contrasting colour, as I quite like the look of having the stitches visible. An older child might like to use a back stitch, and then turn the bag inside out so that the stitches are hidden and it all looks a bit neater.

Harry used a thick cotton thread to do the sewing and reasonably sharp needle, under supervision of course. I think that he did pretty well considering that he's only just 5! For a younger child you could make the holes for them in advance and let them use a larger, blunt needle to sew up the sides. Or you could sew up the bag yourself and provide them with materials to decorate.

We decorated the bag using coloured buttons and heart shaped pieces of felt. You could also add a name or initials to make it more personal for the recipient. We just glued the decorations on using fabric glue, but you could of course sew the decorations on to make the bag a little more hard wearing.

Valentine's Day felt gift bag craft for children


Fill the bag with small Valentine's sweets, and then use some pretty ribbon to tie the top closed. Something like this would also make a sweet little wedding or party favour.

If you like this idea you might also be interested in some other ways to present gifts on Valentine's Day

Monday, 3 February 2014

Watching my son learning to read

This is a bit of a follow up to a post that I wrote last September about reading to children, and in particular older children. I have been so fascinated watching Harry as he learns to read that I wanted to document it somehow.

When Harry started school last September, he couldn't recognise all his letters or sounds, and he had no concept at all of putting them together to make words. His first breakthrough came when he started putting the sounds together to make those first simple words, then he jumped forward again when he realised that letters don't always sound the same, and that the sound changes according to their position in the word and the influence of other letters. Now he has reached the stage where he can recognise words without needing to sound them out individually, and he is starting to read more fluently and with expression.

I have an interest in language and linguistics, so I naturally want to encourage his reading, and I do spend time working on it with him. I don't push it, but fortunately he is eager to learn. I love watching him sounding out words that he sees when we are out and about, and he is so pleased with himself.

I have also now started reading proper chapter books to him at bedtime, and his attention span and interest have really surprised me. We've nearly finished the Magic Faraway Tree series of books, which he has really enjoyed. Another book that caught his imagination was Charlie and the Chocolate Factory. I try to talk to him a lot about how wonderful reading is, how you can lose yourself in a book and take part in adventures with the characters, how you can learn all about different places in the world and different times in history.

I know that boys don't tend to read as much as girls but I'm trying my best to instill that love of reading in him. I don't read nearly as much as I used to, or as much as I would like to, as I find it a challenge to make the time at the moment. Hopefully that will change as the children get older, because I know that seeing me enjoy reading is the way to inspire them to do the same.

Ladybird vintage book Teaching Reading