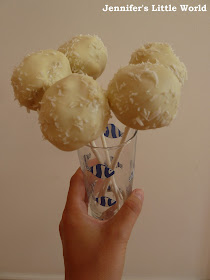
I added "Make cake pops" to my Day Zero Project list along with lots of other new baking ideas that I wanted to try, and when we held our Antarctic themed day the other week I had the perfect opportunity to try out some snowball cake pops. They weren't the most successful baked items I have ever made, but it was a good start!
I kept it very simple for my first attempt. I found a great video which explained how to make cake pops very well, so I will share it with you below in case you want to have a go.
I used my usual Victoria Sandwich recipe, passed down from my Mum hence the imperial measurements - 6oz margarine, 6oz sugar, 3 eggs and 6oz self-raising flour - and made the two sandwich cakes. Then I put them into my Kenwood mixer and bashed them up until they were in crumbs. Then I made up the same amount of butter icing that I would usually make to fill and cover the sponge cake - 75g butter and 175g icing sugar - and mixed it all up together.
I used the resulting mixture to make lots of balls. This is where I went slightly wrong, and I made the cake balls far too big. My sticks (available from Hobbycraft or most large supermarkets) were very long and so I felt as though the balls needed to be large to balance them, but because they were so heavy they slipped off. I put all the cake balls into the fridge to cool for a little while before dipping them in chocolate.
I melted the white chocolate in a mug so that it would be nice and deep for dipping. Then I dipped the cake pops in the chocolate and put them in the fridge to set. Another mistake of mine was that I hadn't set up a proper area for them once dipped. Lots of instructions suggest a piece of polystyrene covered in cling film, and having this ready would have been a very good idea.
I found the whole process a bit fiddly, and so I only actually made a few proper cake pops, the rest were just left as cake balls on a plate with the melted chocolate spooned over! Then I sprinkled some desiccated coconut over them to make them look snowy.
Here are my finished efforts:
Not bad, but could do better. It's not something that I'm going to rush to make again - to be completely honest I prefer the taste of a cake made the normal way - but I'm glad that I tried!


I've been intrigued by Cake Pops for ages, I always wondered how they made the balls - now I know! I've promised my daughter we'll give these a go, so a huge thank you for your tips and sharing what you'd do differently :)
ReplyDeleteYou're welcome, good luck! Just don't make them too big!
DeleteA cheat is to get a cake pop mould - I was bought one and it's great, you just bake your normal sponge recipe and pour the mixture into the silcone and the ball come out just the right size. I made some for a baby shower recently.
ReplyDeleteI've seen these in the shops and wondered if they were any good, perhaps they are the way to go, it was certainly very fiddly trying to shape the balls
DeleteOoo yummo! I'm loving how you have wowed everyone with a couple of corking cake-related posts this week already! :)
ReplyDeleteThank you, you are most kind, I'm afraid that my baking is rather toddler inspired!
Delete