Wednesday 30 January 2013

Adventures in soap making, Hobbycraft style

Making soap was another activity that I added to my Day Zero Project list. When a new Hobbycraft opened around the corner I used a 25% off voucher to stock up on things that I needed to complete some of the tasks, and this soap making kit was one of the things that I bought. There were several different kits to choose from, and I went for the House of Crafts Handmade Soap Kit (affiliate link) which cost me just under £10 with the discount.

Making simple homemade soap

I didn't realise when I was putting together my list that making real soap is a rather complicated process and involves dangerous chemicals, but this kit uses the melt and pour method which is very easy and doesn't require much equipment. This is what is inside the box:

Making simple homemade soap

The mould is only large enough to make three soaps at a time, so you can't make the entire kit at once unless you find something else to use for moulds. This means that you need to cut the soap compound up in order to melt it, making it a bit difficult to guess the quantities. However if you do end up melting too much you can always let it set and then re-use it.

I melted the soap compound in the microwave in short bursts, which probably took about a minute in total. Then you just stir in some fragrance and petals, pour into the moulds and leave it to set, which takes about two hours. These are the first soaps that I made:

Making simple homemade soap

This kit made me 9 bars of soap, and I have plenty of petals and fragrance left over. You can buy the Melt and Pour Soap Base (affiliate link) separately, so now I've worked my way through this batch (or distributed them as gifts amongst friends and family...) I might have a go at making some more.

While I was building up the courage to have a go at using the set (I don't know why, when it was so easy!) I asked for advice on-line and Maggy at Red Ted Art directed me to her post on Dinosaur Egg Soap. By pure co-incidence a couple of days later I was shopping in Asda and spotted a small plastic egg full of tiny dinosaur erasers, and I knew that they would be perfect for some dinosaur soap. 

So I decided that I would freestyle it a bit and have a go at my own dinosaur soap. I used some green and brown twiggy bits from the kit for leaves, and as I was impatient and having only three moulds was limiting my creativity, I also used some silicon cupcake cases (not pictured) which turned out well too. Harry helped me with some of these and loved it, he's a reluctant bather but after his bath that night I think he was the cleanest he's ever been!

Making simple homemade soap

I've never been sure about buying these type of craft kits, perhaps thinking that they are cheating a little bit, but I had a lot of fun making these soaps. On the same shopping trip I also purchased a candle making kit which was also really good and something I've used several times since.

Saturday 26 January 2013

Australia Day

Happy Australia Day!

I love Australia. Australia has fascinated me since I studied it years ago at primary school, and a few years ago I was lucky enough to tour the country on a fabulous holiday. Australia Day is celebrated on January 26th, and so I put together some activities for us to do to teach Harry a little bit about the country. As an introduction I first sat him through our holiday photos. They showed him the huge variety in terrain and climate across the country which is part of its appeal to me. We also talked in simple terms about how when it is winter here it is summer in Australia, and vice versa.

Crafts and activities for Australia day


Australia on the map

Australia is a really easy country to find on the map. Inspired by an Australian cookie map that I saw online (sorry, the original link is no longer available) we made our own Australia shaped biscuit. I used my trusty shortbread recipe (175g plain flour, 50g sugar, 125g butter) because I know that it keeps its shape well when cooked. I printed out a good sized outline map and placed it under greaseproof paper. Then I rolled the dough out to cover the outline and cut around it with a sharp knife. When it was cooked we decorated with icing and sprinkes. I didn't bother too much about the details, but when Harry is a bit older and we do it again I'll try and encourage him to copy some of the natural features of the landscape using the decorations, following a map from the atlas like in the link above.

Crafts and activities for Australia day

Aboriginal art

I remembered when we studied Australia at school that we painted a wall of the classroom using sticks as paintbrushes. I tried this with Harry but it was a bit too difficult for him, so instead we used cotton buds to make the dots that are a feature of Aborginal art. We looked at some pictures found using Google images, and then Harry chose his favourites as inspiration.

Crafts and activities for Australia day

The Australian Flag

Australian flag
Image source FreeAussieStock.com

When I'm looking for flags to print I always turn to the Activity Village Flag Printables. The Australian flag is an easy one to colour. The Union Flag in the top corner symbolises Australia's history as six British colonies, and historically a demonstration of loyalty to the British Empire. The largest star has seven points - a point for each of the six federating British Colonies (New South Wales, Queensland, South Australia, Tasmania, Victoria, Western Australia) and one for the Territory of Papua and any future territories. The remaining five stars form the constellation the Southern Cross, one of the most distinctive constellations seen from the Southern Hemisphere.

Australian animals

We talked about all the different animals that you can see in Australia, some that he was familiar with (kangaroo, crocodile, snake, koala) and some not (echidna, goanna, platypus, cassowary). I found some Australian animal colouring pages to do, again on Activity Village.

Australian music

While we did the colouring we listened to some Australian songs - Kookaburra sits in the Old Gum Tree and Waltzing Matilda. There's plenty out there on YouTube, and some of them explain the unfamiliar language as you go along. 

I really enjoyed doing these projects, and Harry learned a lot too. We'll definitely be doing more next year, and I'm going to start thinking about some ideas for other countries! 

I also wrote a post here about teaching young children about geography which you might enjoy. 


If you feel inspired, here you can find the posts about our other themed days:

Space Day
Antarctic Day
Under the Sea Day
Dinosaur Day
Transport Day
Roman Day
Disney Frozen Day Beach Day

And some tips on how to hold a themed day at home for children.

Thursday 24 January 2013

The big girl bed

We decorated Mia's bedroom over Christmas, and so it seemed natural to move her from her cot to a proper bed. We ordered the same one that we bought for Harry - a single bed which lifts up to provide storage underneath. It's a full size single but it's aimed at children so it's not too high. We also spent a fortune on bedding. I feel a bit bad because Harry has cheap Tesco sheets, but we have splashed out a bit more for Mia and gone mad on some gorgeous elephant bedding from John Lewis - even throwing in a matching cushion impulse buy which is very unlike us! Hopefully it will last her though - I know that I used my first child bedding right up until I left home!

We do have one problem though. We perhaps didn't realise at the time how easy Harry's transition to a bed was. Well, he wasn't a great sleeper anyway, and he certainly didn't sleep any worse in the bed. When he woke up he would just lie there screaming, and it took him months to get out of bed by himself. Mia worked it out immediately, and putting her in bed and closing the door is followed immediately by pattering footsteps across the room and whimpering at the door.

We haven't worked out a strategy yet. We are just going back in and returning her to bed and after a few tries she is staying there and going to sleep. I'm a bit worried as to where we are heading though - I have visions of evenings ahead where we spend the entire evening returning her to bed before collapsing exhausted into bed ourselves. Then even worse, repeating this throughout the night.

I'd love to hear any tips that you might have about persuading young toddlers to stay in bed once you put them there!

First bedding for little girl

Tuesday 22 January 2013

Pudding?

I remember when I was growing up my hardworking Mum, in addition to making us all dinner every night, also made us a pudding. Sometimes it was quite simple (Instant Whip - a treat sadly no longer with us), sometimes it was a bit more complicated (yummy treacle tart) but it was always delicious (my favourite was chocolate sponge pudding with chocolate sauce).

I don't make separate puddings (or perhaps I should call it dessert ). Ram and I tend to sneak some kind of chocolately treat once the children are in bed, although the children are allowed ice-cream if they have finished all their dinner (this is not a regular occurance!).

Now that Harry has started at a new pre-school, the word "pudding" has entered his vocabulary. Some of the children make a dessert for all the children to have after their tea, and they must refer to this as their pudding. Harry hasn't picked up on any sweet and/or unhealthy connotations of the word yet - he uses it to talk about anything that comes after the first thing that he has eaten, whether that is a piece of cheese, fruit or ice-cream.

It got me thinking though. Do you make a separate dessert for the evening meal, or are you like me and find it enough of a challenge to put one course on the table at a time?

Sunday 20 January 2013

Harry's Birthday party and my rainbow cake

This weekend, my little boy turned four. Four! I can't believe it. The first couple of years went so sloooowly, and the next couple have gone so fast! I spent a long time preparing for Harry's family party. I decided that I really wanted to make a rainbow cake, and so I chose the theme of a rainbow party all based around this. I made a rainbow pinata, purchased rainbow paper tableware, organised a rainbow themed craft and stocked up on colourful party food and nibbles.

Then the snow came. As we had family that were planning on travelling some distance, unfortunately we had to make the decision to cancel the party rather than risk them driving in the snow and ice. I won't deny that I was disappointed of course, but fortunately Harry was excited enough about the snow that it was enough of a distraction. Luckily we still managed to get some of the family together to make it a party for him.

It certainly wasn't enough to stop me from making the centerpiece - my rainbow cake. I'd seen these on Pinterest, but most of the recipes were from the US and I wasn't sure that I was confident enough to adapt one. Then I discovered this fantastic UK rainbow cake recipe, and it worked brilliantly. It did take me an entire evening, and I was extremely grateful for my electric mixer, but I was delighted with the result, and everyone seemed impressed!

My first rainbow cake

My first rainbow cake

My first rainbow cake

My first rainbow cake

The pinata worked really well too, especially as Harry pulled the winning string! We also had lots of fun playing outside in the snow - we can always have a party but we can't guarantee him snow on his birthday again!

Friday 18 January 2013

Review - Baker Days Valentine's Day letter box cake

When I was asked if I would like to review a cake, how could I say no? Baker Days sell a wide variety of cakes, big and small, which can be personalised with text and photos. The letter box cake is designed so that it will fit easily through a standard letterbox, something that really appealed to me as I often find myself waiting in for deliveries or trekking out to the sorting office to collect parcels.

I was asked to choose a cake from their selection of Valentine Cakes. My husband and I are not particularly slushy romantics, so I chose a design that I thought was quite simple and modern. I opted not to go for a design that had a photograph of me on it, although I can see that might work well for other types of cake like a birthday cake.

The box did fit through the letterbox, although I happened to be on the other side of the door as it arrived so I gave the postman a helping hand! The cake is well protected inside a lovely little presentation tin, and a small packet of love hearts was a nice touch.

Review - Baker Days Valentine's Day letter box cake

The standard cake is sponge, and you can pay a little extra for different flavours of cake. We thought that the cake tasted lovely, and it was beautifully soft. The cake isn't enormous though - we could have easily polished it off between the two of us.

Review - Baker Days Valentine's Day letter box cake


I think that a letter box cake is a brilliant gift to send to someone and let them know that you are thinking of them on a special occasion. These cakes are so well packaged that I think it would be almost impossible for them to arrive damaged. You don't need to worry about inconveniencing the recipient, and so it could be a lovely surprise.

This cake costs £14.99 including delivery. This isn't cheap, although of course it is a lot easier than trying to organise posting your own or purchased cake.

We received the cake to review.

Wednesday 16 January 2013

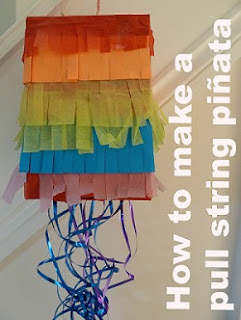
How to make a rainbow pull string pinata


How to make a simple rainbow pull string pinata

Firstly I have to admit that I have never actually seen a piñata in action. But we are having a little birthday party for Harry this weekend, and I wanted to do something a bit different so I thought I'd have a go at making our own piñata. I wasn't sure about having a piñata to be bashed about with sticks (what a waste of my hard work!) so I thought that I would have a go at a pull string version, with the added bonus that I am hoping it can be re-used year after year! Harry's party is going to have a rainbow theme (all based around a certain pinnable masterpiece of the cake variety, which I am hoping to pull off) so I went with rainbow colours.

I was at a bit of a loss with how to begin, as all the piñata tutorials that I found were very fancy and involved papier mache and balloons. However this pull-string pinata tutorial gave me the confidence to have a go at a simple version using a box.

How to make a simple rainbow pull string pinata

I used one of the many rectangular cardboard boxes that we have hanging around after Christmas. Harry helped me to paint it red all over, then I made fringed strips from tissue and coloured paper (whatever we had about) in rainbow colours to glue along the sides. I added a loop of string to the top so that it could be hung up.

The bottom of the piñata is one large flap, which we also painted red. I found it best to make the flap open over the entire bottom of the box, so that nothing gets caught inside.

To make the pull strings I used some of that metallic ribbon that I keep for decorating wrapped presents and never use. I made 15 strings. The winning string is knotted firmly in place, with extra tape for good measure. The other strings are just threaded through using a large needle and pull out easily. To uncurl the ribbons, the piñata spent the night on the dining table with the ribbons stretched out and flattened under large books.

How to make a simple rainbow pull string pinata

I filled it with various sweets and treats. This is a delicate process, as of course the weight of the sweets inside forces the flap open, so you need to secure it in place. After a few experiments, I found that four strips of tissue paper, each about 1cm wide, glued into place around the edges of the flap worked well. Then hang it up (or pass to a tall, responsible adult) and let children take it in turns to pull a string and see who is showered with goodies!

Sunday 13 January 2013

Les Miserables and me

My first introduction to the musical Les Miserables came at the age of 12. I was in the school choir, and for a performance at the local theatre we sang a selection of songs from the musical. I wasn't sure about it at first, but after a school trip to see the stage show in London I was completely hooked. I saved up my pocket money to buy the three cassette box set of the Complete Symphonic Recording, which I have listened to countless times. I've seen the show on stage several times, and I was lucky enough to see the 25th Anniversary Concert at the O2 in 2010.

I've been waiting for the film version of the musical for about 20 years, so I was really excited to be able to watch it on the day of release. I was very apprehensive as to how it would turn out - but I'm pleased to say that I loved it!

I am very familiar with the lyrics and the songs, so I did notice where the film differed from the stage show. There were songs moved about, lines swapped, and new lyrics added. It didn't detract from the story, but I didn't always agree with the decisions made.

The casting was good, I thought that all the actors could sing in tune, although I would have liked to see a bit more passion from Russel Crowe. The orchestra was sometimes a bit drowned out by the singing and the background noises - I did feel that the drama of the opening notes was lost somewhat in the sounds of the wind and sea.

The best solo has to be Anne Hathaway as Fantine singing I Dreamed a Dream. It appeared to be shot in one take, and the emotion in the song was depicted perfectly. Close second would be Samantha Barks singing On My Own.

One thing that I really liked about the film was how elements from the book had been included to flesh out the story a bit and give a bit more background. In particular, scenes were added to show what happens to Valjean and Cosette after they leave the Thernardiers, which I thought worked really well. There was also a shot of Gavroche in tears following Eponine's death - in the book they are brother and sister. In many ways, watching the film brought the book to life for me as well as the musical.

I'd really recommend watching Les Miserables, especially if you are a fan of the musical or the book, you won't be disappointed!

Les Miserables vintage programme and ticket

Thursday 10 January 2013

I love going to soft play!

That's right, in contrast to lots of parents, I love taking the children to soft play. This is why:

  • The children love it.

  • Because they love it, it can be used for bribery purposes ("Harry, if you stay in bed tomorrow until the sun comes up on your Groclock, then we will go to soft play").

  • The children burn off so much energy that an afternoon nap for Mia is a given and there's a good chance that Harry will be happy to sit quietly on the sofa in front of the television for a bit too.

  • It's indoors so not weather dependent.

  • If you arrive as soon as it opens then you have a good hour and a half before it gets too busy, and that's usually plenty of time for us anyway.

  • I can drive right up to it and park easily outside.

  • At our local one, if you buy a monthly pass and use it then the cost isn't too bad.

  • It's good exercise for the adults too (I actually quite enjoy climbing about myself!).

We go soon after breakfast and take snacks for the journey home, so we don't stay long enough to need any food (which admittedly doesn't look particularly appealing), and our local one always seems clean enough to me, perhaps because we tend to visit in the morning.

Saturday 5 January 2013

Day Zero Project - Bake gingerbread men from scratch

I've been meaning to make gingerbread men from scratch for a long time, which is why I added it to my Day Zero Project list. I blogged about making gingerbread men from ready made dough, and also about icing ready made gingerbread men. I did make a gingerbread house from scratch so perhaps that counts, but I really wanted to just make a batch of gingerbread men. I used a recipe which my Mum gave me. It's a good recipe because it is very simple, but the gingerbread men do also spread quite a lot when you cook them (somewhat resembling gingerbread clouds) so it wouldn't be a good recipe for anything that needs to hold its shape, like a gingerbread house.

Simple Gingerbread Men Recipe:

8oz plain flour
4oz sugar
4oz margarine
3 tablespoons of golden syrup
1 tablespoon of ground ginger
1 teaspoon of bicarbonate of soda

Mix the ingredients together, then cut into shapes and place on greaseproof paper on a baking tray. Make sure to leave some space between the biscuits. Bake at about 180C for about 7 minutes. Remove from the oven and leave to cool.

We iced them with some royal icing and some sweets found inside the Christmas selection boxes. It made about 16 gingerbread men.

Making gingerbread men with children

I find it quite difficult at the moment to come up with activities that I can do with both children. Mia still has such a short attention span, and will generally destroy anything that I'm trying to do with Harry. I gave her a bit of dough and a small board and rolling pin, and she just ate the dough really before getting bored and wandering off. Harry on the other hand worked really nicely and cut out all the shapes.

When they had cooled we decorated them. Mia was more interested in eating the biscuits, I iced the details and Harry placed the buttons. I'm very proud of them!

Making gingerbread men with children

Thursday 3 January 2013

The Wizarding World of Harry Potter, Islands of Adventure, Orlando

Universal Studios Resort in Orlando is a large resort, which includes two theme parks - Universal Studios Florida and Islands of Adventure - as well as hotels and various other entertainment venues. We visited them both some years ago, but since our visit the new Wizarding World of Harry Potter has opened. I really wanted to go, so we set aside a day of our Florida holiday before Christmas to visit. Because Harry Potter was the main draw for us, we opted to just spend a day at the Islands of Adventure theme park and to miss out the other areas on this occasion.

Even though it has been open for a couple of years, the Wizarding World of Harry Potter is very popular. We visted on a quiet weekday in early December, so the crowds weren't too bad. The main attraction is Harry Potter and the Forbidden Journey. It's a new ride, set inside Hogwarts Castle, and it combines actual ride movement through moving scenery with simulator type experiences in front of large screens. I've not experienced anything like it before, the advanced technology used really is amazing.

Standing outside Hogwarts Castle

A large part of Harry Potter and the Forbidden Journey is the queuing area. If you arrive early to beat the queue to the ride then you can miss a lot of what is going on, so it's worth either visiting again later or taking your time as you walk through the castle. You see prop replicas and scenery, combined with very clever video footage of the characters from the films performing little scenes, and even paintings on the wall holding conversations. I believe that if you don't want to go on the main ride, or if you have children that are too small, you can just do a separate walkthrough of the castle.

The two other rides in the Wizarding World of Harry Potter are both old rides that have been re-themed. There is a small rollercoaster - The Flight of the Hippogriff - and a larger ride with two intertwined rollercoasters - Dragon Challenge.

The other attraction is the town of Hogsmeade - a large reconstruction of Hogsmeade with lots of little shops, including Honeydukes sweet shop, Ollivanders wand shop and Zonko's joke and toy shop, between them selling a vast range of merchandise. You can also buy real Butterbeer which we enjoyed very much, although it was very sweet! It wasn't cheap, and I bought mine in a souvenir mug which made it a bit more expensive, but I don't think there is anywhere outside of Hogsmeade that you can drink Butterbeer!

Drinking Butterbeer in Hogsmeade

If you enjoy the Harry Potter books and films then I'd really recommend a visit if you can. There is a huge amount of attention to detail, and because JK Rowling was fully involved in all aspects of the creation of the Wizarding World of Harry Potter it really is a faithful representation and exactly how you would imagine it to be.


Hogwarts Express at Islands of Adventure, Orlando, Florida

We spent quite some time in the rest of the Islands of Adventure park too. There are some big rides there, like the Incredible Hulk Coaster which seems to go on and on and up and down and around for ages. We also love The Amazing Adventures of Spiderman. It was very new on our first visit some years ago and it hasn't dated at all. It has been updated since we last rode it, and the technology really is amazing as you go on a 3D animated journey with Spiderman.

Islands of Adventure isn't really aimed at young children, and we didn't see nearly as many pushchairs as we did at the other Orlando theme parks. However there are lots of attractions there that young children would enjoy, and in particular the Seuss Landing area has several rides which very young children can go on. On this visit we avoided all the water rides in the park, because we knew from previous experience that they do leave you absolutely drenched!

You can't take bags or any loose articles on to most of the big rides at Islands of Adventure. Free lockers operated using fingerprints are provided, and the length of the free period is determined by how long the queue for the ride is. The locker areas can get very congested and it does take time to leave and retrieve things. If you want to spend the day riding all the big rollercoasters it's worth trying to avoid taking any kind of bag with you, and instead wearing clothes with secure zipped pockets for phones and wallets etc.

When it comes to buying tickets you can save a small amount booking tickets in advance on-line. However because we just wanted a day ticket, and because of the unpredictability of small children, we bought our tickets there on the day. The ticket window opens before the park gates do, so you don't need to waste any time queuing.

Tuesday 1 January 2013

2013 - A shiny New Year

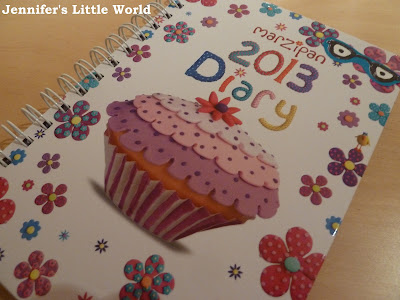
I'm always excited by a New Year. After the excess of Christmas, both in terms of food and new possessions, the New Year means a new diary, a blank page and a fresh start.

I'm in a very different place than I expected to be this time last year - a stay at home Mum. Although my redundancy took place a couple of months ago, the children stayed in part-time childcare until we went on holiday, and then with the holiday and Christmas it hasn't really had time to sink in. Harry starts at a new, local pre-school in January for three afternoons a week, then he will start school in September. We are keeping Mia out of childcare for the time being. She is on the waiting list to start at Harry's nursery when she is 2 in May but, assuming that I am not working, I will probably keep her at home with me for a little longer.

I am really looking forward to the opportunity to spend some extra time with Mia, especially now that she is past the baby stage. It will also be good for her to have me to herself for a bit, as I feel that she is often pushed aside by Harry's insistence to be heard, leading to her becoming stroppy and frustrated. I'm also determined to make the most of Harry's last few months before he starts school, it's a precious time which I don't want to waste.

We've been doing some decorating over the last few days, and emptying out rooms is always a good opportunity to take stock of your possessions. I'm pretty good about taking things off to the charity shop, but there is plenty in the house that doesn't need to be here and could benefit others. I also need to reorganise a bit and make sure that the children have the age appropriate toys in their rooms - there are lots of Harry's old toys that Mia would love to play with now but that have been buried amongst all the other things.

I'm also intending to concentrate on myself a bit over the next year. I started the Day Zero Project and I have a list of things that I want to do over the next couple of years. I've been making preparations - just before Christmas a new Hobbycraft opened literally around the corner, and armed with a 25% voucher I spent most of my Christmas money in advance on things that I needed. I've already completed 8% of the list, and it would be great if I could complete 50% by the end of the year.

I'd like to wish all my readers a Happy New Year, I appreciate each and every one of you and may 2013 be a fantastic year for you, full of everything that makes you happy.

2013 diary